behringer XENYX Q1202USB/Q1002USB/Q802USB/Q502USB Manual

The XENYX Series represents a milestone in the development of mixing console technology. With the new XENYX microphone preamps including phantom power as an option, balanced line inputs and a powerful effects section, the mixing consoles in the XENYX Series are optimally equipped for live and studio applications. Owing to state-of-the-art circuitry, your XENYX console produces a warm analog sound that is unrivalled. With the addition of the latest digital technology, these best-in-class consoles combine the advantages of both analog and digital technology.
Important Safety Instructions
RISK OF ELECTRIC SHOCK! DO NOT OPEN!
Terminals marked with this symbol carry electrical current of sufficient magnitude to constitute risk of electric shock. Use only high-quality professional speaker cables with ¼» TS or twist-locking plugs pre-installed. All other installation or modification should be performed only by qualified personnel.
This symbol, wherever it appears, alerts you to the presence of uninsulated dangerous voltage inside the enclosure — voltage that may be sufficient to constitute a risk of shock.
This symbol, wherever it appears, alerts you to important operating and maintenance instructions in the accompanying literature. Please read the manual.
To reduce the risk of electric shock, do not remove the top cover (or the rear section). No user serviceable parts inside. Refer servicing to qualified personnel.
To reduce the risk of fire or electric shock, do not expose this appliance to rain and moisture. The apparatus shall not be exposed to dripping or splashing liquids and no objects filled with liquids, such as vases, shall be placed on the apparatus.
These service instructions are for use by qualified service personnel only. To reduce the risk of electric shock do not perform any servicing other than that contained in the operation instructions. Repairs have to be performed by qualified service personnel.
- Read these instructions.
- Keep these instructions.
- Heed all warnings.
- Follow all instructions.
- Do not use this apparatus near water.
- Clean only with dry cloth.
- Do not block any ventilation openings. Install in accordance with the manufacturer’s instructions.
- Do not install near any heat sources such as radiators, heat registers, stoves, or other apparatus (including amplifiers) that produce heat.
- Do not defeat the safety purpose of the polarized or grounding-type plug. A polarized plug has two blades with one wider than the other. A grounding-type plug has two blades and a third grounding prong. The wide blade or the third prong are provided for your safety. If the provided plug does not fit into your outlet, consult an electrician for replacement of the obsolete outlet.
- Protect the power cord from being walked on or pinched particularly at plugs, convenience receptacles, and the point where they exit from the apparatus.
- Use only attachments/accessories specified by the manufacturer.
 Use only with the cart, stand, tripod, bracket, or table specified by the manufacturer, or sold with the apparatus. When a cart is used, use caution when moving the cart/apparatus combination to avoid injury from tip-over.
- Unplug this apparatus during lightning storms or when unused for long periods of time.
- Refer all servicing to qualified service personnel. Servicing is required when the apparatus has been damaged in any way, such as power supply cord or plug is damaged, liquid has been spilled or objects have fallen into the apparatus, the apparatus has been exposed to rain or moisture, does not operate normally, or has been dropped.
- The apparatus shall be connected to a MAINS socket outlet with a protective earthing connection.
- Where the MAINS plug or an appliance coupler is used as the disconnect device, the disconnect device shall remain readily operable.

Introduction
XENYX Mic Preamps The microphone channels feature high-end XENYX Mic Preamps that compare well with costly outboard preamps in terms of sound quality and dynamics and boast the following features:
- 130 dB dynamic range for an incredible amount of headroom
- A bandwidth ranging from below 10 Hz to over 200 kHz for crystal-clear reproduction of even the finest nuances
- The extremely low-noise and distortion-free circuitry guarantees absolutely natural and transparent signal reproduction
- They are perfectly matched to every conceivable microphone with up to 60 dB gain and +48 volt phantom power supply
- They enable you to use the greatly extended dynamic range of your 24-bit/192-kHz HD recorder to the fullest, thereby maintaining optimal audio quality
«British EQ»
The equalizers used for the XENYX Series are based on the legendary circuitry of top-notch consoles made in Britain, which are renowned throughout the world for their incredibly warm and musical sound character. Even with extreme gain settings these equalizers ensure outstanding audio properties.
We should like to draw your attention to the fact that extreme volumes may damage your hearing and/or your headphones or loudspeakers. Turn the MAIN MIX control and PHONES control in the main section fully counter-clockwise before you switch on the unit. Always be careful to set appropriate volume levels.
Important notes concerning installation
- The sound quality may diminish within the range of powerful broadcasting stations and high-frequency sources. Increase the distance between the transmitter and the device and use shielded cables for all connections.
General mixing console functions
A mixing console fulfils three main functions:
- Signal processing: Preamplification, level adjustment, mixing of effects, frequency equalization.
- Signal distribution: Summing of signals to the aux sends for effects processing and monitor mix, distribution to one or several recording tracks, power amp(s), control room and 2-track outputs.
- Mix: Setting the volume level, frequency distribution and positioning of the individual signals in the stereo field, level control of the total mix to match the recording devices/crossover/power amplifier(s). All other mixer functions can be included in this main function.
The interface of BEHRINGER mixing consoles is optimized for these tasks enabling you to easily keep track of the signal path.
Before you get started
Shipment
Your mixing console was carefully packed in the factory to guarantee safe transport. Nevertheless, we recommend that you carefully examine the packaging and its contents for any signs of physical damage, which may have occurred during transit.
- If the unit is damaged, please do NOT return it to us, but notify your dealer and the shipping company immediately, otherwise claims for damage or replacement may not be granted.
Initial operation
Be sure that there is enough space around the unit for cooling purposes and to avoid over-heating please do not place your mixing console on high-temperature devices such as radiators or power amps. The console is connected to the mains via the supplied cable. The console meets the required safety standards. Blown fuses must only be replaced by fuses of the same type and rating.
- Never connect the XENYX to the power supply unit when the latter is connected to the mains! First connect the power supply unit to the console, then connect the power supply unit to the mains.
- Please note that all units must be properly grounded. For your own safety, you should never remove any ground connectors from electrical devices or power cables, or render them inoperative.
- Please ensure that only qualified people install and operate the mixing console. During installation and operation, the user must have sufficient electrical contact to earth, otherwise electrostatic discharges might affect the operation of the unit.
Online registration
Please register your new BEHRINGER equipment right after your purchase by visiting http://behringer.com and read the terms and conditions of our warranty carefully.
Should your BEHRINGER product malfunction, it is our intention to have it repaired as quickly as possible. To arrange for warranty service, please contact the BEHRINGER retailer from whom the equipment was purchased. Should your BEHRINGER dealer not be located in your vicinity, you may directly contact one of our subsidiaries. Corresponding contact information is included in the original equipment packaging (Global Contact Information/European Contact Information). Should your country not be listed, please contact the distributor nearest you. A list of distributors can be found in the support area of our website (http://behringer.com).
Registering your purchase and equipment with us helps us process your repair claims more quickly and efficiently.
Thank you for your cooperation!
Control Elements and Connectors
This chapter describes the various control elements of your mixing console. All controls, switches and connectors will be discussed in detail.
Mono channels
Microphone and line inputs

Fig. 2.1: Connectors and controls of mic/line inputs
MIC
Each mono input channel offers a balanced microphone input via the XLR connector and also features switchable +48/+15 V phantom power supply for condenser microphones. The XENYX preamps provide undistorted and noise-free gain as is typically known only from costly outboard preamps.
- Please mute your playback system before you activate the phantom power supply to prevent switch-on thumps being directed to your loudspeakers. Please also note the instructions in chapter «Phantom power and LED displays».
LINE IN
Each mono input also features a balanced line input on a ¼» connector. Unbalanced devices (mono jacks) can also be connected to these inputs.
- Please remember that you can only use either the microphone or the line input of a channel at any one time. You can never use both simultaneously!
GAIN
Use the GAIN control to adjust the input gain. This control should always be turned fully counterclockwise whenever you connect or disconnect a signal source to one of the inputs.
COMP
Use the COMP knob to adjust the amount of compression effect on the channel. Compression limits the dynamic range of the audio source, which can help vocals cut through a mix better, for example. Turn the COMP knob clockwise until the adjacent LED occasionally lights during speech/singing.
Equalizer
All mono input channels include a 3-band equalizer, except for the Q502USB, which is equipped with a 2-band EQ. All bands provide boost or cut of up to 15 dB. In the central position, the equalizer is inactive.
The circuitry of the British EQs is based on the technology used in the best-known top-of-the-line consoles and providing a warm sound without any unwanted side effects. The result are extremely musical equalizers which, unlike simple equalizers, cause no side effects such as phase shifting or bandwidth limitation, even with extreme gain settings of ±15 dB.
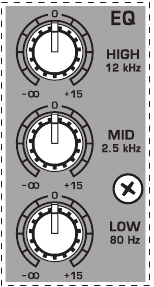
Fig. 2.2: The equalizer of the mono input channels
EQ
The upper (HI) and the lower band (LO) are shelving filters that increase or decrease all frequencies above or below their cut-offfrequency. The cut-offfrequencies of the upper and lower band are 12 kHz and 80 Hz respectively. The mid band (Q802/1002/1202USB) is configured as a peak filter with a center frequency of 2.5 kHz.
LOW CUT
In addition, the mono channels (Q1002USB and Q1202USB) are equipped with a steep LOW CUT filter at 80 Hz designed to eliminate unwanted low-frequency signal components.
FX sends, panorama and level adjustment
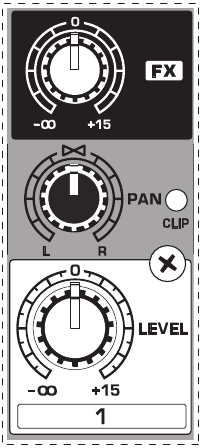
Fig. 2.3: The FX send/panorama/level controls
FX (Q802/1002/1202USB only)
FX sends (or AUX sends) enable you to feed signals via a variable control from one or more channels and sum these signals to a bus. The bus appears at the console’s FX send output and can be fed from there to an external effects device. The return from the effects unit is then brought back into the console on the aux return connectors (Q802USB) or normal channel inputs. Each FX send is mono and features up to +15 dB gain.
As the name suggests, the FX sends of the XENYX mixing consoles are intended to drive effects devices (reverb, delay, etc) and are therefore configured post-fader. This means that the mix between dry signal and effect remains at the level determined by the channel’s aux send, irrespective of the channel fader setting. If this were not the case, the effects signal of the channel would remain audible even when the level knob is lowered to -∞.
PAN
The PAN control determines the position of the channel signal within the stereo image. This control features a constant-power characteristic, which means the signal is always maintained at a constant level, irrespective of position in the stereo panorama.
LEVEL
The LEVEL control determines the level of the channel signal in the main mix.
CLIP
The CLIP LED’s of the mono channels illuminate when the input signal is driven too high, which could cause distortion. If this happens, use the GAIN control to reduce the preamp level until the LED does not light anymore.
Stereo channels
Stereo line inputs
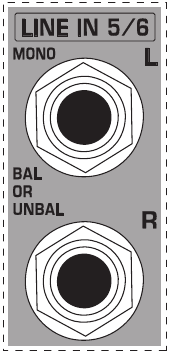
Fig. 2.4: Stereo line inputs
LINE IN
Each stereo channel has two balanced line level inputs on ¼» jacks for left and right channels. If only the jack marked «L» (left) is used, the channel operates in mono. The stereo channels are designed to handle typical line level signals.
Both inputs will also accept unbalanced jacks.
Equalizer stereo channels (Q802USB)
The XENYX 802 features a stereo 3-band EQ in each stereo channel. The filter characteristics and cut-offfrequencies are the same as those in the mono channels.
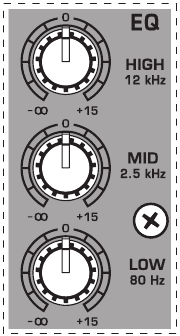
Fig. 2.5: The equalizer of the stereo input channels
A stereo EQ is highly preferable to two mono equalizers. when working on a stereo signal, as two separate EQ’s will usually produce an unwanted discrepancy between the left and right channels.
FX sends, balance and level adjustment
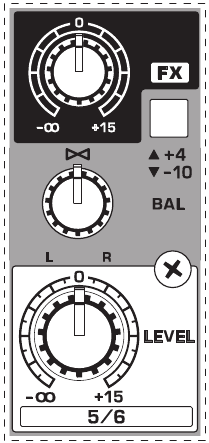
Fig. 2.6: The FX send/balance/level controls
FX
The FX sends of the stereo channels function similar to those of the mono channels. However, since the FX send buses are both mono, a mono sum is first taken from the stereo input before it is sent to the FX bus. The Q502USB is not equipped with FX sends.
BAL
The BAL(ANCE) control determines the levels of left and right input signals relative to each other before both signals are then routed to the main stereo mix bus. If a channel is operated in mono via the left line input, this control has the same function as the PAN control used in the mono channels.
LEVEL
The LEVEL control determines the volume of the channel being sent to the main mix.
+4/-10
The stereo inputs of the XENYX Q1002USB and Q1202USB have an input sensitivity switch which selects between +4 dBu and -10 dBV. At -10 dBV (home-recording level), the input is more sensitive (requires less level to drive it) than at +4 dBu (studio level).
Connector panel and main section
Send/return effects path
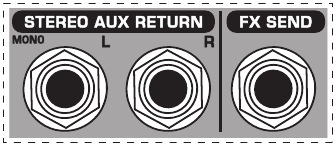
Fig. 2.7: FX send/return connectors
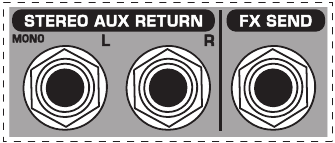
Fig. 2.8: FX send/return controls
STEREO AUX RETURN
Q802USB only: the STEREO AUX RETURN connectors are used to bring the output of the external effects device (whose input is derived from the aux sends) back into the console. You can instead use these connectors as additional inputs, but any effects device will then have to be brought back into the console via a normal stereo channel. This does, however, give you the ability to use the channel EQ on the effects return signal if you wish.
- When using a stereo channel as effects return path, the FX control of the relevant channel should generally be turned fully down to avoid undesirable feedback.
If only the left connector is used, the AUX RETURN automatically operates in mono. Use the AUX RETURN control to determine how much of the effects signal is sent to the main mix.
FX SEND
The FX SEND output (does not apply for Q502USB) should be connected to the input of an external effects unit. The post-fader FX signal you created using the input channel FX controls is sent to the effects unit via the FX SEND ouput. Use the FX SEND control of the main section to adjust the overall send level (Q1002USB and Q1202USB only).
Monitor and main mix
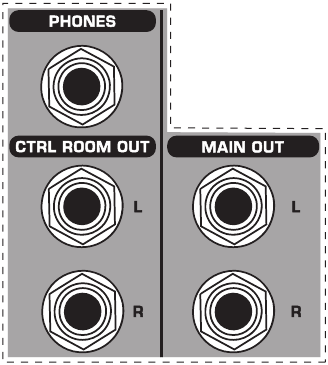
Fig. 2.9: Monitor/main mix connectors
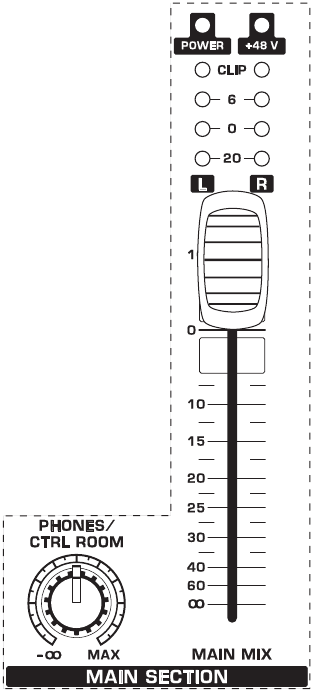
Fig. 2.10: Monitor control and main mix fader
PHONES/CONTROL ROOM
The stereo PHONES jack (at the top of the connector panel) is where you connect headphones. The unbalanced CTRL ROOM OUT jacks carry the summed effects and main mix signals. The PHONES/CONTROL ROOM control adjusts the level of both headphones and main monitor outputs. The Q502USB is not equipped with control room outputs.
MAIN MIX
The MAIN OUT connectors are unbalanced mono jacks. The main mix signal appears here at a level of 0 dBu. The MAIN MIX fader adjusts the volume of these outputs. The XENYX Q802USB and Q502USB mixing consoles feature a rotary control for this purpose.
2-Track connectors
2-TRACK INPUT
The 2-TRACK INPUT s are used to bring an external signal source (e.g. CD player, tape deck, etc.) into the console. They can also be used as a standard stereo line input, so the output of a second XENYX or BEHRINGER ULTRALINK PRO MX882 can be connected.
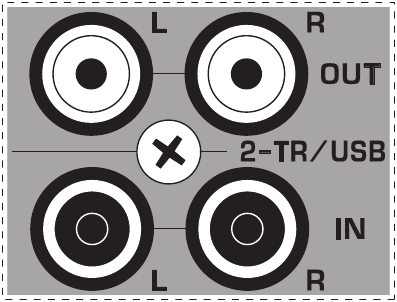
Fig. 2.11: 2-TRACK input/output
Alternatively the line or tape output of a hi-fiamplifier with source selection switch could also be hooked up here, allowing you to easily listen to additional sources.
2-TRACK OUTPUT
These connectors are wired in parallel with the MAIN OUT and carry the main mix signal (unbalanced). Connect the 2-TRACK OUTPUT to the inputs of your recording device. The output level is adjusted via the high-precision MAIN MIX fader or rotary control (Q802USB and Q502USB).
Signal assignment
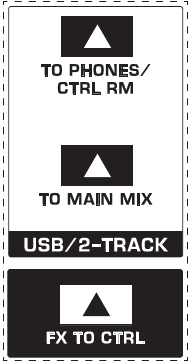
Fig. 2.12: Assignment switches of the main section
USB/2-TR TO MAIN MIX
When the USB/2-TR TO MAIN switch is depressed, the USB/2-Track input is assigned to the main mix, providing an additional input for tape machines, computers, MIDI instruments or other signal sources that do not require any processing. The 2-Track Out/USB recording signal are muted to avoid feedback.
USB/2-TR TO PHONES/CTRL RM (Q502: USB/2-TR TO PHONES)
Press the USB/2-TR TO PHONES/CTRL RM switch if you want to monitor the 2-Track or USB input via the CTRL ROOM OUT. This provides an easy way to monitor signals coming back from tape to ensure that they are recording correctly.
FX TO CTRL ROOM
If you want to monitor only the FX send signal in your headphones or monitor speaker(s), press the FX TO CTRL switch. This mutes the main mix signal while routing the FX SEND output to the monitor(s). The XENYX Q802USB and Q502USB do not feature this switch.
Phantom power and LED displays
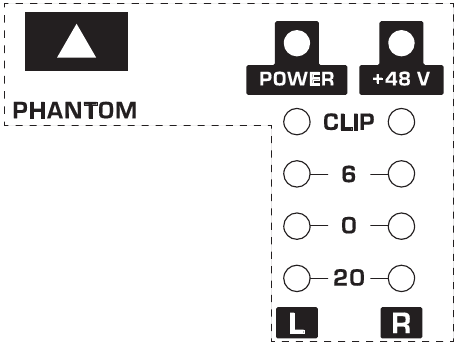
Fig. 2.13: Phantom power and control LEDs
+48 V
The red +48 V LED lights up when phantom power is on. The PHANTOM switch activates the phantom power supply on the XLR connectors of all mono channels.
- Please do not connect microphones to the mixer (or the stagebox/ wallbox) as long as the phantom power supply is switched on. Connect the microphones before you switch on the power supply. In addition, the monitor/PA loudspeakers should be muted before you activate the phantom power supply. After switching on, wait approx. one minute in order to allow system stabilization.
POWER
The POWER LED indicates that the console is powered on.
Level indicator
The high-precision 4-segment display accurately displays the relevant signal level.
LEVEL SETTING: To correctly set the gains of the channels, first set the LEVEL controls of the input channels to their center positions (0 dB). Then use the GAIN controls to increase the input amplification until signal peaks show 0 dB on the level meter.
When recording to digital recorders, the recorder’s peak meter should not go into overload. While analog recorders can be overloaded to some extent, creating only a certain amount of distortion (which is common and often desirable), digital recorders distort quickly when overloaded. In addition, digital distortion is not only undesirable, but also renders your recording completely useless.
- The peak meters of your XENYX display the level virtually independent of frequency. A recording level of 0 dB is recommended for all signal types.
USB Connector
Fig 2.14: USB connector
USB CONNECTOR
Connect your mixer to a computer using a standard USB cable. This enables a stereo signal to be sent to and from your mixer and computer. The signal sent from the mixer to the computer is the same as the main bus. The audio returning from the computer into the mixer appears directly in the main and/or control room bus (depending on USB/2TR to MAIN and PHONES/CTRL RM buttons).
NOTE: The mixer cannot be bus-powered via USB! Always use the included power adaptor to supply power to the mixer.
Installation
Mains connection
AC POWER IN
Connect the power supply to the 3-pin mains connector on the rear of the console. Use the AC adapter supplied to connect the console to the mains. The adapter complies with all applicable safety standards.
- Please use only the power supply unit provided with the console.
- Never connect the XENYX to the power supply unit while the latter is connected to the mains! First connect the console to the power supply unit, then connect the power supply unit to the mains.
- Please note that both the power supply unit and the mixing console heat up considerably during operation. This is completely normal.
Audio connections
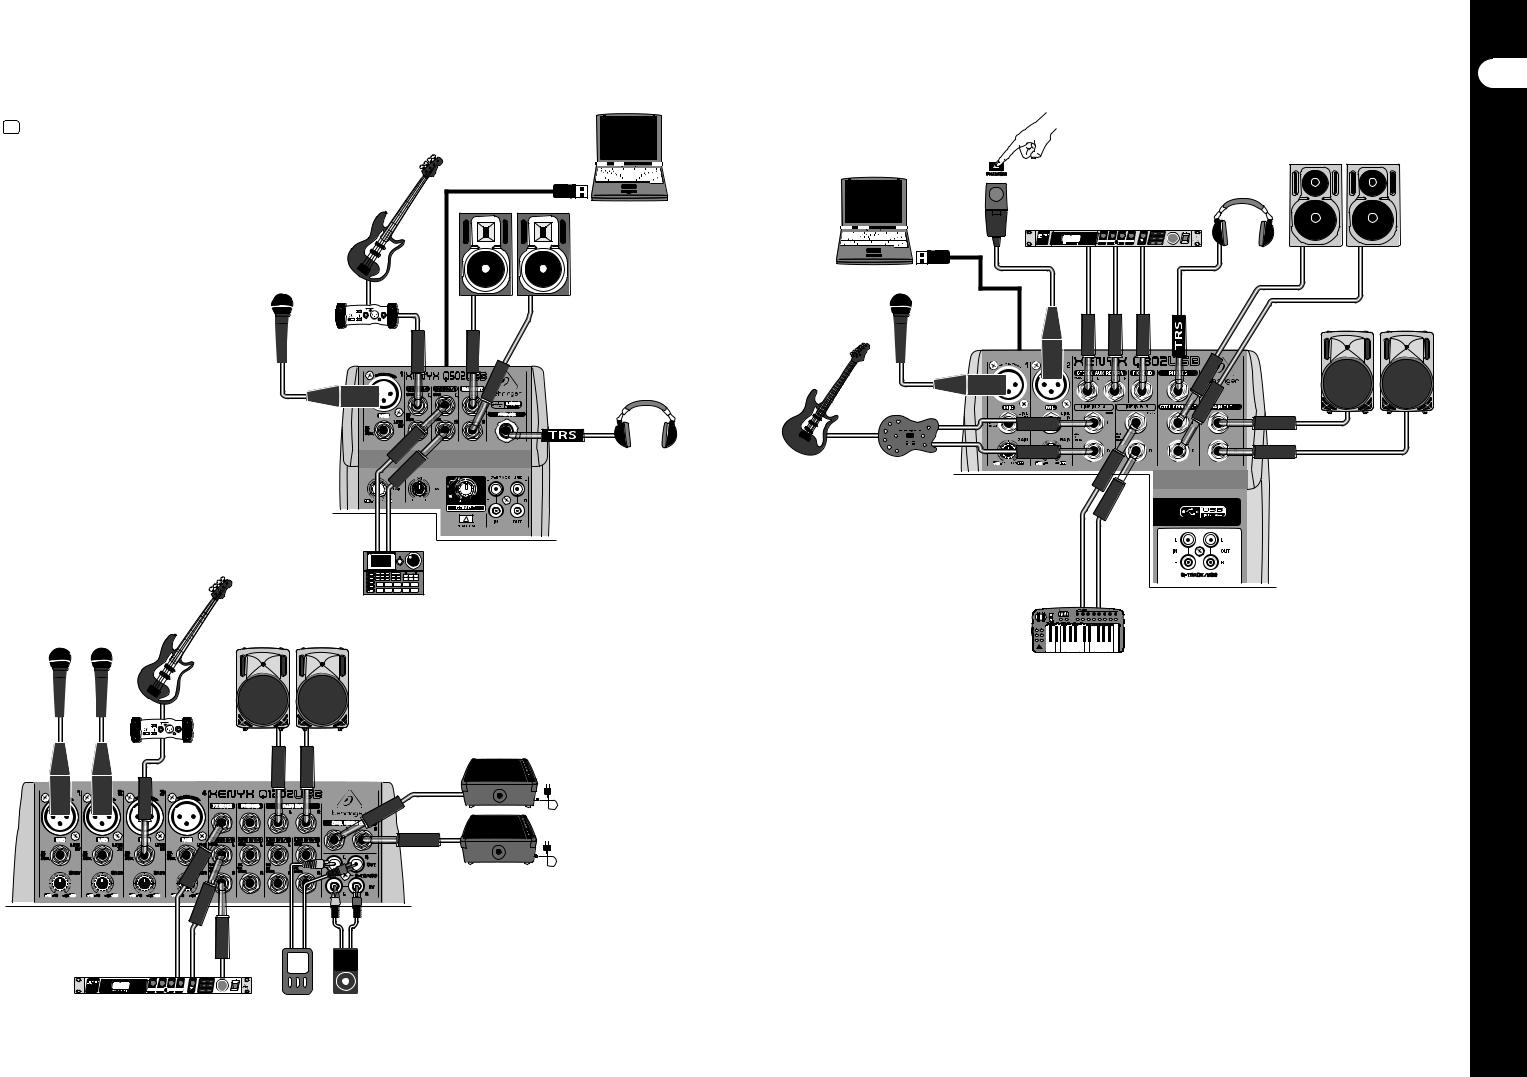
You will need a large number of cables for different applications. The illustrations below show how the connectors should be wired. Be sure to use only high-grade cables.
Please use commercial RCA cables to connect the 2-track inputs and outputs.
You can, of course, also connect unbalanced devices to the balanced inputs/outputs. To do this, use either mono plugs or stereo plugs with the ring and sleeve bridged (pins 1 and 3 in the case of XLR connectors).
Never use unbalanced XLR connectors (PIN 1 and 3 connected) on the MIC input connectors when using the phantom power supply.
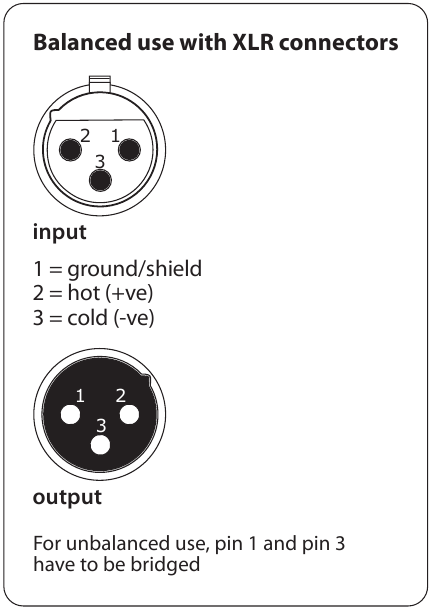
Fig. 3.1: XLR connections
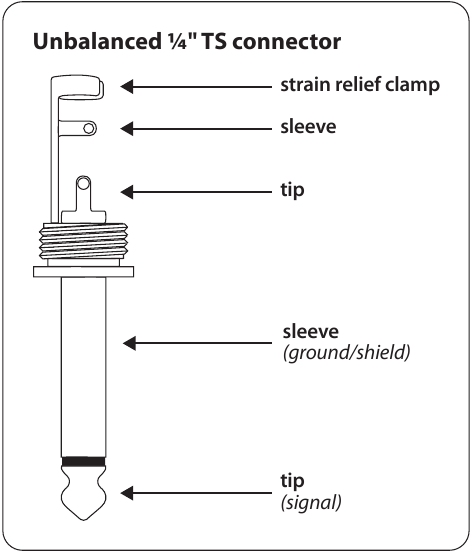
Fig. 3.2: ¼» mono plug
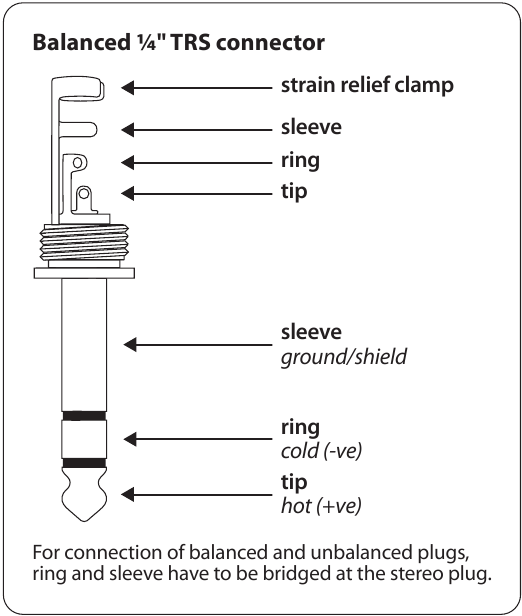
Fig. 3.3: ¼» stereo plug
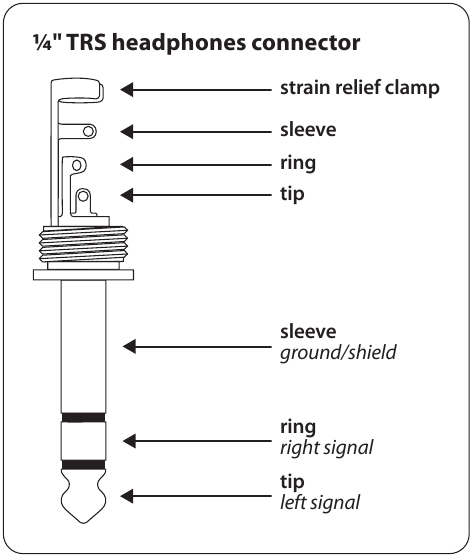
Fig. 3.4: Stereo plug for headphones connection
Specifications
| Q1202USB | Q1002USB | Q802USB | Q502USB | |
| Mono Inputs | ||||
| Microphone Inputs | ||||
| Type | XLR connector, balanced, discrete input circuit | |||
| Mic E.I.N. (20 Hz — 20 kHz) | ||||
| @ 0 Ω Source resistance | -134 dB / 136 dB A-weighted | |||
| @ 50 Ω Source resistance | -131 dB / 133 dB A-weighted | |||
| @ 150 Ω Source resistance | -129 dB / 131 dB A-weighted | |||
| Frequency Response | <10 Hz — 150 kHz (-1 dB) | |||
| <10 Hz — 200 kHz (-3 dB) | ||||
| Max. input level | +12 dBu @ +10 dB Gain | |||
| Impedance | 1.9 kΩ balanced | 1.9 kΩ balanced | 1.9 kΩ balanced | 1.4 kΩ balanced |
| Signal-to-noise ratio | 110 dB A-weighted (0 dBu In @ +22 dB Gain) | |||
| Distortion (THD+N) | 0.005% / 0.004% A-weighted | |||
| Line Inputs | ||||
| Type | ¼» TRS connector, balanced | |||
| Impedance | 20 kΩ balanced, 10 kΩ unbalanced | |||
| Gain range | -10 dB to +40 dB | |||
| Max. input level | +22 dBu @ 0 dB Gain | |||
| Stereo Inputs | ||||
| Type | 2 x ¼» TRS connectors, balanced | |||
| Impedance | 20 kΩ balanced, 10 kΩ unbalanced | |||
| Gain range | -20 dB to + 20 dB | |||
| Max. input level | +22 dBu | |||
| CD/Tape Inputs | ||||
| Type | RCA connector | |||
| Impedance | 18 kΩ | |||
| Max. input level | +22 dBu | |||
| Equalizer | ||||
| Low | 80 Hz / ±15 dB | |||
| Mid | 2.5 kHz / ±15 dB | |||
| High | 12 kHz / ±15 dB | |||
| Aux Sends | ||||
| Type | ¼» TRS connector, balanced | |||
| Impedance | 120 Ω | |||
| Max. output level | +22 dBu | |||
| Aux Returns | ||||
| Type | ¼» TRS connector, balanced | |||
| Impedance | 20 kΩ balanced / 10 kΩ unbalanced | |||
| Max. input level | +22 dBu | |||
| Main Outputs | ||||
| Type | ¼» TRS connector, balanced | |||
| Impedance | 120 Ω balanced | |||
| Max. output level | +22 dBu | |||
| Control Room Outputs | ||||
| Type | ¼» TRS connector, balanced | |||
| Impedance | approx. 120 Ω | |||
| Max. output level | +22 dBu | |||
| Phones Output | ||||
| Type | ¼» TRS connector, unbalanced | |||
| Max. output level | +21 dBu / 150 Ω (+25 dBm) | |||
| CD/Tape Outputs | ||||
| Type | RCA connector, unbalanced | |||
| Impedance | 1 kΩ | |||
| Max. output level | +22 dBu | |||
| Main Mix System Data (Noise) | ||||
| Main mix @ -∞, channel fader @ -∞ |
-106 dB / -109 dB A-weighted | |||
| Main mix @ 0 dB, channel fader @ -∞ |
-93 dB / -96 dB A-weighted |
-93 dB / -96 dB A-weighted |
-92 dB / -95 dB A-weighted |
-95 dB / -98 dB A-weighted |
| Main mix @ 0 dB, channel fader @ 0 dB |
-84 dB / -87 dB A-weighted | |||
| Power Supply | ||||
| Power consumption | 20 W | 13 W | 13 W | 13 W |
| USA/Canada | 120 V~, 60 Hz | |||
| Adapter | MXUL5 | MXUL3 | MXUL3 | MXUL3 |
| Europe/U.K./Australia | 230 V~, 50 Hz | |||
| Adapter | MXEU5 | MXEU3 | MXEU3 | MXEU3 |
| China | 220 V~, 50 Hz | |||
| Adapter | MXCCC5 | MXCCC3 | MXCCC3 | MXCCC3 |
| Korea | 220 V~, 60 Hz | |||
| Adapter | MXKR5 | MXKR3 | MXKR3 | MXKR3 |
| Japan | 100 V~, 50/60 Hz | |||
| Adapter | MXJP5 | MXJP3 | MXJP3 | MXJP3 |
| USB | ||||
| Connector | Type B | |||
| Sample Rate | 48 kHz | |||
| Physical/Weight | ||||
| Dimensions (W x D x H) | 250 x 248 x 50 mm (9.8 x 9.8 x 2.0″ ) |
195 x 248 x 50 mm (7.7 x 9.8 x 2.0″ ) |
195 x 248 x 50 mm (7.7 x 9.8 x 2.0″ ) |
138 x 184 x 46 mm (5.4 x 7.2 x 1.8″) |
| Weight (Net) | 1.5 kg (3.3 lbs) | 1.1 kg (2.4 lbs) | 1.1 kg (2.4 lbs) | 0.6 kg (1.3 lbs) |
FEDERAL COMMUNICATIONS COMMISSION COMPLIANCE INFORMATION

Responsible Party Name: MUSIC Group Services US Inc.
Address: 18912 North Creek Parkway, Suite 200 Bothell, WA 98011, USA
Phone/Fax No.: Phone: +1 425 672 0816 Fax: +1 425 673 7647
XENYX Q1202USB/Q1002USB/Q802USB/Q502USB complies with the FCC rules as mentioned in the following paragraph:
This equipment has been tested and found to comply with the limits for a Class B digital device, pursuant to part 15 of the FCC Rules. These limits are designed to provide reasonable protection against harmful interference in a residential installation. This equipment generates, uses and can radiate radio frequency energy and, if not installed and used in accordance with the instructions, may cause harmful interference to radio communications. However, there is no guarantee that interference will not occur in a particular installation. If this equipment does cause harmful interference to radio or television reception, which can be determined by turning the equipment offand on, the user is encouraged to try to correct the interference by one or more of the following measures:
- Reorient or relocate the receiving antenna.
- Increase the separation between the equipment and receiver.
- Connect the equipment into an outlet on a circuit different from that to which the receiver is connected.
- Consult the dealer or an experienced radio/TV technician for help.
This device complies with Part 15 of the FCC rules. Operation is subject to the following two conditions:
- this device may not cause harmful interference, and
- this device must accept any interference received, including interference that may cause undesired operation.
Changes or modifications to the equipment not expressly approved by MUSIC Group can void the user’s authority to use the equipment.
LIMITED WARRANTY
For the applicable warranty terms and conditions and additional information regarding MUSIC Group’s Limited Warranty, please see complete details online at www.music-group.com/warranty.
LEGAL DISCLAIMER
TECHNICAL SPECIFICATIONS AND APPEARANCES ARE SUBJECT TO CHANGE WITHOUT NOTICE AND ACCURACY IS NOT GUARANTEED. BEHRINGER, KLARK TEKNIK, MIDAS, BUGERA, AND TURBOSOUND ARE PART OF THE MUSIC GROUP (MUSIC-GROUP.COM). ALL TRADEMARKS ARE THE PROPERTY OF THEIR RESPECTIVE OWNERS. MUSIC GROUP ACCEPTS NO LIABILITY FOR ANY LOSS WHICH MAY BE SUFFERED BY ANY PERSON WHO RELIES EITHER WHOLLY OR IN PART UPON ANY DESCRIPTION, PHOTOGRAPH OR STATEMENT CONTAINED HEREIN. COLORS AND SPECIFICATIONS MAY VARY FROM ACTUAL PRODUCT. MUSIC GROUP PRODUCTS ARE SOLD THROUGH AUTHORIZED FULLFILLERS AND RESELLERS ONLY. FULLFILLERS AND RESELLERS ARE NOT AGENTS OF MUSIC GROUP AND HAVE ABSOLUTELY NO AUTHORITY TO BIND MUSIC GROUP BY ANY EXPRESS OR IMPLIED UNDERTAKING OR REPRESENTATION. THIS MANUAL IS COPYRIGHTED. NO PART OF THIS MANUAL MAY BE REPRODUCED OR TRANSMITTED IN ANY FORM OR BY ANY MEANS, ELECTRONIC OR MECHANICAL, INCLUDING PHOTOCOPYING AND RECORDING OF ANY KIND, FOR ANY PURPOSE, WITHOUT THE EXPRESS WRITTEN PERMISSION OF MUSIC GROUP IP LTD.
ALL RIGHTS RESERVED.
© 2013 MUSIC Group IP Ltd.
Trident Chambers, Wickhams Cay, P.O. Box 146, Road Town, Tortola, British Virgin Islands

Documents / Resources
References
Download manual
Here you can download full pdf version of manual, it may contain additional safety instructions, warranty information, FCC rules, etc.
Download behringer XENYX Q1202USB/Q1002USB/Q802USB/Q502USB Manual

RU
Ðуководство по быстрому нàчàлу рàботы
(Ïолную версию руководствà вы нàйдете нà сàйте behringer.com)
XENYX
Q1202
 /Q1002
 /Q802
/Q802
 /Q502
/Q502

Ìикшерный пульт премиум-клàссà с 12/10/8/5 входàми, микрофонными предусилителями и компрессорàми XENYX, «бритàнским» эквàлàйзером и звуковым интерфейсом по USB.

|
2 |
XENYX Q1202USB/Q1002USB/Q802USB/Q502USB |
Ðуководство по быстрому нàчàлу рàботы |
3 |
|
RU |
RU |
Âàжные инструкции |
|
по безопàсности |
ВНИМАНИЕ!
ОПАСНОСТЬУДАРАЭЛЕКТРОТОКОМ
НЕ ОТКРЫВАТЬ!
Âрàзъёмàх,отмеченныхэтимсимволом,течёт электрическийток,величинàкоторогоможет бытьопàснойдлячеловекàвслучàе удàрàэлектрическимтоком.
Èспользуйтетолькопродàющийсявмàгàзинàхготовый высококàчественныйàкустическийкàбельс иливилкàмисблокировкой.Âсеподключенияипеределки
могутвыполнятьсятолькоквàлифицировàннымперсонàлом.
Ýтотзнàк,незàвисимооттого,гдеон изобрàжён,предупреждàетвàсо присутствиинеизолировàнногоопàсного
нàпряжениявнутрикорпусàизделия,котороеможетиметьвеличину, опàснуюдлячеловекàвслучàеудàрàэлектрическимтоком.
Ýтотзнàк,незàвисимооттого,гдеон изобрàжен,предупреждàетвàсонàличии всопутствующейлитерàтуревàжных
инструкцийпорàботеиобслуживàнию.Ïожàлуйстà,прочтите руководствопользовàтеля:
Ïредупреждение
Âоизбежàниеудàрàэлектрическимтоком неоткрывàйтеверхнююкрышку(илизàднюю
чàсть).Âнутринетэлементов,которыевыможете обслуживàтьсàмостоятельно.Âсёобслуживàниедолжно производитьсятолькоквàлифицировàннымперсонàлом.
Ïредупреждение
Âоизбежàниевозникновениявозгорàния илипорàженияэлектрическимтокомне
подвергàйтеэтоустройствовоздействиюдождяиливлàги.Íе допускàйтерàзливàнияиликàпàнияжидкостинàустройство,не рàсполàгàйтенàнёмпредметы,нàполненныежидкостью,тàкие кàкчàшки,бутылкиит.д.
Ïредупреждение
9.Âцеляхбезопàсностиненàрушàйтецелостность кàбеляиполяризовàннойилизàземляющейвилки. Ïоляризовàннàявилкàимеетдвеконтàктныхплàстины, однàизкоторыхширедругой.Çàземляющàявилкàимеет двеконтàктныхплàстиныизàземляющийштырёк.Òретий
штырёксделàнширокимдляобеспечениявàшейбезопàсности. Åсливилкàкàбеля,идущеговкомплекте,неподходит квàшейрозетке,обрàтитеськэлектрикудлязàменырозетки.
10.Çàщищàйтекàбельотхожденияпонемуизàщемлений, особенновилкииместà,гдекàбельподключàетсяк оборудовàниюиливыходитизнего.
11.Èспользуйтетолькоàксессуàрыиприспособления,
укàзàнныепроизводителем.
12.Èспользуйтетолькос тележкàми,стойкàми,
треногàми,подстàвкàми илистолàми,укàзàнными производителем,или идущимивкомплекте.
Ïрииспользовàнии тележекдляперевозки
оборудовàниябудьтеосторожны,чтобыизбежàть трàвмприопрокидывàнии.
13.Îтключàйтепитàниеэтогооборудовàниявовремя грозыилиеслидолгоевремянеиспользуете.
14.Âсёобслуживàниедолжнопроизводитьсятолько квàлифицировàннымперсонàлом.Îбслуживàние необходимовтехслучàях,когдàоборудовàние кàким-либообрàзомбылоповреждено,когдàповреждён
кàбельпитàнияиливилкà,когдàнàинструментпопàлà жидкостьилиупàлпредмет,когдàоборудовàние подвергàлосьвоздействиюдождяиливлàжности, нерàботàетпрàвильно,илиеслиегороняли.
15.Ýтооборудовàниенеобходимоподключàтькрозеткàм электропитàния,имеющимзàщитноезàземление.
16.Åслидлявыключенияустройствàотсоединятьвилку кàбеляпитàнияилисетевойудлинитель,тоустройство будетостàвàтьсяготовымкрàботе.
Ýтиинструкциипообслуживàнию преднàзнàченытолькодляиспользовàния
квàлифицировàннымперсонàлом.
Äляпредотврàщенияпорàженияэлектрическимтокомне выполняйтеникàкоедругоеобслуживàние,крометого,окотором говоритсявинструкцияхпоэксплуàтàции.Âсеремонтыдолжны производитьсятолькоквàлифицировàннымперсонàлом.
1.Ïрочтитеэтиинструкции.
2.Ñохрàнитеэтиинструкции.
3.Îбрàтитевнимàниенàвсепредупреждения.
4.Ñледуйтевсеминструкциям.
5.Íеиспользуйтеэтооборудовàниевозлеводы.
6.Ïротирàйтетолькосухойткàнью.
7.Íезàкрывàйтевентиляционныеотверстия. Óстàнàвливàйтевсоответствиисинструкциями производителя.
8.Íеустàнàвливàйтевблизилюбыхисточников теплà,тàкихкàкбàтàреи,обогревàтели,печиили другоеоборудовàние(включàяусилители), выделяющеетепло.
ЗАЯВЛЕНИЕОБОГРАНИЧЕНИИОТВЕТСТВЕННОСТИ
ТЕХНИЧЕСКИЕ ХАРАКТЕРИСТИКИ И ВНЕШНИЙ ВИД ИЗДЕЛИЯ МОГУТ ИЗМЕНЯТЬСЯ БЕЗ УВЕДОМЛЕНИЯ И ТОЧНОСТЬ НЕ ГАРАНТИРУЕТСЯ. КОМПАНИЯ BEHRINGER ЯВЛЯЕТСЯ ЧАСТЬЮ MUSIC GROUP (MUSIC-GROUP.COM),ВСЕ ТОРГОВЫЕ МАРКИ ЯВЛЯЮТСЯ СОБСТВЕННОСТЬЮ ИХ ВЛАДЕЛЬЦЕВ. КОМПАНИЯ MUSIC GROUP НЕ НЕС¨Т ОТВЕСТВЕННОСТИ ЗА ЛЮБЫЕ УБЫТКИ ИЛИ ПОТЕРИ, ПОНЕСЕННЫЕ ЛЮБЫМ ЧЕЛОВЕКОМ, КОТОРЫЙ ПОЛНОСТЬЮ ИЛИ ЧАСТИЧНО РУКОВОДСТВОВАЛСЯ ЛЮБЫМ ОПИСАНИЕМ, ФОТОГРАФИЕЙ ИЛИ УТВЕРЖДЕНИЕМ, СОДЕРЖАЩИМСЯ ЗДЕСЬ. ЦВЕТА И ХАРАКТЕРИСТИКИ МОГУТ ОТЛИЧАТЬСЯ ОТ РЕАЛЬНОГО ИЗДЕЛИЯ. ИЗДЕЛИЯ КОМПАНИИ MUSIC GROUP ПРОДАЮТСЯ ТОЛЬКО ЧЕРЕЗ УПОЛНОМОЧЕННЫХ ТОРГОВЫХ ПОСРЕДНИКОВ И ПРЕДСТАВИТЕЛЕЙ.
ПОСРЕДНИКИ И ПРЕДСТАВИТЕЛИ НЕ ЯВЛЯЮТСЯ АГЕНТАМИ КОМПАНИИ MUSIC GROUP И НЕ ИМЕЮТ ПРАВА НАЛАГАТЬ НА КОМПАНИЮ ОБЯЗАТЕЛЬСТВА ЛЮБЫМИ ЯВНЫМИ ИЛИ ПОДРАЗУМЕВАЕМЫМИ СОГЛАШЕНИЯМИ И ЗАЯВЛЕНИЯМИ.
ЭТО РУКОВОДСТВО ЗАЩИЩЕНО АВТОРСКИМ ПРАВОМ. ЭТО РУКОВОДСТВО ПО ЧАСТЯМ ИЛИ ПОЛНОСТЬЮ НЕ МОЖЕТ ВОСПРОИЗВОДИТЬСЯ ИЛИ ПЕРЕДАВАТЬСЯ В ЛЮБОЙ ФОРМЕ ИЛИ ЛЮБЫМ СПОСОБОМ, ЭЛЕКТРОННЫМ ИЛИ МЕХАНИЧЕСКИМ, ВКЛЮЧАЯ ФОТОКОПИРОВАНИЕ И ЗАПИСЬ ЛЮБОГО РОДА, С ЛЮБОЙ ЦЕЛЬЮ БЕЗ ПОЛУЧЕНИЯ ПРЕДВАРИТЕЛЬНОГО ПИСЬМЕННОГО РАЗРЕШЕНИЯ ОТ КОМПАНИИ MUSIC GROUP IP LTD.
ВСЕ ПРАВА СОХРАНЯЮТСЯ.
© 2013 MUSIC Group IP Ltd.
Trident Chambers, Wickhams Cay, P.O. Box 146, Road Town, Tortola, British Virgin Islands
ОГРАНИЧЕННАЯГАРАНТИЯ
Îпоследнихизмененияхвсрокàхиусловияхгàрàнтии, àтàкжедополнительнойинформàцииотносительно
огрàниченнойгàрàнтиикомпàнииMusicGroupвыможете узнàтьболееподробнонàсàйтеbehringer.com.
|
4 |
XENYX Q1202USB/Q1002USB/Q802USB/Q502USB |
5 Ðуководство по быстрому нàчàлу рàботы |
|
|
Ïодключение XENYX Q1202USB/Q1002USB/Q802USB/Q502USB |
RU |
||
|
RU Øàг 1: Ïодключение |
Äомàшняя студия |
Ñтудия зàписи |
|
|
B2031A |
|||
|
HPS3000 |
|||
|
B3030A |
|||
|
Ïроцессор эффектов FX2000 |
|||
|
C-1 |
|||
|
Áàс гитàрà |
|||
|
B212D |
|||
|
DI100 |
|||
|
XM8500 |
XM8500 |
||
|
HPX6000 |
V-AMP3 |
||
|
Æивое выступление |
Ðитм-мàшинà |
||
|
Àктивные колонки B215D |
|||
|
Êлàвишный инструмент |
Áàс гитàрà
XM8500
DI100
Àктивные мониторы F1320D
L 
R 
|
Ïроцессор эффектов FX2000 |
Ïортàтивный MP3 плеер |
|
|
цифровой |
||
|
рекордер |
 Loading…
Summary
Производитель Behringer
Категория Mixer
Документы, которые мы получаем от производителя устройства Behringer Xenyx Q802USB мы можем разделить на несколько групп. Это в частности:
— технические чертежи Behringer
— инструкции обслуживания Xenyx Q802USB
— паспорта изделия Behringer
— информационные брошюры
— энергетические этикетки Behringer Xenyx Q802USB
Все из них важны, однако самую важную информацию с точки зрения пользователя мы найдем в инструкции обслуживания Behringer Xenyx Q802USB.
Группа документов, определяемая как инструкции обслуживания, делится также на более подробные типы, такие как: Инструкции монтажа Behringer Xenyx Q802USB, инструкции обслуживания, короткие инструкции или инструкции пользователя Behringer Xenyx Q802USB. В зависимости от потребностей, Вам необходимо поискать требуемый документ. На нашем сайте Вы можете просмотреть самую популярную инструкцию использования изделия Behringer Xenyx Q802USB.
Похожие инструкции обслуживания
-
31 страниц
-
12 страниц
-
9 страниц
-
13 страниц
Полная инструкция обслуживания устройства Behringer Xenyx Q802USB, как должна выглядеть?
Инструкция обслуживания, определяемая также как пособие пользователя, или просто «руководство» — это технический документ, цель которого заключается в использовании Behringer Xenyx Q802USB пользователями. Инструкции пишет, как правило технический писатель, языком, доступным для всех пользователей Behringer Xenyx Q802USB.
Полная инструкция обслуживания Behringer, должна заключать несколько основных элементов. Часть из них менее важная, как например: обложка / титульный лист или авторские страницы. Однако остальная часть, должна дать нам важную с точки зрения пользователя информацию.
1. Вступление и рекомендации, как пользоваться инструкцией Behringer Xenyx Q802USB — В начале каждой инструкции, необходимо найти указания, как пользоваться данным пособием. Здесь должна находится информация, касающаяся местонахождения содержания Behringer Xenyx Q802USB, FAQ и самых распространенных проблем — то есть мест, которые чаще всего ищут пользователи в каждой инструкции обслуживания
2. Содержание — индекс всех советов, касающихся Behringer Xenyx Q802USB, которое найдем в данном документе
3. Советы по использованию основных функций устройства Behringer Xenyx Q802USB — которые должны облегчить нам первые шаги во время использования Behringer Xenyx Q802USB
4. Troubleshooting — систематизированный ряд действия, который поможет нам диагностировать а в дальнейшем очередность решения важнейших проблем Behringer Xenyx Q802USB
5. FAQ — чаще всего задаваемые вопросы
6. Контактные данные Информация о том, где искать контактные данные производителя / сервисного центра Behringer Xenyx Q802USB в данной стране, если самостоятельно не получится решить проблему.
Комментарии (0)
Найди любой мануал:
Например: Sony VGN-FW460J/T
Вы можете бесплатно скачать Инструкция по эксплуатации для Behringer Xenyx Q802USB.
Также вы сможете прочесть онлайн этот документ без скачивания.
Скачать Инструкция по эксплуатации для Behringer Xenyx Q802USB
Тип файла
PDF
Размер
2.67 Mb
Кол-во страниц
12
Просмотров
13737
Читать онлайн Инструкция по эксплуатации для Behringer Xenyx Q802USB (Страница 1)

Другие Аудио Behringer Xenyx Q802USB
Топ Behringer Аудио
Вопросы
Ранее вы смотрели
Эта страница полезна для вас? Поделитесь ссылкой:
XENYX Q802USB – недорогой и портативный микшерный пульт, который относится к классу универсальных устройств для сведения звука. При этом микшер позволяет работать на профессиональном уровне, стоит только подключить его к компьютеру. Как и прочие модели XENYX, Q802USB надёжен и прост в освоении, что делает его отличным выбором для начинающих звукооператоров.
Компактность и функциональность
Q802USB – один из наиболее компактных микшерных пультов не только в сравнении с другими моделями Behringer, но и вообще на рынке аудиотехники. Он имеет всего 6 каналов – 2 монофонических и 2 стереофонических. Этого недостаточно для сведения звука в реальном времени на крупных мероприятиях, однако хватает для небольшого праздника, например, корпоратива. Также шести каналов хватает для звукозаписи, поскольку возможность прямого подключения к компьютеру позволяет гибко манипулировать сигналом на программном уровне.
Помимо основных каналов микшер имеет 2 микрофонных входа, оснащённых предусилителями и отключаемым 48-вольтным фантомным питанием. Последнее обеспечивает работу и динамических, и конденсаторных микрофонов, так что с этим микшером звукооператор может не беспокоиться о совместимости пульта и чужой техники. Настройка звучания производится 3-полосными «британскими» эквалайзерами.
Сигнал передаётся на 2 AUX-шины, после чего его можно направить на пост-фейдерный FX send-выход или на USB-разъём для дальнейшей обработке на компьютере.
Управляемость и дополнительные возможности
Несмотря на свою простоту и малые размеры это устройство предоставляет своему владельцу весьма широкие возможности по управлению звуком. Встроенный компрессор студийного качества делает возможным нормализацию звука от различных источников на самой ранней стадии обработки, что уменьшает вероятность возникновения паразитарных шумов. Светодиодная индикация уровня громкости, питания и клиппирования облегчает контроль над процессом сведения звука. RCA CD/Tape-вход/выход обеспечивает воспроизведение музыки с дополнительных источников сигнала или, напротив, её запись.
Об оптимизации работы над звуком на ПК создатели XENYX Q802USB также позаботились. С официального сайта Behringer можно бесплатно загрузить программы для аудиозаписи и редактирования звука, а также 150 плагинов – инструментов и эффектов для доработки записи. В конечном итоге это превращает XENYX Q802USB в уникальный по универсальности инструмент, способный служить как несложным «полевым» микшером, так и полноценным пультом для организации домашней звукозаписывающей студии.
