-
Bookmarks
Quick Links
Thank you for choosing
GRD products
BLISS
User’s Manual
Summary of Contents for GRD Systems Bliss
-
Page 1
Thank you for choosing GRD products BLISS User’s Manual… -
Page 2
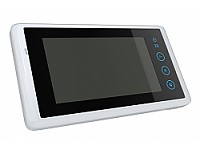
Package Monitor – 1pc. Door panel — 1pc. Wall mounting bracket with screws – 1pc. Table mounting bracket – 1pc. Power adaptors – 2pcs. User’s manual – 1pc. Monitor Speci cation: Display 4″ LCD Resolution 320 x 240 pixels Input voltage ~100-240V (50-60 Hz) Output adaptor voltage 5V, 1.0 A… -
Page 3: Schematic Diagram
Installation instructions • Choose monitor and door panel position (recommended installation height is GRD Bliss door phone connection diagram between 145cm and 160cm). • Before installtion starts, make sure that the distance between monitor and door panel…
-
Page 4: Safety Instructions
Brightness / contrast and talking volume adjust Safety Instructions Upper part of the monitor right panel has three adjustments. Upper adjustment 1. Do not install near other electronic equipment such as computers, TV, video recorder as changes image contrast of the monitor. Middle adjustment changes image brightness this may cause radiated interference to the unit.
Перейти к контенту
-
Bookmarks
Quick Links
Thank you for choosing
GRD products
BLISS
User’s Manual
Summary of Contents for GRD Systems Bliss
-
Page 1
Thank you for choosing GRD products BLISS User’s Manual… -
Page 2
Package Monitor – 1pc. Door panel — 1pc. Wall mounting bracket with screws – 1pc. Table mounting bracket – 1pc. Power adaptors – 2pcs. User’s manual – 1pc. Monitor Speci cation: Display 4″ LCD Resolution 320 x 240 pixels Input voltage ~100-240V (50-60 Hz) Output adaptor voltage 5V, 1.0 A… -
Page 3: Schematic Diagram
Installation instructions • Choose monitor and door panel position (recommended installation height is GRD Bliss door phone connection diagram between 145cm and 160cm). • Before installtion starts, make sure that the distance between monitor and door panel…
-
Page 4: Safety Instructions
Brightness / contrast and talking volume adjust Safety Instructions Upper part of the monitor right panel has three adjustments. Upper adjustment 1. Do not install near other electronic equipment such as computers, TV, video recorder as changes image contrast of the monitor. Middle adjustment changes image brightness this may cause radiated interference to the unit.
-
Contents
-
Table of Contents
-
Bookmarks
Quick Links
USER MANUAL
7″ Touch Screen
Video Door Phone
Related Manuals for GRD Sense
Summary of Contents for GRD Sense
-
Page 1: User Manual
USER MANUAL 7” Touch Screen Video Door Phone…
-
Page 2: Table Of Contents
Table of Contents Name and Functions of Each Part ……………….2 Front Part……………………2 Rear Part……………………3 Features and Functions………………….4 Features ……………………4 Main Functions ………………….4 Packing Contents …………………….5 Connection Diagram………………….6 System Layout ………………….6 Wiring Diagram ………………….7 Installation……………………..9 Installation location ………………..9 Wire & Monitor Installation ………………9 Operation Description…………………..10 Main Screen ………………….10 Visitor Call……………………11…
-
Page 3: Warning And Caution
WARNING AND CAUTION Please make sure to follow the instructions to prevent any danger or property losses Warning: Death or serious injury are expected Do not disassemble, install, or repair this product on your own accord Do not place the product near a hot or humid place Do not forcibly bend the cord or put a heavy object on the product Do not use water, thinner or a detergent used to wash oil products when you wash the exterior…
-
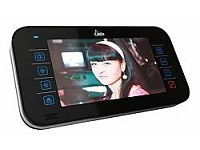
Page 4: Name And Functions Of Each Part
1. Name and Functions of Each Part 1.1 Front Part Part Name Description Power Indicator Review Button Touch button for reviewing picture or video Intercom Button Touch button for intercom Monitor Button Touch button for monitoring Talk Button Touch button for talking with visitor Door Release Button Touch button for releasing door Touch Screen…
-
Page 5: Rear Part
1.2 Rear Part Part name Function Speaker Loud speaker 75Ω Switcher Impedance matching for video signal CCTV1 / CCTV2 / CCTV3 / CCTV4 / video out (2 wire in Video Input /Output polarity) DC Power 14.5V DC supply Telephone Interface for the telephone line Connection Interface for door station 1/door station 2 /extensions /audio Interface…
-
Page 6: Features And Functions
2. Features and Functions 2.1 Features 7” TFT-touch screen, 800*480 Resolution Support 2 door stations, 4 CCTV cameras, 1 master monitor + 3 extension monitors, 1 audio phone and 1 CCTV output Built-in flash memory:100 pictures Support telephone function and call forwarding TF card: 1024 images and 128 videos 16 melodies for different door stations Support motion detection…
-
Page 7: Packing Contents
3. Packing Contents…
-
Page 8: Connection Diagram
4. Connection Diagram 4.1 System Layout There are two CCTV connection modes. CCTV connection mode 1 Each monitor can connect to different CCTV, and can only monitor the directly connected CCTV (Extensions ≤ 3). Master Ext1 Ext2 Master Ext.1 Ext.2 Ext.3 Ext3 CCTV_OUT…
-
Page 9: Wiring Diagram
4.2 Wiring Diagram Please be careful to wiring on polarity. Intercom wiring diagram with one monitor Intercom Audio intercom inter power inter audio video I/O data I/O video out audio I/O CCTV 4 video 2 CCTV 3 VCC 2 CCTV 2 Video CCTV 1 audio 2…
-
Page 10
CCTV connection mode 1 Each monitor can connect to different CCTV, can and can only monitor the connected CCTV. video out CCTV 4 CCTV 3 CCTV 2 CCTV 1 CCTV connection mode 2 Only the master can connect to CCTV, extensions get CCTV video from the master. The extensions monitor CCTV by sending requests to the master. Only one monitor can monitor CCTV at a time (pay attention to the impedance matching switch). -
Page 11: Installation
5. Installation 5.1 Installation location Monitor installation location Standard monitor installation height is about 1,500mm where screen center is at eye level; in this case, wall-hanging metal center is 1,450mm above ground level. 5.2 Wire & Monitor Installation Push down the button with screwdriver Put the wire into the hole from the bottom Release the screwdriver Check the fastness of the wire…
-
Page 12: Operation Description
6. Operation Description 6.1 Main Screen It will show corresponding functions when pressing each icon on main screen. Icon Definition: Home/Leaving/Do Not Disturb enter [Camera] enter [CCTV] page enter [Video] page enter [Image] page enter [Voicemail] page enter [Photo Frame] page enter [Intercom] page enter [Telephone] page enter [Setting] page…
-
Page 13: Visitor Call
6.2 Visitor Call When door station calls in, the visitor’s image will be shown on the monitor screen (on-screen duration 90 seconds). Icon Definition: talk back to [Main Screen] switch between door stations record video and CCTVs adjust display parameters call transfer manually open the door turn off screen…
-
Page 14
During the talk: press [Change] to switch to other door station or CCTV, and the current talk will be terminated. press [Record] to record a video clip or capture a picture from the calling door station, depending on the system setting (see 6.7). press [Setting] to adjust the sound volume, brightness, color and contrast. -
Page 15: Monitor Function
6.3 Monitor Function When you press the [Camera1]/[Camera2] or [CCTV1]/[CCTV2]/[CCTV3]/[CCTV4] icon on main screen, the system will enter monitor mode, and will show image from the corresponding door station/CCTV. Remark: The [Transfer] buttons will be in disable status under monitor mode. 6.4 Multimedia 6.4.1.
-
Page 16: Voicemail Function
show next page delete the selected image/video You can press the icon on the top left corner to switch [Image]/[Video] review mode. 6.4.3. Voicemail Function Audio Message Record Press [ Voicemail ] on main screen to record an audio message. Icon Definition:…
-
Page 17
List: view audio return to [Main Screen] message leave a voice message leave a voice for family message for guest Press [For Guest] / [For Family], enter the recording page to record voice message. Monitor support up to 30s for each message. Review Audio Record Press to review records. -
Page 18: Photo Frame Function
6.4.4. Photo Frame Function Press [Photo Frame] on main screen, monitor will play the image one by one automatically. Icon Definition: return to [Main Screen] show previous image display image show next image delete Remark: Only photos with specific format can be shown in the photo frame. To convert the photo, please see Appendix I.
-
Page 19: Telephone
Icon Definition: call the audio phone [Inner Call] call extension monitor 1 [Ext. 1] call extension monitor 2 [Ext. 2] call extension monitor 3 [Ext. 3] call master monitor [Master] call all monitors [Broadcast] : In the [Intercom] page, you can enable/disable [Mute] function, and adjust the volume.
-
Page 20: Call Forwarding Function
Icon Definition: enable/disable [Mute] function adjust volume enable/disable call forwarding function [Call Forwarding] function is enable reset phone redial 6.6.1. Call Forwarding Function To use call forwarding function, you need set a forwarding telephone number, please take the following steps: Press [Telephone] icon on main screen, enter [Telephone] page Set a telephone number you want to forward: Phone Number…
-
Page 21: Control The Door Station By Telephone
Set ring time before call forwarding, * 5* Ring Time Remark: The ring time range = [1s ~ 30s], and you must input 2 figures. For example: 2. Check the phone No. 1. Set » 123″ as forwarding 3. Set the waiting time: «0 6s» phone number you set 6.6.2.
-
Page 22
[Camera] setting page In this page, you can turn [Motion Detect] on or off, set one camera as default for monitoring, set default camera for motion detection, set detection start & end time and set door open timeout. To set a default camera for motion detection, enter into option list: CAM1/CAM2/CCTV1/CCTV2/CCTV3/CCTV4 Choose one option →… -
Page 23
[Monitor Record] setting page In this page, you can Turn [Auto Record] on or off. If [Auto Record] is on, the monitor will capture pictures or videos automatically, when door station calls in. Select picture or video record mode. To set video recording timeout, enter into drop-down option list: 15 s/30 s/60 s. -
Page 24
In this page, you can select one voicemail for guest as the message to play under [Leaving] mode. Remark: The Voicemail message is stored on the TF card. This configuration will be invalid if there is no valid TF card inserted. To record message for guest, please see 6.4.3. -
Page 25
[General] setting page In this page, you can set up date & time; select a language and CCTV mode. Default option — CCTV mode 1. Remark: The CCTV mode of every monitor should keep the same. With the CCTV mode of master monitor changing, the extensions’ CCTV mode will change automatically. -
Page 26: Specifications
Set ring timeout:10 s/20 s/30 s. In [Factory Reset] setting page you can restore system to factory settings (except date & time, intercom address). 7. Specifications Category Specification AC: 100V ~ 240V, 50Hz/60Hz Input power DC: 14.5V Power Consumption Max: 12W, standby: 5W TFT LCD 7 inch digital TFT LCD LCD resolution…
-
Page 27: Appendix I: Converting Image For Photo Frame
Appendix I: Converting image for photo frame To use photo frame function, the video door phone needs specific formatted JPG image. We provide the program PhotoManager to convert the image. Start the program and you will see the bellow interface. Click on the left top corner to import a target image folder.
![]() Домофоны GARDI — инструкции по установке, эксплуатации, программированию и обслуживанию, руководства пользователя. Общее количество материалов — 8.
Домофоны GARDI — инструкции по установке, эксплуатации, программированию и обслуживанию, руководства пользователя. Общее количество материалов — 8.
GARDI GRAND — Инструкция по эксплуатации
Видеодомофон
Формат: pdf | Размер: 1013.9 Kb | Язык: Русский
GARDI LUX 64 — Инструкция по эксплуатации
Видеодомофон
Формат: pdf | Размер: 4.6 Mb | Язык: Русский
GARDI LUX 64 SD/M — Инструкция по эксплуатации
Видеодомофон
Формат: pdf | Размер: 4.6 Mb | Язык: Русский
GARDI LUX 8 — Инструкция по эксплуатации
Видеодомофон
Формат: pdf | Размер: 4.6 Mb | Язык: Русский
GARDI LUX 8 SD/M — Инструкция по эксплуатации
Видеодомофон
Формат: pdf | Размер: 4.6 Mb | Язык: Русский
GARDI NOTA 2 — Инструкция по эксплуатации
Видеодомофон
Формат: pdf | Размер: 899.1 Kb | Язык: Русский
GARDI NOTA STL — Инструкция по эксплуатации
Видеодомофон
Формат: pdf | Размер: 2.7 Mb | Язык: Русский
GARDI SLIM — Инструкция по эксплуатации
Видеодомофон
Формат: pdf | Размер: 851.4 Kb | Язык: Русский
-
Contents
-
Table of Contents
-
Bookmarks
Quick Links
USER MANUAL
7″ Touch Screen
Video Door Phone
Related Manuals for GRD Sense
Summary of Contents for GRD Sense
-
Page 1: User Manual
USER MANUAL 7” Touch Screen Video Door Phone…
-
Page 2: Table Of Contents
Table of Contents Name and Functions of Each Part ……………….2 Front Part……………………2 Rear Part……………………3 Features and Functions………………….4 Features ……………………4 Main Functions ………………….4 Packing Contents …………………….5 Connection Diagram………………….6 System Layout ………………….6 Wiring Diagram ………………….7 Installation……………………..9 Installation location ………………..9 Wire & Monitor Installation ………………9 Operation Description…………………..10 Main Screen ………………….10 Visitor Call……………………11…
-
Page 3: Warning And Caution
WARNING AND CAUTION Please make sure to follow the instructions to prevent any danger or property losses Warning: Death or serious injury are expected Do not disassemble, install, or repair this product on your own accord Do not place the product near a hot or humid place Do not forcibly bend the cord or put a heavy object on the product Do not use water, thinner or a detergent used to wash oil products when you wash the exterior…
-
Page 4: Name And Functions Of Each Part
1. Name and Functions of Each Part 1.1 Front Part Part Name Description Power Indicator Review Button Touch button for reviewing picture or video Intercom Button Touch button for intercom Monitor Button Touch button for monitoring Talk Button Touch button for talking with visitor Door Release Button Touch button for releasing door Touch Screen…
-
Page 5: Rear Part
1.2 Rear Part Part name Function Speaker Loud speaker 75Ω Switcher Impedance matching for video signal CCTV1 / CCTV2 / CCTV3 / CCTV4 / video out (2 wire in Video Input /Output polarity) DC Power 14.5V DC supply Telephone Interface for the telephone line Connection Interface for door station 1/door station 2 /extensions /audio Interface…
-
Page 6: Features And Functions
2. Features and Functions 2.1 Features 7” TFT-touch screen, 800*480 Resolution Support 2 door stations, 4 CCTV cameras, 1 master monitor + 3 extension monitors, 1 audio phone and 1 CCTV output Built-in flash memory:100 pictures Support telephone function and call forwarding TF card: 1024 images and 128 videos 16 melodies for different door stations Support motion detection…
-
Page 7: Packing Contents
3. Packing Contents…
-
Page 8: Connection Diagram
4. Connection Diagram 4.1 System Layout There are two CCTV connection modes. CCTV connection mode 1 Each monitor can connect to different CCTV, and can only monitor the directly connected CCTV (Extensions ≤ 3). Master Ext1 Ext2 Master Ext.1 Ext.2 Ext.3 Ext3 CCTV_OUT…
-
Page 9: Wiring Diagram
4.2 Wiring Diagram Please be careful to wiring on polarity. Intercom wiring diagram with one monitor Intercom Audio intercom inter power inter audio video I/O data I/O video out audio I/O CCTV 4 video 2 CCTV 3 VCC 2 CCTV 2 Video CCTV 1 audio 2…
-
Page 10
CCTV connection mode 1 Each monitor can connect to different CCTV, can and can only monitor the connected CCTV. video out CCTV 4 CCTV 3 CCTV 2 CCTV 1 CCTV connection mode 2 Only the master can connect to CCTV, extensions get CCTV video from the master. The extensions monitor CCTV by sending requests to the master. Only one monitor can monitor CCTV at a time (pay attention to the impedance matching switch). -
Page 11: Installation
5. Installation 5.1 Installation location Monitor installation location Standard monitor installation height is about 1,500mm where screen center is at eye level; in this case, wall-hanging metal center is 1,450mm above ground level. 5.2 Wire & Monitor Installation Push down the button with screwdriver Put the wire into the hole from the bottom Release the screwdriver Check the fastness of the wire…
-
Page 12: Operation Description
6. Operation Description 6.1 Main Screen It will show corresponding functions when pressing each icon on main screen. Icon Definition: Home/Leaving/Do Not Disturb enter [Camera] enter [CCTV] page enter [Video] page enter [Image] page enter [Voicemail] page enter [Photo Frame] page enter [Intercom] page enter [Telephone] page enter [Setting] page…
-
Page 13: Visitor Call
6.2 Visitor Call When door station calls in, the visitor’s image will be shown on the monitor screen (on-screen duration 90 seconds). Icon Definition: talk back to [Main Screen] switch between door stations record video and CCTVs adjust display parameters call transfer manually open the door turn off screen…
-
Page 14
During the talk: press [Change] to switch to other door station or CCTV, and the current talk will be terminated. press [Record] to record a video clip or capture a picture from the calling door station, depending on the system setting (see 6.7). press [Setting] to adjust the sound volume, brightness, color and contrast. -
Page 15: Monitor Function
6.3 Monitor Function When you press the [Camera1]/[Camera2] or [CCTV1]/[CCTV2]/[CCTV3]/[CCTV4] icon on main screen, the system will enter monitor mode, and will show image from the corresponding door station/CCTV. Remark: The [Transfer] buttons will be in disable status under monitor mode. 6.4 Multimedia 6.4.1.
-
Page 16: Voicemail Function
show next page delete the selected image/video You can press the icon on the top left corner to switch [Image]/[Video] review mode. 6.4.3. Voicemail Function Audio Message Record Press [ Voicemail ] on main screen to record an audio message. Icon Definition:…
-
Page 17
List: view audio return to [Main Screen] message leave a voice message leave a voice for family message for guest Press [For Guest] / [For Family], enter the recording page to record voice message. Monitor support up to 30s for each message. Review Audio Record Press to review records. -
Page 18: Photo Frame Function
6.4.4. Photo Frame Function Press [Photo Frame] on main screen, monitor will play the image one by one automatically. Icon Definition: return to [Main Screen] show previous image display image show next image delete Remark: Only photos with specific format can be shown in the photo frame. To convert the photo, please see Appendix I.
-
Page 19: Telephone
Icon Definition: call the audio phone [Inner Call] call extension monitor 1 [Ext. 1] call extension monitor 2 [Ext. 2] call extension monitor 3 [Ext. 3] call master monitor [Master] call all monitors [Broadcast] : In the [Intercom] page, you can enable/disable [Mute] function, and adjust the volume.
-
Page 20: Call Forwarding Function
Icon Definition: enable/disable [Mute] function adjust volume enable/disable call forwarding function [Call Forwarding] function is enable reset phone redial 6.6.1. Call Forwarding Function To use call forwarding function, you need set a forwarding telephone number, please take the following steps: Press [Telephone] icon on main screen, enter [Telephone] page Set a telephone number you want to forward: Phone Number…
-
Page 21: Control The Door Station By Telephone
Set ring time before call forwarding, * 5* Ring Time Remark: The ring time range = [1s ~ 30s], and you must input 2 figures. For example: 2. Check the phone No. 1. Set » 123″ as forwarding 3. Set the waiting time: «0 6s» phone number you set 6.6.2.
-
Page 22
[Camera] setting page In this page, you can turn [Motion Detect] on or off, set one camera as default for monitoring, set default camera for motion detection, set detection start & end time and set door open timeout. To set a default camera for motion detection, enter into option list: CAM1/CAM2/CCTV1/CCTV2/CCTV3/CCTV4 Choose one option →… -
Page 23
[Monitor Record] setting page In this page, you can Turn [Auto Record] on or off. If [Auto Record] is on, the monitor will capture pictures or videos automatically, when door station calls in. Select picture or video record mode. To set video recording timeout, enter into drop-down option list: 15 s/30 s/60 s. -
Page 24
In this page, you can select one voicemail for guest as the message to play under [Leaving] mode. Remark: The Voicemail message is stored on the TF card. This configuration will be invalid if there is no valid TF card inserted. To record message for guest, please see 6.4.3. -
Page 25
[General] setting page In this page, you can set up date & time; select a language and CCTV mode. Default option — CCTV mode 1. Remark: The CCTV mode of every monitor should keep the same. With the CCTV mode of master monitor changing, the extensions’ CCTV mode will change automatically. -
Page 26: Specifications
Set ring timeout:10 s/20 s/30 s. In [Factory Reset] setting page you can restore system to factory settings (except date & time, intercom address). 7. Specifications Category Specification AC: 100V ~ 240V, 50Hz/60Hz Input power DC: 14.5V Power Consumption Max: 12W, standby: 5W TFT LCD 7 inch digital TFT LCD LCD resolution…
-
Page 27: Appendix I: Converting Image For Photo Frame
Appendix I: Converting image for photo frame To use photo frame function, the video door phone needs specific formatted JPG image. We provide the program PhotoManager to convert the image. Start the program and you will see the bellow interface. Click on the left top corner to import a target image folder.
-

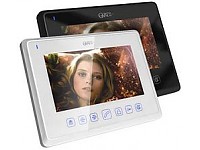
Gardi Style
7″ TFT Цветной сенсорный дисплей; можно подключить: 2 блока вызова, управление замком через панель, 2 видео канала, интерком между 2-мя домофонами (дополнительный монитор); блок питания в комплекте 210х160х22мм ЦВЕТА: Белый и Черный
подробнее
-
Gardi Style-2
7″ TFT Цветной сенсорный дисплей; можно подключить: 2 блока вызова, управление замком через панель, 2 видео канала, интерком между 2-мя домофонами (дополнительный монитор); блок питания в комплекте 210х160х22мм, функция DVR + 8 MP3-мелодий
подробнее
-
Gardi Magic Touch
7″ TFT сенсорный цветной экран, 4-х проводной, накладной монтаж, подключение 2 видеопанелей, 4 CCTV камеры и 4 мониторов в параллель с функцией интерком.
подробнее
Цена:
уточняйте у менеджера -
Gardi Nota
2 7″ TFT цветной экран, 4-х проводной, HandsFree, накладной монтаж, подключение 2 панели и 2 монитора в параллель с функцией интерком, подключение замка от видеопанели, Просмотр изображения с камер с любого монитора, 235x120x28 мм. Звук, Звонок управление. Выбор мелодий, режим не беспокоить. Совместим со Slim и Slider
подробнее
Цена:
уточняйте у менеджера -
Gardi Nota STL
7″ TFT цветной экран /4-х проводной, 4 мелодии вызова, возможность подключения 2 мониторов параллельно, возможность подключения 2 вызывных панелей, цифровая регулировка яркости, контрастности и цветности, управление замком через панель, металлический корпус, сенсорная клавиатура, размер 260х 110х 25 ЦВЕТА: Темное серебро и Светлый металлик
подробнее
Цена:
уточняйте у менеджера -
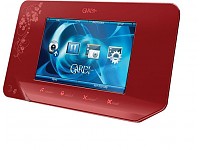
GRD System Asteria
7″ TFT сенсорный; подключение: 2 блока вызова; интерком 5 мониторов, встроенная память на 800 кадров, фоторамка, календарь, SD карта, прямое управление замком, БП в комплекте; 225x125x23 мм; белое исполнене
подробнее
Цена:
уточняйте у менеджера -

GRD System Sting
7″ TFT; подключение: 2 блока вызова, 2CCTV камеры; интерком 4 монитора; прямое управление замком, встроенный БП; 235х120х28 мм; черное и белое исполнение
подробнее
Цена:
уточняйте у менеджера -
GRD System Sting 2
7″ TFT; подключение: 2 блока вызова, 2CCTV камеры; интерком 4 монитора; функция DVR, мультимедийное меню, будильник, автоответчик, плеер, запись фото/видео на microSD, прямое управление замком, встроенный БП; 235х120х28 мм; черное и белое исполнение
подробнее
Цена:
уточняйте у менеджера -
Gardi Max v.2
7″ TFT Цветной дисплей /4-х проводной/ HandsFree/ накладной тип крепления/ подключение 2 вызывных панелей + 2 дополнительный в/к/ 4 монитора в параллель с функцией адресный Интреком и переадресацией входного звонка на другие мониторы/ Функция DVR/ прослушивание других мониторов, голосовое сообщение / использование монитора как фоторамки / возможность прослушивания музыки с SD-карточки / интерком с Sting/Sting-2, Style/Style-2 / Запись фото и видео на SD-карточку Автоответчик / Размер: 260x195x35мм/ формат изображения 16:9, выбор мелодий звонка, режим не беспокоить. Регулировки: Звук, Звонок, Яркость, Контрастность, Цветность.
подробнее
Цена:
уточняйте у менеджера -

Gardi Max Tel v.2
7″ TFT Цветной дисплей /4-х проводный/ HandsFree/ накладной тип крепления/ подключение 2 вызывных панелей + 2 дополнительных в/к / 4 монитора в паралель сфункцией адресный Интреком и переадресацией входного звонка на другие мониторы/ ФУНКЦИЯ DVR / прослушивание других мониторов, голсовое сообщение / использование монитора как фоторамки / возможность прослушивания музыки с SD-карточки / интерком с Sting/Sting-2, Style/Style-2 / Запись фото и видео на SD-карточку Автоответчик / подключение к телефонной линии и передресация на мобильный или стационарный телефон. Размер: 260x195x35мм/ формат изображения 16:9, выбор мелодий звонка, режим не беспокоить. Регулировки: Звук, Звонок, Яркость, Контрасность, Цветность.
подробнее
Цена:
уточняйте у менеджера -

Gardi Smarty
3,5″ TFT цветной экран /4-х проводной, 4 мелодии вызова, управление замком через панель, возможность подключения 2 мониторов параллельно, возможность подключения 2 вызывных панелей, цифровая регулировка яркости, контрастности и цветности, металлический корпус, компактный дизайн, сенсорная клавиатура, размеры 169х94х23мм
подробнее
Цена:
уточняйте у менеджера -
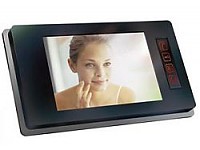
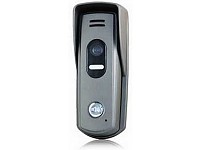
GRD Bliss
Комплект: беспроводной цветной видеодомофон и вызывная панель GRD Bliss. Монитор: 4″ LCD, подключение: 1 вызывная панель, настенное/настольное крепление, БП в комплекте, 190х125х26мм, черн. и бел. исполнение; блок вызова: цвет., накладной, ИК-подсветка, -20 ~ 40°С, 142x98x38мм, черн. исполнение
подробнее
-
GRD VC-17
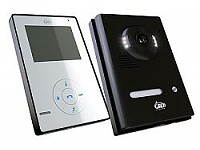
Блок вызова в/домофона GRD VC-17, антивандал., цвет., СMOS камера, аудиопроцессор нового поколения, регулировка громкости динамика и чувствительности микрофона, угол обзора 90гр по гор./75гр по верт, накладной монтаж, 137х49х28 мм
подробнее
Цена:
уточняйте у менеджера
Компания СКБ-ОХРАН предлагает своим покупателям купить продукцию под названием домофоны GARDI с 2012 года поменялась название бренда GRD Systems (видеомониторы, вызывные панели). Имея многолетний опыт продажи данных изделий, она предоставляет только лучшую продукцию, цена качество.
модели монитора для домофона: Gardi Magic Touch, Gardi Nota, Gardi Nota STL, Gardi Style, Gardi Style-2, Gardi System Asteria, Gardi System Sting, Gardi System Sting 2, Gardi Max v.2, Gardi Max Tel v.2, Gardi Smarty, Gardi Bliss, GRD Magic Touch, GRD Nota, GRD Nota STL, GRD Style, GRD Style-2, GRD System Asteria, GRD System Sting, GRD System Sting 2, GRD Max v.2, GRD Max Tel v.2, GRD Smarty, GRD Bliss.
![]()
Gardi Grand Видеодомофон — Инструкция по установке и использованию в формате pdf. Руководства по установке, настройке и эксплуатации оборудования.
Дата добавления: 11.07.2011
Размер файла: 1013.9Kb
Формат файла: pdf
Просмотров: 2354
Загрузок: 460
Дополнительная информация
Технические характеристики видеодомофона Gardi Grand:
10,4″ TFT дисплей;
функция hands free (свободные руки);
подключение 2-х вызывных видеопанелей;
подключение вызывных видеопанелей 4-х проводное;
подключение 2-х видеокамер (питание от монитора);
2 домофона в параллель (сопряжение с Slim, Nota-2, Slider, Grand);
аудио интерком (сопряжение с Slim, Nota-2, Slider, Grand);
функция «не беспокоить»;
сенсорные кнопки;
управление замком (через видеопанель);
управление: яркость, громкость;
питание 220 В;
установка накладная (кронштейн в комплекте).
Отзывы и комментарии к материалу «Gardi Grand Видеодомофон — Инструкция по установке и использованию».