
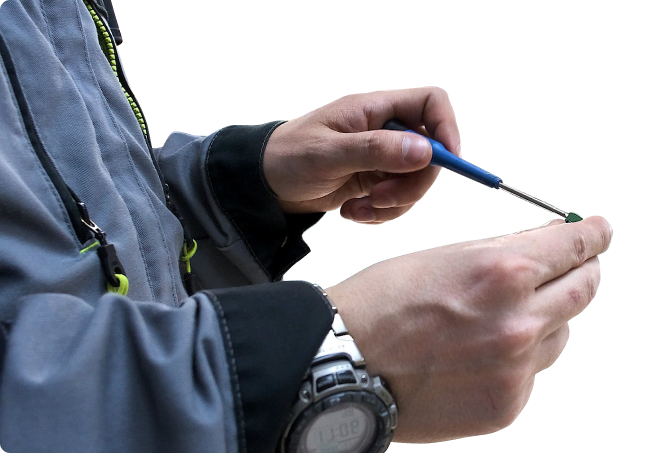
Принтер автоматически откалибруется — сначала выдвинет ленту шагами по несколько миллиметров, затем прогонит 2-3 пустых билета и распечатает тестовую страницу с текущими параметрами, а также сам определит высотку ленты в зависимости от режима печати и установленной ленты.
В результате светодиод READY должен гореть зелёным. Однако, если светодиод STATUS горит красным, и вы используете прямую термопечать, нужно будет соответствующе настроить принтер, об этом ниже.
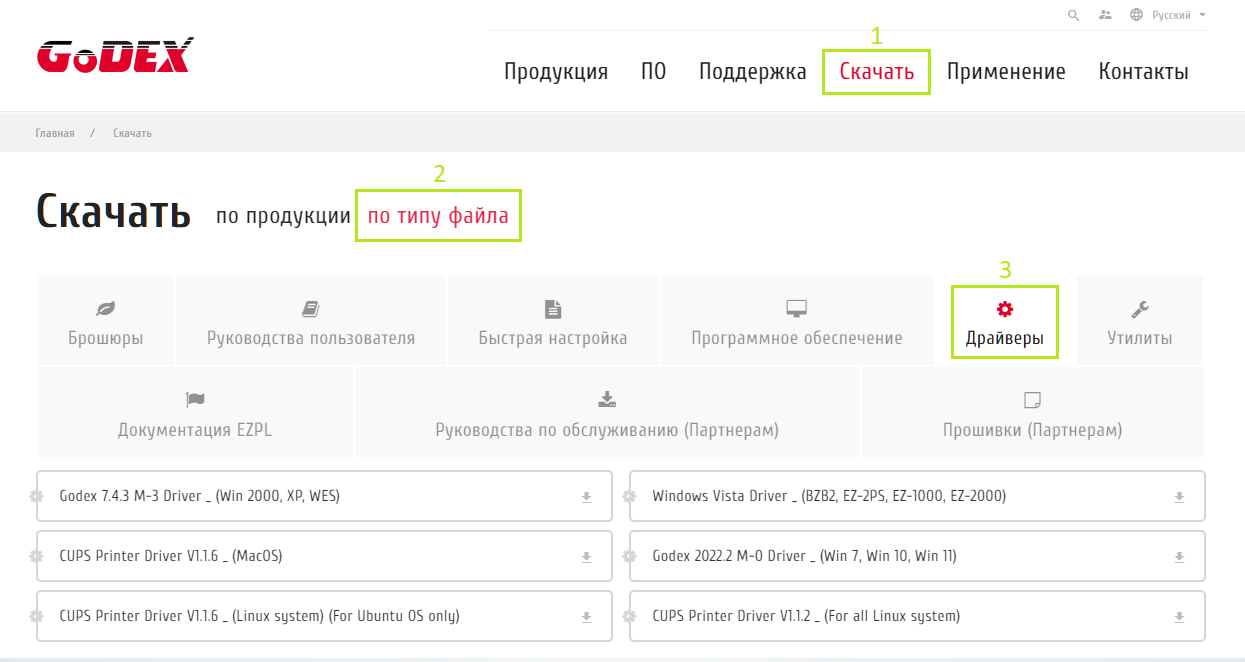


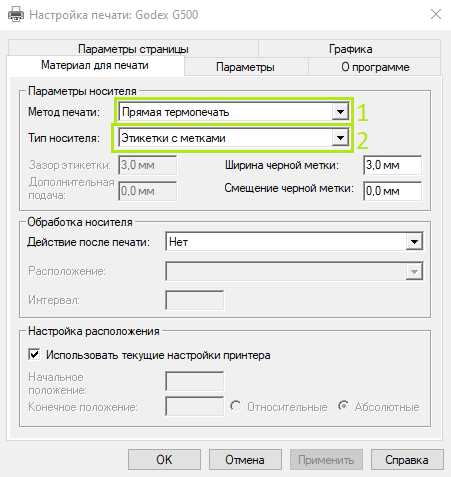


Настройка принтера осуществляется в панели администратора
В нужную вам кассу добавьте два принтера, первый:
Второй:
Вам также потребуется настроить шаблон билета для его автоматической печати при продаже билета из Лайм.Кассы. Шаблон содержит инструкции на языке ZPL, примеры можно найти в этой статье.
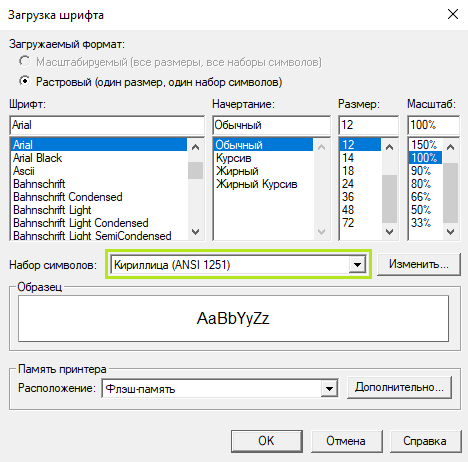
Важно! Cтроки, содержащие инструкции ^A (выбор шрифта) необходимо составлять в виде ^A@B,N,N,E:A, где E:A — указатель на загруженный ранее шрифт с идентификатором А. Этот идентификатор можно поменять в шрифтах принтера, а также загрузить дополнительные при необходимости.
Для того чтобы вращать текст в строчке ^A@B,N,N,E:A (Вам необходимо вставить в зависимости от ориентации, либо "R", либо "B".
Готовый шаблон билета необходимо положить в папку C:ProgramDataLime-SoftJade.Cashdesk.
После этого можно запустить Лайм.Касса и проверить работу принтера.
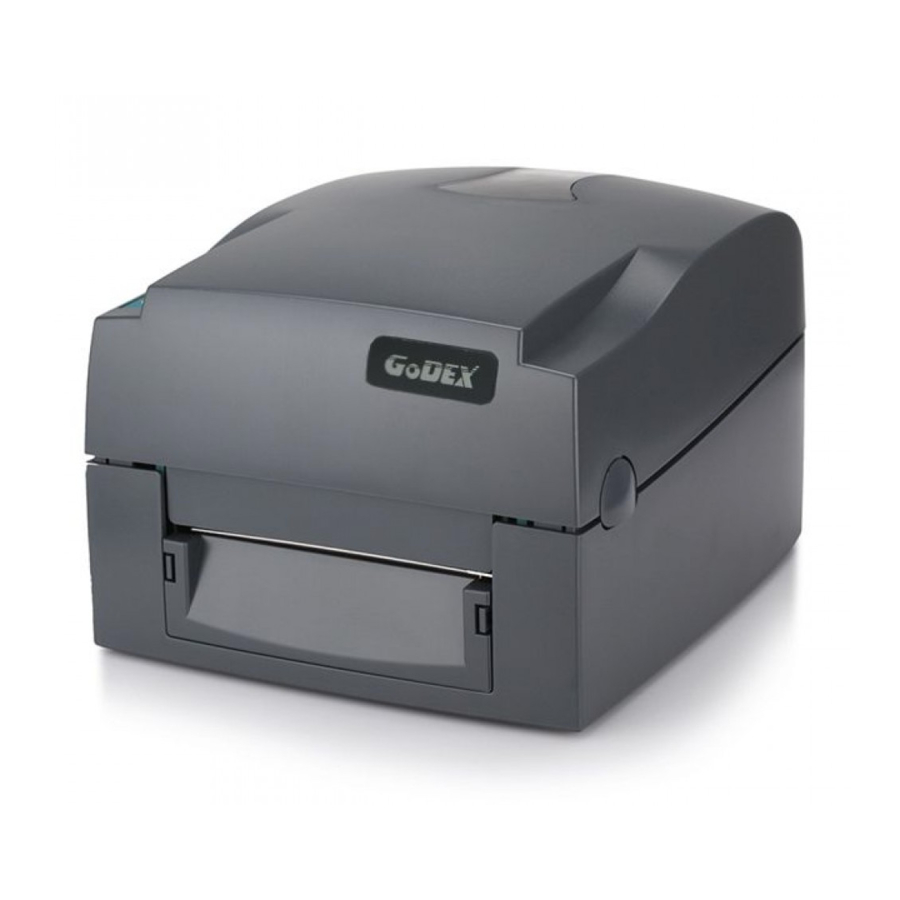
Инструкции Godex G500/G530
Подойдут для:
Инструкции
по принтеру штрихкода Godex G500
(pdf , 1.64 МБ)
Скачать
пользователя Godex G500
(pdf , 3.6 МБ)
Скачать
установки драйвера, процесса создания макета этикетки и вывод тестовой печати из MSWord для принтеров серии EZ
(pdf , 1.08 МБ)
Скачать
по изготовлению негативного (инверсного) штрих кода в программе GoLabel-4
(pdf , 409.16 КБ)
Скачать

Поможем с настройкой оборудования
Не получается настроить? Свяжитесь со специалистами! Наши консультанты перезвонят в течение 20 минут и ответят на все интересующие Вас вопросы. Это бесплатно.
Ваша заявка принята
Наши консультанты перезвонят Вам
в течение 20 минут
Обзоры

Как выбрать принтер печати этикеток: гид и подборка моделей
17.01.2020
2564
Делимся советами, на что обратить внимание при выборе термопринтера. Рассказываем о классах по количеству этикеток за смену, отличия термо- и термотрансферной печати и про другие важные характеристики. В финале вас ждёт подборка моделей от наших ритейл-экспертов.
Преимущества сервиса Port
Авторизованный сервисный центр для 22 производителей
Услуги по монтажу, настройке, ремонту всего спектра оборудования
Аккредитованные специалисты
Доставка оборудования в сервисный центр
БОЛЬШЕ О СЕРВИСНОМ ЦЕНТРЕ
Обязательная гарантия на услуги
Наша компания является авторизованным сервисным центром, поэтому мы всегда следим за качеством своего обслуживания.Воспользовавшись нашими услугами вы получаете:
Штат специалистов, готовый ответить на вопросы
Бесплатный выезд специалиста
Актуальную документацию по обслуживанию оборудования
БОЛЬШЕ О СЕРВИСНОМ ЦЕНТРЕ
-
Contents
-
Table of Contents
-
Troubleshooting
-
Bookmarks
Quick Links
User Manual
: G500 series
Version
: Rev 1.3
Issue Date
: 2012.11.07
P/N
: 920-014011-00
USER MANUAL
G500 SERIES
Related Manuals for Godex G500
Summary of Contents for Godex G500
-
Page 1
USER MANUAL G500 SERIES User Manual : G500 series Version : Rev 1.3 Issue Date : 2012.11.07 : 920-014011-00… -
Page 2
附錄 產品規格 G500 G530 機種 列印模式 熱感式/熱轉式兩用 203 dpi (8 dot/mm) 300 dpi (12 dot/mm) 解析度 5 IPS (127 mm/s) 4 IPS (102 mm/s) 列印速度 4.25” (108 mm) 4.16” (105.7 mm) 列印寬度 Min. 0.16” (4 mm)** Min. 0.39” (10 mm) 列印長度… -
Page 3: Safety Instructions
SAFETY INSTRUCTIONS Please read the following instructions carefully. Keep the equipment away from humidity. Before you connect the equipment to the power outlet, please check the voltage of the power source. Make sure the printer is off before plugging the power connector into the power jack. …
-
Page 5: Barcode Printer
Barcode Printer Box Content Please check that all of the following items are included with your printer. Ribbon Hubs ( set of 2 ) Barcode Printer Power Cord Empty Ribbon Core AC Adapter Label Supply Hub …
-
Page 6: Getting To Know Your Printer
Barcode Printer Getting To Know Your Printer Device Overview Front View TOP COVER OPERATION PANEL FRONT COVER COVER OPEN BUTTONS Release buttons for opening the printer cover Rear View FAN-FOLD LABEL INSERT Feed slot for external label feeding ETHERNET PORT* SERIAL PORT ( RS-232 )* POWER SWITCH…
-
Page 7
Barcode Printer Open The Printer Cover LABEL SUPPLY MODULE RIBBON MODULE — LABEL SUPPLY HUB — RIBBON FEED MECHANISM — LABEL GUIDE PLATES ( SET of 2 ) — RIBBON HUB — EMPTY RIBBON CORE ADJUSTMENT SCREW ( LEFT ) Screw for adjusting the print head pressure ADJUSTMENT SCREW ( RIGHT ) Screw for adjusting the print head pressure… -
Page 8: Printer Setup
Printer Setup Open The Printer Cover Pressing The Cover Open Buttons Place the printer on a flat surface. Open the printer cover by pressing the release buttons on both sides of the printer housing and lift the cover. Pressing the button Pressing the button COVER OPEN BUTTONS Release buttons for opening the printer cover.
-
Page 9: Loading The Ribbon
Printer Setup Loading The Ribbon A New Ribbon Module Installation Place the new ribbon on the hub which forms a ribbon supply hub. Place on the hub RIBBON SUPPLY HUB RIBBON HUB NEW RIBBON Place the empty ribbon core on the hub which forms a ribbon rewind hub. Place on the hub RIBBON FEED MODULE RIBBON HUB…
-
Page 10
Printer Setup Install The Ribbon On The Printer Place the ribbon supply hub at the back of the printing mechanism. Insert into the printing mechanism Pass the ribbon supply hub under the print head. Insert the ribbon rewind hub on the ribbon feed mechanism. Close the printing mechanism, making sure that it clicks into place. -
Page 11: Loading The Label Roll
Printer Setup Loading The Label Roll A New Label Roll Module Installation Place the label stock on the label supply hub, attach the guide plates to the label stock holder. LABEL STOCK Place on the ribbon hub LABEL SUPPLY HUB LABEL GUIDE PLATES Install The Label Roll Module On The Printer …
-
Page 12
Printer Setup Release the printing mechanism and lift it. Pass the labels through the label guides up to the tear-off plate. Adjust the label guides to the label width. Through the label guides LABEL GUIDES Close the printing mechanism. Close Printer Setup… -
Page 13: Installing The Label Supply Hub
Printer Setup Installing The Label Supply Hub 1″ Cores Installing the label supply hub for 1″ cores. 1.5″ Cores Installing the label supply hub for 1.5″ cores. 3″ Cores Installing the label supply hub for 3″ cores. Printer Setup…
-
Page 14: Preparing For Tag Printing
Printer Setup Preparing For Tag Printing In tag printing, the tag hole indicates the height of a label. During adjustment, the sensor must therefore be positioned directly below the tag hole as shown in the illustration. The tag hole should be at least 3 mm in diameter to ensure correct functioning.
-
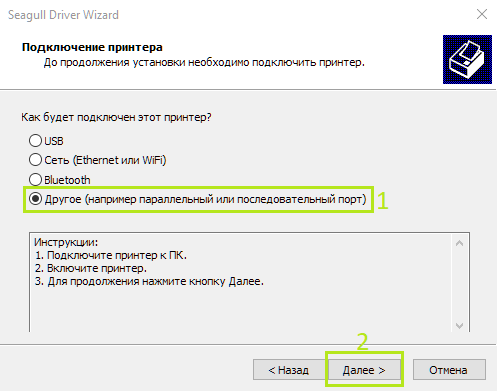
Page 15: Connecting The Printer To The Host Computer
Printer Setup Connecting The Printer To The Host Computer Please make sure that the printer is switched off. Connect the power cord to the AC adapter and connect the adapter to the printer. Connect the USB / parallel cable to the printer and host computer. …
-
Page 16: Installing The Driver
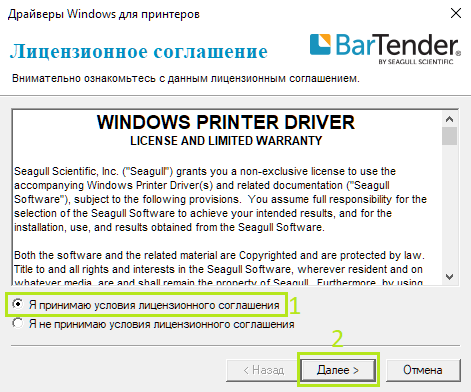
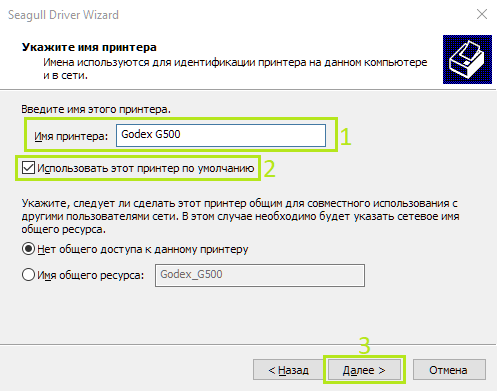
Printer Setup Installing The Driver STEP-01Insert the product CD in the CD/DVD drive of the host computer and open the «Seagull-Driver» folder on the CD. STEP-02Select the icon for the driver file and click it to start the installation. STEP-03Follow the instructions on the screen. The Driver Wizard guides you through the installation procedure. STEP-04Select «Install printer drivers».
-
Page 17
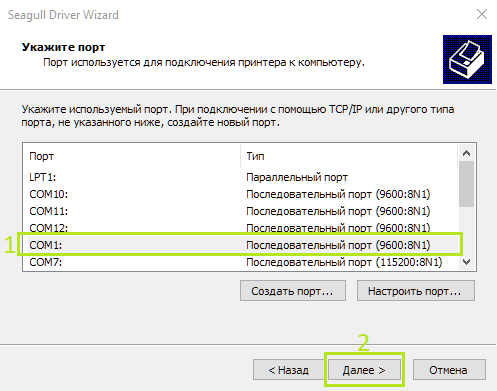
Printer Setup STEP-06Specify the port used to connect the printer to the host computer. STEP-07Enter a printer name and assign the appropriate rights. STEP-08Once the installation is complete, a summary of the printer settings is displayed. STEP-09Check whether the printer settings are correct and click «Finish» to start copying the driver files. STEP-10Wait until copying is complete, then finish the installation. -
Page 18
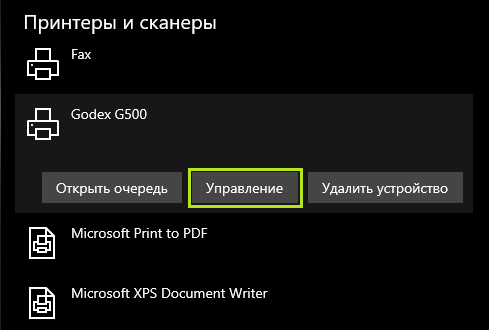
Printer Setup STEP-11Once the driver installation is complete, the new printer should appear in the «Printers and Faxes» folder. Printer Setup… -
Page 19: Operation Panel
Operation Panel LED Operation Panel FEED Button When you press the FEED button, the printer moves the label to the defined stop position. If you are using continuous labels, pressing the FEED button will move label stock until you release the button again. If you are using individual labels, pressing the FEED button will move only one label.
-
Page 20: Label Size Calibration And Self Test Page
STEP-04Once the printer has successfully measured the label stock, it will print a self-test label. The contents of a self-test printout are listed below. Model & Version G500 GX.XXX USB ID setting USB S/N: XXXXXXXX Serial port setting…
-
Page 21: Error Alerts
Operator Panel Error Alerts In the event of a problem that prevents normal functioning of the printer, you will see an error message on LED indicators and hear some beep signals. Please refer to below table for the error alerts. Light on …
-
Page 22: Netsetting For Ethernet
NetSetting for Ethernet Installing The NetSetting software The NetSetting software is used to manage the network configurations when connecting the printer via Ethernet port. It is available on product CD or can be downloaded from official website. To install the NetSetting, please follow below steps.
-
Page 23: The Interface Of Netsetting
PC. Click the magnifier icon to search the Godex printers which are connected via Ethernet port in you network environment. Once a connected Godex printer is detected, it will be listed on the start page.
-
Page 24: Ip Setting
NetSetting for Ethernet IP Setting The IP Setting tab can change the printer name, Port number, Gateway setting and the password for configuring the printer. You can also set the printer’s IP address ether by DHCP or by Static IP. You can press “Set”…
-
Page 25: Alert Path Setting
NetSetting for Ethernet Alert Path Setting NetSetting will send the alert messages to designated mail account when the error happened on printer. The alert messages are sent by SMTP (Simple Mail Transfer Protocol) or SNMP (Simple Network Management Protocol). You can set or change the configurations of SMTP and SNMP on this “Alert Path Setting” tab. You can press “Set”…
-
Page 26
NetSetting for Ethernet Alert Message Setting For the alert message notification function, you can decide which error cases need to be sent out to the operator. Moreover, the alert messages can be set to be sent by SMTP, SNMP or both. You can press “Set”… -
Page 27: Printer Configuration
NetSetting for Ethernet Printer Configuration Set or change the configurations of connected printer. Most of key settings for the printer operation can be done by this setting page. You can press “Set” button to apply the settings and “ReGet” button to refresh the setting values. NetSetting for Ethernet…
-
Page 28: User Command
NetSetting for Ethernet User Command The “User Command” tab provides a communication interface for operator to control the printer. Input printer commands in «Input Command» window and press “Send Command” button, the commands will be sent to the printer. For some commands that will return response message, the message will be displayed in «Output Message» window. You can press “Send Command”…
-
Page 29: Firmware Download
NetSetting for Ethernet Firmware Download On “Firmware Download” tab, the current version of printer firmware will be showed on the screen. If you need to update the printer firmware, just specify the file location of firmware file and press “Start Download Firmware” button. The printer firmware then can be updated remotely.
-
Page 30
Accessories Preparation Steps Before installing the optional modules, please make some preparations as follows. STEP-01 Turn Off The Printer : Remember to switch off the printer before installing any module. STEP-02 Open The Printer Cover : Open the printer cover by pressing the release buttons on both sides of the printer housing. Please see the Section 2-1 for further information about Open The Printer Cover. -
Page 31: Installing The Label Dispenser
Accessories Installing The Label Dispenser The Overview Of The Label Dispenser CONNECT CABLE OF LABEL DISPENSER PAPER SENSOR PAPER FEED ROLLER LABEL DISPENSER MODULE SCREWS A label liner thickness of 0.006 mm ± 10% and a weight of 65 g/m ±…
-
Page 32
Accessories Installing The Label Dispenser Connect the dispenser cable to the lower jack as shown in the illustration on the right. LOWER JACK CONNECT CABLE OF LABEL DISPENSER MODULE The printer must be switched off, or the motherboard may be damaged! … -
Page 33
Accessories Secure the dispenser using the screws provided for this purpose. Locking Locking SCREWS Install The Label Roll Module On The Printer Pass the paper through the guides. Through the label guides LABEL GUIDES NOTICE Labels should be at least 25 mm high. … -
Page 34
Accessories Remove the first labels from the liner, so you can pull the liner through the guides. THE PAPER FEED ROLLER OF PRINTER Tear a label THE FIRST LABEL Pass the label stock through the printer as shown in the illustration on the right. LABEL LINER LABEL STOCK… -
Page 35
Accessories Close the label dispenser and the print mechanism. The installation is completed now. Close Press the FEED button to feed the label. The label will be peeled from the liner while it passes through the label dispenser. There is a paper sensor on the Label Dispenser module. It will stop the printing if it is covered … -
Page 36: Installing The Cutter
Accessories Installing The Cutter The Overview Of The Cutter CONNECT CABLE OF CUTTER MODULE CUTTER MODULE SCREWS Remember to switch off the printer before installing the cutter. Do not use to cut adhesive labels! Glue residue will be left on the cutter blade and impair its …
-
Page 37
Accessories CONNECT CABLE OF CUTTER MODULE UPPER JACK The printer must be switched off, or the motherboard may be damaged! NOTICE There are 2 jacks : the lower jack is for the dispenser, the upper jack for the cutter. … -
Page 38
Accessories Secure the cutter cover using the screws provided for this purpose. Locking Locking SCREWS Place the cutter cover Pass the labels through the guides. Close the printing mechanism. Through the label guides Through the cutter module LABEL GUIDES Accessories… -
Page 39
Accessories To finish, press the FEED button to set the label position. Press the FEED key NOTICE We advise against using inside wound label stock. Accessories… -
Page 40: Maintenance And Adjustment
Maintenance And Adjustment Cleaning The Print Head Dirt on the print head or ribbon, or glue residue from the label stock may result in inadequate print quality. The printer cover must therefore always be closed during printing. Keeping dirt and dust away from the paper or labels ensures a good print quality and a longer lifespan of the print head.
-
Page 41: Adjusting The Print Line
Maintenance And Adjustment Adjusting The Print Line When the print line is incorrectly set, the print quality on one side of the medium may suffer. In such a case, the print line must be adjusted so it is positioned parallel to the paper feed roller. Adjustment Methods …
-
Page 42: Troubleshooting
Maintenance And Adjustment Troubleshooting Problem Solution The printer is switched on but the display does Check the power supply. not light up. Check the software settings (driver settings) or command codes. Look for the error alert in the table in Section 3-3 Error alerts . One or both LEDs light up red and printing is …
-
Page 43: Product Specifications
APPENDIX Product Specifications Model G500 G530 Print Method Thermal Transfer / Direct Thermal Resolution 203 dpi (8 dot/mm) 300 dpi (12 dot/mm) Print Speed 5 IPS (127 mm/s) 4 IPS (102 mm/s) Print Width 4.25” (108 mm) 4.16” (105.7 mm) Min.
-
Page 44
APPENDIX Product Specifications Model G500 G530 6, 8, 10, 12, 14, 18, 24, 30, 16X26 and OCR A & B Bitmap fonts Bitmap fonts 90°, 180°, 270° rotatable; single characters 90°, 180°, 270° rotatable Resident Fonts Bitmap fonts 8 times expandable in horizontal and vertical directions Scalable fonts 90°, 180°, 270°… -
Page 45
APPENDIX Product Specifications Model G500 G530 Code page 437, 850, 851, 852, 855, 857, 860, 861, 862, 863, 865, 866, 869, 737 Code Pages Windows 1250, 1251, 1252, 1253, 1254, 1255, 1257 Unicode (UTF8, UTF16) Resident graphic file types are BMP and PCX, other graphic formats are… -
Page 46
Minimum print height and maximum print speed specification compliance can be dependent on non-standard material variables such as label type, thickness, spacing, liner construction, etc. Godex is pleased to test non-standard materials for minimum print height and maximum print speed capability. -
Page 47: Pinout Description
Minimum print height and maximum print speed specification compliance can be dependent on non-standard APPENDIX material variables such as label type, thickness, spacing, liner construction, etc. Godex is pleased to test non-standard materials for minimum print height and maximum print speed capability.
This manual is also suitable for:
G530
G500/530-U — поставляется с интерфейсом: USB2.0
G500/530-UP — поставляется с интерфейсами: USB2.0 + LPT (Parallel)
G500/530-US — поставляется с интерфейсами: USB2.0 + RS232 (Serial)
G500/530-UES — поставляется с интерфейсами: USB2.0 + RS232 (Serial) + Ethernet (RJ45)
Дистанционное управление и настройка принт-сервера осуществляется с помощью программы GoLabel, которая инсталлируется на Вашем ПК.
Включите принтер , не отпуская кнопку подачи. Когда СВЕТОДИОДНЫЙ ИНДИКАТОР ГОТОВНОСТИ начнет мигать красным, а СВЕТОДИОДНЫЙ ИНДИКАТОР СОСТОЯНИЯ загорится оранжевым, отпустите кнопку подачи. Принтер измерит материал для этикеток и сохранит высоту этикетки.
Через программу NetSetting или любым другим способом выясняем какой ip у нашего принтера в сети.
Потом переходим на webpage.
И попадаем в настройки нашего принтера Godex .
Технические характеристики
| Модельный ряд | G500-U (только USB) — термо/термотрансферный принтер, 203dpi | G500-UES (USB + Serial port + Ethernet) — термо/термотрансферный принтер, 203dpi | G530-UES (USB + Serial port + Ethernet) — термо/термотрансферный принтер, 300dpi |
|---|---|---|---|
| Характеристики принтеров этикеток | |||
| Метод печати | Термо или Термо-трансферный | ||
| Разрешение печати | 203 dpi (8 dot/mm) | 203 dpi (8 dot/mm) | 300 dpi (12 dot/mm) |
| Скорость печати | 5 IPS (12.7 см/сек) | 5 IPS (12.7 см/сек) | 4 IPS (10.16 см/сек) |
| CPU | ARM7 (166 мГц) | ||
| Встроенная память | 8Мб Flash, 16Мб SDRAM | ||
| Интерфейсы | USB2.0, RS232, RJ45 (LAN принт-сервер 10/100Mbps) | ||
| Индикация, управление | 2 двухцветных светодиода:Ready, Status; 1 функциональная клавиша FEED (промотка бумаги) | ||
| Сенсор края этикетки | Перемещаемый сенсор на отражение; 2 излучающих светодиода, зафиксированных по центру | ||
| Материал для печати | Бумажные, тканевые , полимерные носители, картон и другие носители в рулонах (Этикет-лента с разрывом, Этикетки с чёрной меткой, Этикетки с отверстием, Непрерывные лента) | ||
| Длина печати | Мин 4мм (0.16”) ~ Макс. 1727мм (68”) | Мин 4мм (0.16”) ~ Макс. 1727мм (68”) | Мин 4мм (0.16”) ~ Макс. 762мм (30”) |
| Максимальная ширина печати | 108 мм (4.25”) | 108 мм (4.25”) | 105.7 мм (4.16”) |
| Термотрансферная лента (максимальная длина) | 300 метров (981″) | ||
| Язык программирования | EZPL, GEPL, EZPL встроенные во флеш память принтера, с функцией автоматического переключения | ||
| Программное обеспечение | Бесплатный редактор для создания и редактирования этикеток Qlabel-IV (русифицирован), Утилита Godex Net Setting для настройки сетевых параметров и управления настройками принтера, DLL библиотеки и драйверы для различных 32/64 битных версий Windows (2000/Server2003&2008/XP/Vista/Win7), Linux драйвера для Ubuntu v9.04/9.10, Компонента и DLL для 1С 7.7 для печати этикеток на принтерах EZPL. Все ПО входит в комплект поставки. | ||
| Поддерживаемые штрих-коды | 1D штрих коды: Code39, Code93, Code128 (группы A,B,C), UCC/EAN-128 K-Mart, UCC/EAN128, UPC A/E (c дополнениями 2 из 5), I 2 из 5, I 2 из 5 с Shipping Bearer Bars, EAN 8/13 (с дополн. 2 из 5), Codabar, Post NET, EAN128, DUN14, HIBC, MSI, Произвольный вес, Telepen, Pressey, ITF14, FIM, China Postal Code, RPS128, GS1 DataBar. 2D штрих коды: PDF417, Datamatrix code, MaxiCode, QR code, Micro PDF417, MicroQR code, Aztec code. | ||
| Обработка изображений | Загрузка в принтер графических файлов типа BMP, PCX. Поддерживается программная загрузка файлов типа: ICO, WMF, JPG, JPEG, EMF | ||
| Встроенные шрифты | Растровые шрифты: 6, 8, 10, 12, 14, 18, 24, 30, 16×26, OCR A&B с возможностью поворота на 90°, 180°, 270°, с 8-микратно изменяемыми по горизонтали и вертикали размерами. Масштабируемые штрифты с возможностью поворота на 90°, 180°, 270°. | ||
| Загружаемые шрифты | Возможна загрузка любых растровых или масштабируемых шрифтов, в том числе и русских Windows Bit-map шрифтов (8 углов ориентации) и русских True Type шрифтов ver. 2.XX (4 угла ориентации). Шрифты можно поворачивать на 90°, 180°, 270°. | ||
| Комплектация | Блок питания, шнур блока питания, USB интерфейсный кабель, кабель RS232 (для варианта G5x0/US,UES), кабель LPT (для варианта G5x0/UP), демо-рулон красящей ленты, ось для красящей ленты (для втулки диаметром 1”), пустая втулка для красящей ленты, демо-рулон этикет ленты, втулка для рулона этикеток, втулка держателя рулона с этикетками, 2 ограничительные пластины для рулона с этикетками, инструкция по быстрому старту, CD с инструкцией на русском языке и ПО | ||
| RTC (встроенные часы реального времени) | Версия с RTC по специальному предзаказу. | ||
| Возможность расширения памяти | Есть возможность расширения памяти | ||
| Возможные опции и модули расширения | Отделитель этикеток, Резак (роторный), Внешний держатель больших рулонов до 250мм (10″) | ||
| Поддерживаевые кодовые страницы символов | CODEPAGE: 437, 850, 851, 852, 855, 857, 860, 861, 862, 863,865, 866, 869, 737. WINDOWS: 1250,1251,1252,1253,1254,1255, 1257. Unicode:(UTF8,UTF16) | ||
| Термотрансферная лента (диаметр втулки) | 25.4 мм (1″) | ||
| Термотрансферная лента (макс.диаметр рулона) | 68 мм (2.67″) | ||
| Термотрансферная лента (применяемые типы) | Wax, Wax/Resin, Resin | ||
| Термотрансферная лента (ширина) | Мин.30 мм (1.18″) ~ Макс.110 мм (4.33”) | ||
| Этикет лента (диаметр втулки) | 25.4 мм, 38.1 мм, 76.2 мм (1”, 1.5”, 3”) | ||
| Этикет лента (макс.диаметр рулона) | 127 мм (5″) | ||
| Этикет лента (толщина) | Мин.0.06 мм (0.003”) ~ Макс.0.25 мм (0.01”) | ||
| Этикет лента (ширина) | 25.4мм (1″) ~ 118мм (4.64″) | ||
| Условия эксплуатации и стандарты | |||
| Условия эксплуатации | +5°C ~ 40°C | ||
| Влажность при хранении | 10-90% (без конденсата) | ||
| Условия хранения | -20°C ~ 50°C | ||
| Влажность при эксплуатации | 30-85% (без конденсата) | ||
| Стандарты безопасности | CE (EMC), FCC Class A, CB, cUL, CCC, ГОСТ-Р | ||
| Срок гарантии | 3 года | ||
| Питание | |||
| Харакеристики блока питания (зарядного устройства) | Автоопределение напряжения 100/240VAC, 50/60 Hz, 24V/2.5A | ||
| Физические | |||
| Вес | 2.73 Кг. (без аксессуров) | ||
| Габариты мм. | Длина: 285мм; Высота: 171мм; Ширина: 226мм | ||
| Корпус | Ударопрочный пластик | ||
| Цвет | Светло-чёрный |