
- Manuals
- Brands
- Flashforge Manuals
- 3D Printers
- Creator3
- User manual
-
Contents
-
Table of Contents
-
Bookmarks
Quick Links
FlashForge Corporation
FlashForge Creator3 3D Printer
User Guide
! NOTE Please read FlashForge Creator3 3D Printer User Guide carefully before use. Please
well keep this User Guide for future reference.
Creator3 User Guide | www.flashforge.com
0086- 0579-82273989
Related Manuals for Flashforge Creator3
Summary of Contents for Flashforge Creator3
-
Page 1
FlashForge Corporation FlashForge Creator3 3D Printer User Guide ! NOTE Please read FlashForge Creator3 3D Printer User Guide carefully before use. Please well keep this User Guide for future reference. Creator3 User Guide | www.flashforge.com 0086- 0579-82273989… -
Page 2: Table Of Contents
Content……………………….2 Preface……………………….3 Introduction……………………..4 Notice……………………….5 Chapter 1: 3D Printing Technology………………… 9 1.1 Process……………………… 9 Chapter 2: About Creator3………………….11 2.1 About Your Creator3………………..11 Chapter 3:Unpacking………………….35 Chapter 4: Hardware Assembly………………..40 4.1 Filament Installation………………..40 4.2 Printer Start-up………………….41 4.3 Loading Filament………………….41 4.4 Unloading Filament…………………
-
Page 3: Preface
FlashForge Creator3. Even if you are familiar with earlier FlashForge machines or 3D printing technology, we still recommend that please read this guide, as there is lots of important information about the Creator3 for you to get a better 3D experience.
-
Page 4: Introduction
·The User Guide is written based on Windows 7 OS. ·The version of the FlashPrint is latest. The FlashForge Creator3 3D Printer User Guide contains the information needed for you to set up and use this device. This User Guide including the following parts: Preface, Introduction and After-sale service.
-
Page 5: Notice
① Always use the Creator3 with a properly grounded outlet. Do not refit Creator3 plug. ② Do not use Creator3 in damp or wet locations. Do not expose Creator3 to burning sun. ③ In case of device damage, please use the power supply provided by FlashForge.
-
Page 6
The device must be placed in a dry and ventilated environment. The distances of the left, right and back side space should be at least 20cm, and the distance of the front side space should be at least 35cm. Creator3 User Guide | www.flashforge.com 400-699-1063… -
Page 7
· Filament Requirements Do not abuse the filament. Please make sure you use the FlashForge filament or the filament from the brands accepted by FlashForge. · Filament Storage All polymers degrade with time. Do not unpack until filament is needed. Filament should be stored at clean and dry conditions. -
Page 8
Connect the equipment into an outlet on a circuit different from that to which the receiver is connected. Consult the dealer or an experienced radio/TV technician for help. This document contains proprietary information protected by copyright. Copyright © 2018 FlashForge Corp. All Rights Reserved Creator3 User Guide | www.flashforge.com 400-699-1063… -
Page 9: Chapter 1: 3D Printing Technology
Fused Filament Fabrication (FFF) is the most common method of 3D printing. It is also the method that the Creator3 uses. It works by melting plastic material called filament onto a print surface in high temperature. The filament solidifies after it cools down, which happens instantaneously after it is extruded from the nozzle.
-
Page 10
Creator3 via USB stick, Wi-Fi or Ethernet cable. 1.1.3 Build the 3D Model: Once the output file has been transferred to your Creator3, it will start to turn the 3D model into a physical object by laying down layers of filament. -
Page 11: Chapter 2: About Creator3
Chapter 2: About Creator3 2.1 About Your Creator3 2.1.1 Views Front Left Right Creator3 User Guide | www.flashforge.com 400-699-1063…
-
Page 12
15. Right Spool Box Handle 4. Right Extruder 10. Right Filament Intake 16. Ethernet Cable Input 5. Left Extruder 11. Left Filament Intake 17. Power Input 6. Nozzle Brush 12. Left Spool Box Cover 18. Power Switch Creator3 User Guide | www.flashforge.com 400-699-1063… -
Page 13
2.1.2 Terms The surface on which the Creator3 builds an object. Build Plate The blue tape that covers Creator3’s build plate so that Build Tape the object can stick to the build plate well. The three dimensional amount of space that an object Build Volume will use once it is completed. -
Page 14
Nozzle Diameter 0.4mm Print Speed 10~200 mm/s Software FlashPrint Input:3MF/ STL/OBJ/FPP/BMP/PNG/JPG/JPEG Support Formats Output:GX/G Win xp/Vista/7/8/10、Mac OS、Linux Device Size 627*485*615mm Net Weight 40Kg AC Input Input: 100V-240VAC, 47-63Hz Power: 500W Connectivity USB Stick, WiFi, Ethernet, Creator3 User Guide | www.flashforge.com 400-699-1063… -
Page 15
Back Print interface Abort: To abort the print job. Pause/Resume: To suspend or resume the print job. Left/Right Extruder temperature: Can be changed during printing. Platform temperature: Can be changed during printing. Creator3 User Guide | www.flashforge.com 400-699-1063… -
Page 16
Z axis position To set the printing speed during printing: Tap [Yes] to save the setting while tap [No] to cancel the setting. Creator3 User Guide | www.flashforge.com 400-699-1063… -
Page 17
Tap the [Start] button to heat up to the target temperature. The default temperature is Extruder 220℃ and Platform 100℃. Tap the temperature display bar to set the temperature. Tools Tap [Tools] to enter the tools interface . Creator3 User Guide | www.flashforge.com 400-699-1063… -
Page 18
6.Status: To check the real-time status of the printer. 7.About: Information about the printer. 8.Back Filament 1.Load; 2.Unload; 3.Load-Left Extruder; 4.Load-Right Extruder; 5.Unload-Left Extruder; 6.Unload-Right Extruder; 7.Begin:Tap [Begin] to start load/unload filament on Left/Right extruder. 8.Back. Creator3 User Guide | www.flashforge.com 400-699-1063… -
Page 19
Cancel:Tap [Cancel] button to abort preheat job. f. Back. g. Done: Operate according instruction on the touch screen,tap [Done] to finish filament load. h. Done: Operate according instruction on the touch screen,tap [Done] to finish filament unload. Creator3 User Guide | www.flashforge.com 400-699-1063… -
Page 20
Repeat the steps 5 to 8 to do the next two until you see [Finish]. points leveling Tap [Finish] to complete leveling. Note: By tapping [Next Step],you can skip the point’s leveling, this will affect leveling result or printing effect. Creator3 User Guide | www.flashforge.com 400-699-1063… -
Page 21
Creator3 User Guide | www.flashforge.com 400-699-1063… -
Page 22
X+: The extruder moves to the zero points, that is, to the right direction. X-: The extruder moves to the direction opposite to the X+. Z+: The build plate descends. Z-: The build plate elevates. Back Creator3 User Guide | www.flashforge.com 400-699-1063… -
Page 23
9. Calibration: To adjust the initial distance between the extruder and the build plate. 10. Light Bar Control: To turn on/off the light bar control. 11. Factory Reset: Return to factory setting. 12. Update: To update the firmware version. Creator3 User Guide | www.flashforge.com 400-699-1063… -
Page 24
Tap to choose the display language. Creator3 User Guide | www.flashforge.com 400-699-1063… -
Page 25
WiFi Turn on the WiFi. Choose a wifi signal and input the passwords, then printer can be connected to internet. Back Creator3 User Guide | www.flashforge.com 400-699-1063… -
Page 26
Setup Wlan hotspot: To set the SSID and password. SSID: The name of hotspot. Password: The password of hotspot. Save: To save the setting. Back Door Opened Pause To turn on/off the Door Opened Pause. Creator3 User Guide | www.flashforge.com 400-699-1063… -
Page 27
Filament abnormal status won’t be detected when filament is used up or suspended. [Filament Check] function should be used with filament in the filament cartridge.This function is invalid if using filament out of the cartridge. Creator3 User Guide | www.flashforge.com 400-699-1063… -
Page 28
Z Calibration 1. Z axis calibration 2. Tap to cancel Z axis calibration 3. Z axis calibration completed. Creator3 User Guide | www.flashforge.com 400-699-1063… -
Page 29
X axis in the middle of the platform at coordinates(0,-100). 4. Choose whether the two lines coincide: Tap [next] to choose whether the two lines coincide: Yes/No. Creator3 User Guide | www.flashforge.com 400-699-1063… -
Page 30
2.Extruder begins to heat up. 3.Extruder begins to do the calibration: Right extruder prints a base line perpendicular to Y axis in the middle of the platform at coordinates(100,0), then left extruder prints a base line Creator3 User Guide | www.flashforge.com 400-699-1063… -
Page 31
Tap [Skip] button will skip the prompts and directly adjust deviation value. Tap [Recalibration] button to do the calibration. After recalibration, if the two lines coincide, click the [OK] button. Y axis calibration completed. Creator3 User Guide | www.flashforge.com 400-699-1063… -
Page 32
Factory Reset Tap to return to factory setting. Update Tap to update the firmware version. Before use this function, you need to connect the printer to internet with WIFI or Ethernet cable first. Creator3 User Guide | www.flashforge.com 400-699-1063… -
Page 33
About It displays the basic information about the device. Note: Please provide the printer serial number to aftersales when your printer need maintenance. Creator3 User Guide | www.flashforge.com 400-699-1063… -
Page 34
Accessories Filament Power Cable Quick Start Guide USB stick Allen Wrench Screwdriver Solid Glue Stamping Wrench Unclogging Pin Tool After-sales service card Grease Teflon Tube Creator3 User Guide | www.flashforge.com 400-699-1063… -
Page 35: Chapter 3:Unpacking
Chapter 3:Unpacking This chapter will present you the whole unpacking procedure of Creator3 3D printer. (Note: Make sure you read the whole unpacking guide) (3-1) Place the packaging box on a clean work surface (Mind the upwards direction) Open the box, take out the protective foam on the top.
-
Page 36
(3-3)T , remove (3-4)Remove the box and foam on the bottom the wrapping plastic bag. Now, exterior package of Creator 3 have all been removed. (3-5) Creator3 User Guide | www.flashforge.com 400-699-1063… -
Page 37
USB stick*1, nozzle brush*2). (3-7)Remove the blue fastening tape on the front door and open front door, take out the front foam from the printer, on the front foam sheet, you can see: filament*2, Creator3 User Guide | www.flashforge.com 400-699-1063… -
Page 38
(3-9)Take out power cable and plug the power cable into the input on the back and turn on the power switch. Press the touch screen button and tap [Tools]. Creator3 User Guide | www.flashforge.com 400-699-1063… -
Page 39
Tap [Manual], then Tap [Z-] to partially elevate the build plate. (3-10) 3-11 ( 3-11 ) Remove the bottom foam pieces under the platform. Congratulations! You have unpacked your Creator3. Next, let’s move on to hardware assembly of Creator3. Creator3 User Guide | www.flashforge.com 400-699-1063… -
Page 40: Chapter 4: Hardware Assembly
Your Creator3 has been installed before leaving factory, you can start up the Creator3 for printing after mounting the filament spool and completing leveling. 4.1 Filament Installation (4-1) The filament cartridge is on both sides of Creator3. Lift the cartridge out of the Creator3. Filament Detecting Equipment in the black.
-
Page 41: Printer Start-Up
4.2 Printer Start-up (4-3) Insert the power supply into the power input on the back of the Creator3 and plug the power cord into an electrical outlet. 4.3 Loading Filament For stable filament loading and proper device protection, you need to install the filament guide tube properly.
-
Page 42
(4-6) Insert the filament from the filament guide tube into the filament intake. Next, we will load the FlashForge filament. (Note: Please lower the build plate to increase the distance between the nozzle and build plate to 50mm at least for avoiding nozzle jam.) -
Page 43: Unloading Filament
(4-10) Insert the filament into the extruder at an upright angle. Then the filament will be drawn through the extruder. Do not tap [Cancel] until the filament load the extruder steadily. 4.4 Unloading Filament 4-11 Creator3 User Guide | www.flashforge.com 400-699-1063…
-
Page 44
Note: Do not pull out the filament with force as it will damage the gears. If the melted filament has cooled down in the extruder, please repeat the steps above. Creator3 User Guide | www.flashforge.com 400-699-1063… -
Page 45: Chapter 5: Build Plate Leveling
(5-2) Tap to choose extruder adjust level: Use Left or Right extruder to do the leveling. (5-3) Wait while the extruder and platform finish initial movements, Extruder move to the first point to do the leveling. Wait for the extruder verifying distance between nozzle and plate. Creator3 User Guide | www.flashforge.com 400-699-1063…
-
Page 46
(5-6) Repeat the above steps to do the next two points leveling until you see [Finish]. Tap [Finish] to complete leveling. Note: You can skip the point’s leveling by tapping [Next Step] if you think levling is already OK, this may affect leveling result or printing effect. Creator3 User Guide | www.flashforge.com 400-699-1063… -
Page 47: Chapter 6: About Software
Chapter 6: About Software This chapter talks about the basic function of FlashPrint. For more information about advanced function, you can browse our website www.FlashForge.com. 6.1 Software Installation 6.1.1 Software Acquisition Method 1: To get the installation package from the USB stick in the toolkit.
-
Page 48
When you start FlashPrint, a dialog box will pop up. Just select FlashForge Creator3 in the machine type list and click [OK]. You can also change the machine type via clicking [Print]—[Machine type]. See graphic 6-2: 6.2.2 Software Introduction Creator3 User Guide | www.flashforge.com… -
Page 49
Load files. Enter the support edit mode Print it directly with your Creator3 or export to your USB Stick View FlashPrint home screen from one of six viewing angles Move model around on XY-plane; shift+click to move along Z axis… -
Page 50
Bottom thickness: For tube, canister and lamp to set up bottom thickness Top diameter: For tube, canister lamp and seal to set up the top diameter Bottom diameter: For tube, canister, lamp and seal to set up the bottom diameter Creator3 User Guide | www.flashforge.com 400-699-1063… -
Page 51
Plane (6-5) Tube(6-6) Canister (6-7) Creator3 User Guide | www.flashforge.com 400-699-1063… -
Page 52
Change model views by moving, rotating, scaling. ● Drag Click the [View] icon and then you can move the object by the following three methods: Method 1: Hold down the left mouse button and drag. Creator3 User Guide | www.flashforge.com 400-699-1063… -
Page 53
[Reset]. ④Show Model Outline Click [View]—[Show Model Outline], it will highlight the yellow border of the object Creator3 User Guide | www.flashforge.com 400-699-1063… -
Page 54
In this way, you could make the model rotate on X/Y/Z axis. Method 2: Click the [Rotate] icon on the left, and then enter into rotating angel values in X/Y/Z axes positioning. Click [Reset] to reset rotating angel values. Creator3 User Guide | www.flashforge.com 400-699-1063… -
Page 55
6.2.8 [Cut] Left-click on the model to select it and double-click on the icon to set the cut plane. The direction and position are available for setting. ①Draw with Mouse ②X Plane Creator3 User Guide | www.flashforge.com 400-699-1063… -
Page 56
③Y Plane ④Z Plane 6.2.9 Extruder Choose to use Left/Right extruder to print the model, first tap the model twice and tap extruder button in FlashPrint twice, then choose Left/Right extruder to print the model. Creator3 User Guide | www.flashforge.com 400-699-1063… -
Page 57
Creator3 can print two identical models simultaneously: Tap and choose the model, then tap [Use Dual Extruder(Duplicate)] to auto duplicate model to two same models, the two models are aligned in the same direction and extruders are moving in the same direction; Tap [Use Dual Extruder(Mirror)] to auto mirror duplicate the model to two models, the two models are aligned in the opposite direction and extruders are moving along the X axis, doing mirror movements. -
Page 58
Creator3 can print a model with two extruders cooperating with each other, tap to choose Left/Right extruder when slicing. NOTE: Before using dual extruder duplicate or mirror printing, Creator3 must do Z axis calibration first; Before using two extruders cooperate to print a model, Creator3 must do Z axis, X axis and Y axis calibration first. -
Page 59
(if support surface doesn’t need support or the support column angle is too large, will Creator3 User Guide | www.flashforge.com 400-699-1063… -
Page 60
6.2.11 Print 6-12 ①Preview: Choose to enter preview interface or not ②Print when slice done: Print or not when slice done Creator3 User Guide | www.flashforge.com 400-699-1063… -
Page 61
● Shells: Contains the outside shell value, capping layer value (under vase pattern, top solid layer setting is invalid.) a. Perimeter Shells: Maximum is 10. b.Top Solid Layer: Maximum is 30, minimum is 1. Bottom Solid Layer: Maximum is 30, minimum is 1. Creator3 User Guide | www.flashforge.com 400-699-1063… -
Page 62
Pause At Heights: Allows users to pre-set a height in which the print will suspend automatically. The function usually applied when you want to change the Creator3 User Guide | www.flashforge.com 400-699-1063… -
Page 63
Method 1: [File]—[Save Project] Click in the menu bar to save the file as a project file with the “.fpp” suffix, all models in the scene (include support) are independent. After Creator3 User Guide | www.flashforge.com 400-699-1063… -
Page 64
● Auto layout newly-imported model: Set Yes or No. ● Preferred Extruder: Right/Left Extruder. ● Printing Window Type: Including Basic Mode and Expert Mode Creator3 User Guide | www.flashforge.com 400-699-1063… -
Page 65
Select the object and duplicate the object through the following two methods: Method 1: Click [Edit]—[Duplicate] Method 2: Press the shortcut Ctrl+D ⑥ Delete Select the object and delete the object through the following two methods: Creator3 User Guide | www.flashforge.com 400-699-1063… -
Page 66
[Edit]—[Supports] to enter supports setting interface. 6.2.14 Print Menus ① Connect Machine You can connect the Creator3 with your PC via Ethernet Cable or WiFi. Note: The machine icon on the bottom right displays the connection status: Connected Disconnected Method 1:Connect Via Ethernet Cable a. -
Page 67
Method 2:Connect Via WiFi ①Connect Creator3 with your PC under AP mode a.Turn on your Creator3 b. Tap [Tools]-[Setting]-[WLan hotspot]-[WLan hotspot ON]. c. Click on the wireless network setting in your computer, and find the wireless [Connect] signal-“Creator3”. Click to connect your computer with Creator3 via Wlan hotspot. -
Page 68
②Connect Creator3 with your PC under STA mode a. Tap [Tools]-[Setting]-[WiFi]-[WiFi ON] to turn on the WiFi of Creator3 and connect your computer and Creator3 with the same WiFi signal. [Print]-[Connect Machine] b. Click on FlashPrint. Then the following dialog box pops up. -
Page 69
③Check for Updates : Click [Help]—[Check for Update] to detect the available updates online. ④ About FlashPrint : Click [Help]—[About FlashPrint], the software information box will pop up. The contents include the current software version and copyright information. Creator3 User Guide | www.flashforge.com 400-699-1063… -
Page 70: Chapter 7: Basic Printing
FlashForge Creator3 (7-2) Click to select [Load] (7-3)Click the icon to load a .stl model file and the object will display on the build area. [Edit]—[Surface to Platform] to make your model perfectly positioned (7-4)Click Creator3 User Guide | www.flashforge.com 400-699-1063…
-
Page 71
Note: If you’ve place your model in a right place, you can skip the step above.(7-5) Click the [Print] icon on the top, you should make some setups for your print job. Creator3 User Guide | www.flashforge.com 400-699-1063… -
Page 72
Gcode file. Note: .gx files are available for preview while the .g files are not. They are displaying as follows: g. Files gx. Files Next, we are going to print the model. Creator3 User Guide | www.flashforge.com 400-699-1063… -
Page 73: Print Methods
7.2 Print Methods After generating the Gcode file, you can transfer it to your Creator3. You can transfer the file through Ethernet Cable or WiFi or USB stick. 7.2.1 Print from Computer ( Ethernet Cable connection) ①Connect your Creator3 with your PC via a Ethernet cable.(Please refer to 6.2.13 ) ②Turn on your Creator3, level the build plate and load the filament.
-
Page 74: Print From Computer (Wifi Connection)
7.2.2 Print from Computer (WiFi connection) ① Connect your Creator3 with your PC via WiFi. Enter into the IP Address shown on your Creator3 interface and then click [Connect]. ② Turn on your Creator3, level the build plate and load the filament.
-
Page 75
● Click the [Print] button, the PC will transfer the Gcode file to the printer. 7-10 7-10 Creator3 User Guide | www.flashforge.com 400-699-1063… -
Page 76: Print From Usb Stick
7-11 7.2.3 Print from USB Stick ①Insert your USB stick with target .g or .gx file to your Creator3. . ②Turn on the Creator3. Make sure the build plate has been leveled and the filament is loaded. [Print] USB Stick ③…
-
Page 77: Chapter 8: Supports And Service
FlashForge team is on standby and ready to help you with any challenges you may have with your Creator3. If the issues or questions are not covered in this User Guide, you can seek for solutions on our official website or contact us via telephone.
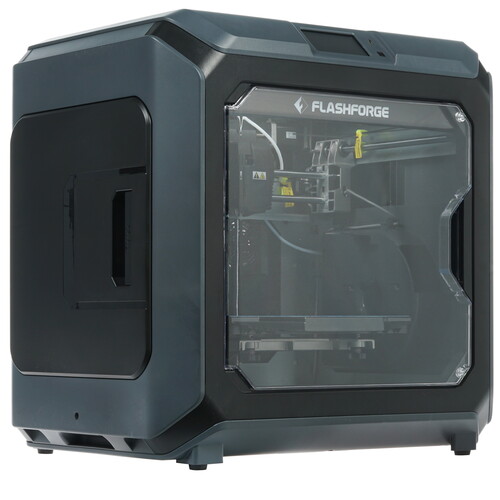
3D-принтер FLASHFORGE Creator 3 FDM

ПРЕДУПРЕЖДЕНИЕ
- Горячий! Не прикасайтесь к нагревательной форсунке и нагревательной плите во время работы.
- Движущиеся части принтера могут привести к травме. Не надевайте перчатки или другие источники запутывания во время работы.
Распаковка

- Отрежьте упаковочные завязки и оторвите стрейч-пленку.
- Поднимите внешнюю упаковочную коробку.

- Снимите верхнюю пену.
- Удалите пену вокруг принтера.

- Разорвите ленты на четырех углах принтера, снимите пузырчатую упаковку.
- Снимите ленты сверху, откройте крышку головки.

- Снимите верхние части и пенопласт.
- Удалите синюю фиксирующую ленту.

- Откройте переднюю дверцу и выньте передний поролон, который должен содержать две катушки с нитью и два контейнера для отходов.
- Снимите зажимы на зубчатом ремне оси X и оси Y.

- Подключите кабель питания к входу на задней панели и включите выключатель питания. Нажмите [Инструменты], [Вручную
- Коснитесь (Z-], чтобы частично поднять рабочую пластину.

- Удалите нижние части пенопласта.
- Итак, вы распаковали Creator 3.

Знакомство со своим создателем 3

- Сенсорный экран
- Вход для USB-накопителя
- Кнопка сенсорного экрана
- Правый экструдер
- Левый экструдер
- Пластина против просачивания
- Коробка для мусора
- Строительная плита
- Регулировочная гайка
- Крышка картриджа с нитью
- Ручка крышки картриджа
- форсунка
- Перегородка турбовентиляторного двигателя
- Сетевой вход
- Выключатель
- Потребляемая мощность
Комплект поставки

Выравнивание платформы сборки
Как сменить язык
Как пользоваться регулировочными гайками
Вращайте гайку по часовой стрелке
Поднимите рабочий стол, чтобы уменьшить расстояние между соплом и рабочим столом.
Поверните гайку против часовой стрелки
Опустите рабочий стол, чтобы увеличить расстояние между соплом и рабочим столом.
- Коснитесь [Инструменты], коснитесь [Уровень], чтобы выровнять платформу построения.

- Подождите, пока экструдер и рабочий стол переместятся, после завершения перемещения выберите, какой экструдер использовать для выравнивания рабочего стола: левый или правый.

- После подтверждения выравнивания экструдера экструдер переместится в первую точку, чтобы проверить расстояние между соплом и рабочим столом. Если проверка завершена, экструдер переместится ко второй точке для проверки расстояния.

- Если расстояние не подходит, пожалуйста, следуйте подсказкам, чтобы отрегулировать снова, пока не появится кнопка [OK]. Повторите шаги 4, чтобы выровнять вторую и третью точки. Затем нажмите [Готово], чтобы выйти.
Сборка оборудования
Установить мусорный ящик
Выньте контейнер для отходов, повесьте его на крючок рядом с рабочей пластиной. (по одному контейнеру для мусора с каждой стороны)
Установить нить

- Откройте крышку нити.

- Вставьте нить в приемное отверстие для нити.


- Примечание. Для удобного вращения нити установите нить в направлении, показанном на рисунке.

- Непрерывно вставляйте нить в приемное отверстие для нити, пока нить не пройдет через направляющую трубку для нити.,

- Нажмите на пружинный прижим, вставьте нить вертикально в левый вход для нити вниз.

- Вставьте направляющую трубку нити в отверстие для фиксации нити.

- Поместите катушку с нитью на держатель катушки, закройте крышку нити.
Загрузите нить
- Нажмите [Инструменты] и [Нить], чтобы войти в интерфейс нити.

- Поверните переключатель после соответствующего экструдера, чтобы загрузить соответствующий экструдер.
- Нажмите [Начать], экструдер начнет нагреваться.

- После нагревания нить протягивается через экструдер. Продолжайте экструзию до тех пор, пока экструдер не обеспечит стабильный поток филамента. Нажмите [Готово], вернитесь назад. Нажмите стрелку влево, чтобы вернуться на главный экран.
Внимание: Если экструдер не может разгрузиться в течение длительного времени, проверьте, вставили ли вы нить в нижнюю часть экструдера.
Калибровка
Пожалуйста, работайте под руководством службы поддержки клиентов для первой калибровки.
Коснитесь [Инструменты], коснитесь (Настройка), коснитесь [Калибровка] на странице настроек.
Калибровка Z
Выровняйте перед калибровкой по оси Z. Пожалуйста, обратитесь к странице 06 для выравнивания.
- Нажмите Калибровка по оси Z] и дождитесь калибровки по оси Z экструдера и рабочего стола. Не прерывайте процесс калибровки.
X Калибровка
Проверьте, выровнены ли линии, напечатанные двумя экструдерами, по оси X, чтобы определить, находятся ли экструдеры на одной оси X.
- Нажмите «Калибровка по оси X» и подождите, пока экструдеры нагреются. После нагрева до заданной температуры последовательно печатаются 2 строки. Проверьте, выровнены ли две строки после печати. Тем временем появится всплывающее окно.

- Если две линии полностью выровнены, нажмите [Да], калибровка оси X выполнена. Если две линии не полностью выровнены, нажмите [Нет]. Отрегулируйте положение экструдеров в соответствии с реальной ситуацией. После этого очистите нить на рабочей пластине и нажмите [Повторная калибровка]. Повторяйте шаг 2, пока две линии не будут полностью выровнены.
Калибровка Y
Проверьте, выровнены ли линии, напечатанные двумя экструдерами, по оси Y, чтобы определить, находятся ли экструдеры на одной оси Y.
- Нажмите [Калибровка оси Y] и подождите, пока экструдеры нагреются. После нагрева до заданной температуры последовательно печатаются 2 строки. Проверьте, выровнены ли две строки после печати. Тем временем появится всплывающее окно.

- Если две линии полностью выровнены, нажмите [Да], калибровка оси Y выполнена. Если две линии не полностью выровнены, нажмите [Нет]. Отрегулируйте положение экструдеров в соответствии с реальной ситуацией. После этого очистите нить на рабочей пластине и нажмите [Повторная калибровка]. Повторяйте шаг 2, пока две линии не будут полностью выровнены.
Первая печать

- Нажмите «Создать».
- Нажмите [Локальная память], чтобы выбрать печать files.

- Выберите предустановленную печать file [PG.gx].
- Коснитесь [Создать].

- Принтер начинает нагреваться и начнет печать после завершения нагрева.
Выгрузить нить
Пожалуйста, следуйте инструкциям ниже, если вам нужно выгрузить нить при ежедневном использовании.
- Нажмите [Инструменты], [Нить], чтобы войти в интерфейс нити.

- Нажмите переключатель выгрузки после соответствующего экструдера, чтобы выгрузить соответствующий экструдер.

- Нажмите [Начать], экструдер начнет нагреваться. Принтер начнет выгрузку нити после завершения нагрева.

- Вытащите направляющую трубку нити из впускного отверстия, оставьте нить на расстоянии 10 см, чтобы нить легко вытягивалась.
- Нажмите на пружинный прижим и протолкните нить вниз на 3 секунды, затем быстро вытяните вертикально.
Отсканируйте QR-код, чтобы получить дополнительную послепродажную поддержку
Чжэцзян Flashforge 3D технологии Лтд
support@ff3dp.com
Послепродажное обслуживание: support@ff3dp.com.

Сказать:+86 579 82273989 Web: www.flashforge.com
Добавить: 2/F, No.518, Xianyuan Road, Цзиньхуа, Чжэцзян, Китай
Документы / Ресурсы
Посмотреть инструкция для Flashforge Creator 3 Pro бесплатно. Руководство относится к категории 3D-принтеры, 2 человек(а) дали ему среднюю оценку 8. Руководство доступно на следующих языках: английский. У вас есть вопрос о Flashforge Creator 3 Pro или вам нужна помощь? Задайте свой вопрос здесь
Не можете найти ответ на свой вопрос в руководстве? Вы можете найти ответ на свой вопрос ниже, в разделе часто задаваемых вопросов о Flashforge Creator 3 Pro.
Какой вес Flashforge Creator 3 Pro?
Flashforge Creator 3 Pro имеет вес 38000 g.
Какая высота Flashforge Creator 3 Pro?
Flashforge Creator 3 Pro имеет высоту 490 mm.
Какая ширина Flashforge Creator 3 Pro?
Flashforge Creator 3 Pro имеет ширину 620 mm.
Какая толщина Flashforge Creator 3 Pro?
Flashforge Creator 3 Pro имеет толщину 630 mm.
Инструкция Flashforge Creator 3 Pro доступно в русский?
К сожалению, у нас нет руководства для Flashforge Creator 3 Pro, доступного в русский. Это руководство доступно в английский.
Не нашли свой вопрос? Задайте свой вопрос здесь
Добро пожаловать в Цветной мир!
Creator 3 от компании FlashForge зарекомендовал себя как надежный FDM-принтер с двумя экструдерами. У нас на канале есть подробный обзор, в котором Creator 3 отлично справился со всеми тестами. Но не так давно FlashForge выпустили Creator 3 Pro – обновленную версию принтера. В данном видео обсудим комплектацию, калибровку и новые функции Creator 3 Pro.

Комплектация
Creator 3 Pro поставляется в коробке с откидными бортами, что упрощает процесс распаковки, учитывая не малый вес принтера – 40 кг.

Во внутреннем ложементе расположен набор комплектующих: инструкция, USB-флешка, пакет с инструментами и калибровочной пластиной, шпатель, два запасных хотэнда и спица. Также в комплекте идут расходники: две катушки PLA-пластика, PTFE-вкладыши, штифты и смазка для осевых валов.

Характеристики
Размер принтера составляет 627x485x615 мм, а область построения – 300x250x200 мм.

Creator 3 Pro оснащен фронтальной дверцей и верхней крышкой для доступа к печатной камере, а также отстегивающимися боковыми дверцами, за которыми расположены держатели катушек. И в отличие от предыдущей модели, они совместимы со всеми стандартами катушек до 1 кг включительно.

Creator 3 Pro получил полностью переработанный экструдер: максимальный нагрев теперь составляет 3200С, а сопла с трубками были заменены на быстросъемные сопла с вариацией размеров до 0.8 мм с возможностью замены на сопла из углеродистой стали для печати армированными инженерными пластиками.


Кинематика осталась прежней – MakerBot, а стол сильно изменился: нагрев поверхности до 1200С занимает всего 5 минут, гибкая пластина с качественным аналогом покрытия BuildTak крепится на магнитах стола, что значительно сокращает время печати и позволяет легко отделить модель без использования шпателя.

На задней панели принтера размещены два вытяжных вентилятора с HEPA-фильтрами, которые обеспечивают необходимый уровень безопасности при работе с токсичными пластиками.

Интерфейс принтера разделен на три основные вкладки: печать, предварительный нагрев и инструменты. В меню печать мы можем открыть файл печати как из внутренней памяти принтера, так и с USB-флешки. В меню инструменты доступны: загрузка/выгрузка филамента, калибровка, движение по осям, показатели принтера и дополнительные настройки.


Кроме стандартной калибровки стола регулировочными винтами, появился режим дополнительной калибровки стола с помощью электромагнитного датчика по 9 точкам для повышения качества первого слоя.


Также стоит отметить, что Creatr 3 Pro как и все модели серии оснащен HD-камерой, с помощью которой можно удаленно контролировать процесс печати через облачный сервис FlashCloud.

Первый тест
Решили в качестве первого теста напечатать подставку под зарядное устройство камеры для экономии места на рабочем столе. Подставка печаталась из двух частей пластиком Esun PLA+.


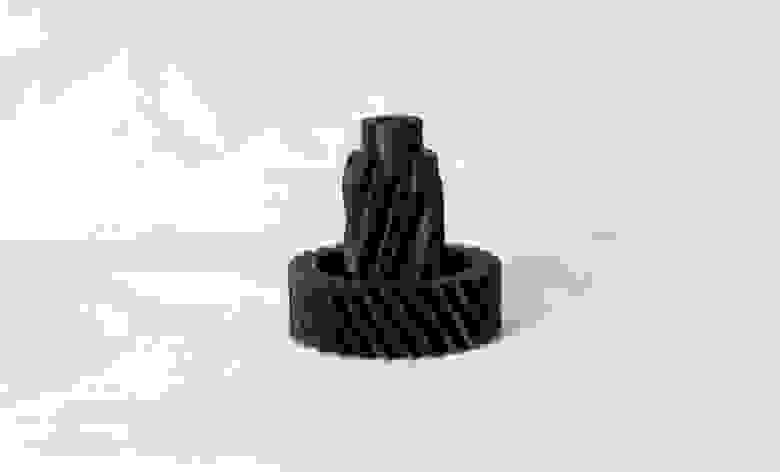
Ожидаемо с PLA+ Creator 3 Pro справился без проблем: сборная модель получилась без искажений геометрии, люфтов в пазах подставки нет.


Второй тест
Следующим тестом решили проверить возможности парного экструдера системы IDEX в режиме двухцветной печати. Перед печатью подобных моделей следует провести калибровку смещения по осям XY, для этого через отдельное меню принтера запускается печать горизонтальных и вертикальных линий.


Печатали красным Raise3D PLA PRO и черным Esan PLA+, для повышения качества печати двумя материалами рекомендуется использовать черновую башню или «вайпвол», как в нашем случае.


В целом напечаталось неплохо, однако выяснилось, что по умолчанию в слайсере FlashPrint шов размещен на лицевой стороне модели, который оказался заметен на красном пластике.

Третий тест
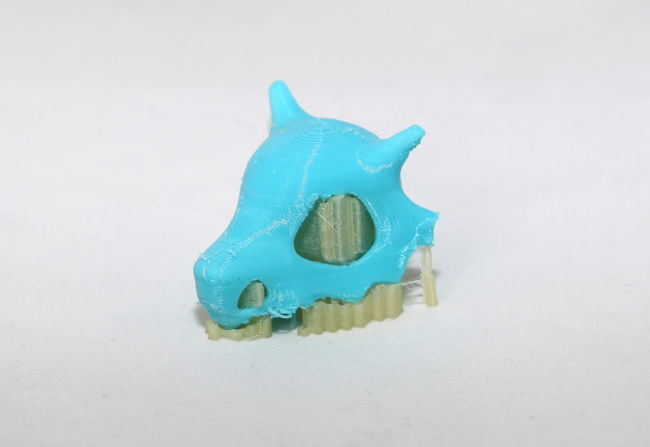
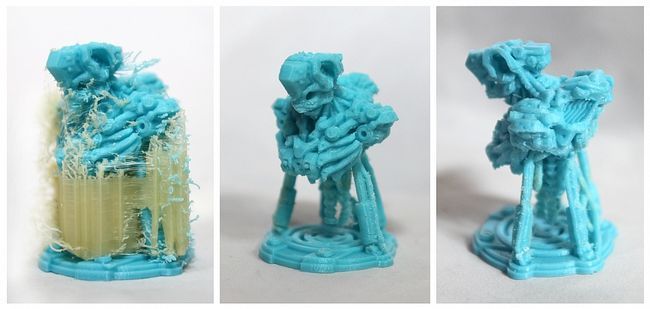
В качестве модели для печати в зеркальном режиме выбрали 3D-скан коллектора автомобильного двигателя, который установили на максимальную высоту – 200 мм. Обе модели печатались Esun PETG.


Модели пропечатались отлично, поддержки не поломались, несмотря на большую высоту, что говорит о равномерном прогреве всей печатной камеры.


Четвертый тест
Во время съемок обзора сломалась перемычка корпуса щупа, решили в качестве очередного теста замоделировать и напечатать новый корпус из X-line Ultran – конструкционного полиамида с добавлением углеродных волокон.


В итоге получили корпус из легкого и в то же время прочного материала.


Итоги
Подведем итоги. Creator 3 Pro справился со всеми задачами, показав одинаково высокое качество печати при использовании стандартных пластиков и высокотемпературных инженерных материалов. Pro-версия Creator 3 действительно стала современным решением в области профессиональной 3D-печати, благодаря серьезным изменениям контруктива принтера, из которых стоит отметить высокие температуры экструдеров, быстрый нагрев стола, широкий выбор сменных сопел и наличие датчика автокалибровки.
- Manuals
- Brands
- Flashforge Manuals
- 3D Printers
- Creator3
- User manual
-
Contents
-
Table of Contents
-
Bookmarks
Quick Links
FlashForge Corporation
FlashForge Creator3 3D Printer
User Guide
! NOTE Please read FlashForge Creator3 3D Printer User Guide carefully before use. Please
well keep this User Guide for future reference.
Creator3 User Guide | www.flashforge.com
0086- 0579-82273989
Related Manuals for Flashforge Creator3
Summary of Contents for Flashforge Creator3
-
Page 1
FlashForge Corporation FlashForge Creator3 3D Printer User Guide ! NOTE Please read FlashForge Creator3 3D Printer User Guide carefully before use. Please well keep this User Guide for future reference. Creator3 User Guide | www.flashforge.com 0086- 0579-82273989… -
Page 2: Table Of Contents
Content……………………….2 Preface……………………….3 Introduction……………………..4 Notice……………………….5 Chapter 1: 3D Printing Technology………………… 9 1.1 Process……………………… 9 Chapter 2: About Creator3………………….11 2.1 About Your Creator3………………..11 Chapter 3:Unpacking………………….35 Chapter 4: Hardware Assembly………………..40 4.1 Filament Installation………………..40 4.2 Printer Start-up………………….41 4.3 Loading Filament………………….41 4.4 Unloading Filament…………………
-
Page 3: Preface
FlashForge Creator3. Even if you are familiar with earlier FlashForge machines or 3D printing technology, we still recommend that please read this guide, as there is lots of important information about the Creator3 for you to get a better 3D experience.
-
Page 4: Introduction
·The User Guide is written based on Windows 7 OS. ·The version of the FlashPrint is latest. The FlashForge Creator3 3D Printer User Guide contains the information needed for you to set up and use this device. This User Guide including the following parts: Preface, Introduction and After-sale service.
-
Page 5: Notice
① Always use the Creator3 with a properly grounded outlet. Do not refit Creator3 plug. ② Do not use Creator3 in damp or wet locations. Do not expose Creator3 to burning sun. ③ In case of device damage, please use the power supply provided by FlashForge.
-
Page 6
The device must be placed in a dry and ventilated environment. The distances of the left, right and back side space should be at least 20cm, and the distance of the front side space should be at least 35cm. Creator3 User Guide | www.flashforge.com 400-699-1063… -
Page 7
· Filament Requirements Do not abuse the filament. Please make sure you use the FlashForge filament or the filament from the brands accepted by FlashForge. · Filament Storage All polymers degrade with time. Do not unpack until filament is needed. Filament should be stored at clean and dry conditions. -
Page 8
Connect the equipment into an outlet on a circuit different from that to which the receiver is connected. Consult the dealer or an experienced radio/TV technician for help. This document contains proprietary information protected by copyright. Copyright © 2018 FlashForge Corp. All Rights Reserved Creator3 User Guide | www.flashforge.com 400-699-1063… -
Page 9: Chapter 1: 3D Printing Technology
Fused Filament Fabrication (FFF) is the most common method of 3D printing. It is also the method that the Creator3 uses. It works by melting plastic material called filament onto a print surface in high temperature. The filament solidifies after it cools down, which happens instantaneously after it is extruded from the nozzle.
-
Page 10
Creator3 via USB stick, Wi-Fi or Ethernet cable. 1.1.3 Build the 3D Model: Once the output file has been transferred to your Creator3, it will start to turn the 3D model into a physical object by laying down layers of filament. -
Page 11: Chapter 2: About Creator3
Chapter 2: About Creator3 2.1 About Your Creator3 2.1.1 Views Front Left Right Creator3 User Guide | www.flashforge.com 400-699-1063…
-
Page 12
15. Right Spool Box Handle 4. Right Extruder 10. Right Filament Intake 16. Ethernet Cable Input 5. Left Extruder 11. Left Filament Intake 17. Power Input 6. Nozzle Brush 12. Left Spool Box Cover 18. Power Switch Creator3 User Guide | www.flashforge.com 400-699-1063… -
Page 13
2.1.2 Terms The surface on which the Creator3 builds an object. Build Plate The blue tape that covers Creator3’s build plate so that Build Tape the object can stick to the build plate well. The three dimensional amount of space that an object Build Volume will use once it is completed. -
Page 14
Nozzle Diameter 0.4mm Print Speed 10~200 mm/s Software FlashPrint Input:3MF/ STL/OBJ/FPP/BMP/PNG/JPG/JPEG Support Formats Output:GX/G Win xp/Vista/7/8/10、Mac OS、Linux Device Size 627*485*615mm Net Weight 40Kg AC Input Input: 100V-240VAC, 47-63Hz Power: 500W Connectivity USB Stick, WiFi, Ethernet, Creator3 User Guide | www.flashforge.com 400-699-1063… -
Page 15
Back Print interface Abort: To abort the print job. Pause/Resume: To suspend or resume the print job. Left/Right Extruder temperature: Can be changed during printing. Platform temperature: Can be changed during printing. Creator3 User Guide | www.flashforge.com 400-699-1063… -
Page 16
Z axis position To set the printing speed during printing: Tap [Yes] to save the setting while tap [No] to cancel the setting. Creator3 User Guide | www.flashforge.com 400-699-1063… -
Page 17
Tap the [Start] button to heat up to the target temperature. The default temperature is Extruder 220℃ and Platform 100℃. Tap the temperature display bar to set the temperature. Tools Tap [Tools] to enter the tools interface . Creator3 User Guide | www.flashforge.com 400-699-1063… -
Page 18
6.Status: To check the real-time status of the printer. 7.About: Information about the printer. 8.Back Filament 1.Load; 2.Unload; 3.Load-Left Extruder; 4.Load-Right Extruder; 5.Unload-Left Extruder; 6.Unload-Right Extruder; 7.Begin:Tap [Begin] to start load/unload filament on Left/Right extruder. 8.Back. Creator3 User Guide | www.flashforge.com 400-699-1063… -
Page 19
Cancel:Tap [Cancel] button to abort preheat job. f. Back. g. Done: Operate according instruction on the touch screen,tap [Done] to finish filament load. h. Done: Operate according instruction on the touch screen,tap [Done] to finish filament unload. Creator3 User Guide | www.flashforge.com 400-699-1063… -
Page 20
Repeat the steps 5 to 8 to do the next two until you see [Finish]. points leveling Tap [Finish] to complete leveling. Note: By tapping [Next Step],you can skip the point’s leveling, this will affect leveling result or printing effect. Creator3 User Guide | www.flashforge.com 400-699-1063… -
Page 21
Creator3 User Guide | www.flashforge.com 400-699-1063… -
Page 22
X+: The extruder moves to the zero points, that is, to the right direction. X-: The extruder moves to the direction opposite to the X+. Z+: The build plate descends. Z-: The build plate elevates. Back Creator3 User Guide | www.flashforge.com 400-699-1063… -
Page 23
9. Calibration: To adjust the initial distance between the extruder and the build plate. 10. Light Bar Control: To turn on/off the light bar control. 11. Factory Reset: Return to factory setting. 12. Update: To update the firmware version. Creator3 User Guide | www.flashforge.com 400-699-1063… -
Page 24
Tap to choose the display language. Creator3 User Guide | www.flashforge.com 400-699-1063… -
Page 25
WiFi Turn on the WiFi. Choose a wifi signal and input the passwords, then printer can be connected to internet. Back Creator3 User Guide | www.flashforge.com 400-699-1063… -
Page 26
Setup Wlan hotspot: To set the SSID and password. SSID: The name of hotspot. Password: The password of hotspot. Save: To save the setting. Back Door Opened Pause To turn on/off the Door Opened Pause. Creator3 User Guide | www.flashforge.com 400-699-1063… -
Page 27
Filament abnormal status won’t be detected when filament is used up or suspended. [Filament Check] function should be used with filament in the filament cartridge.This function is invalid if using filament out of the cartridge. Creator3 User Guide | www.flashforge.com 400-699-1063… -
Page 28
Z Calibration 1. Z axis calibration 2. Tap to cancel Z axis calibration 3. Z axis calibration completed. Creator3 User Guide | www.flashforge.com 400-699-1063… -
Page 29
X axis in the middle of the platform at coordinates(0,-100). 4. Choose whether the two lines coincide: Tap [next] to choose whether the two lines coincide: Yes/No. Creator3 User Guide | www.flashforge.com 400-699-1063… -
Page 30
2.Extruder begins to heat up. 3.Extruder begins to do the calibration: Right extruder prints a base line perpendicular to Y axis in the middle of the platform at coordinates(100,0), then left extruder prints a base line Creator3 User Guide | www.flashforge.com 400-699-1063… -
Page 31
Tap [Skip] button will skip the prompts and directly adjust deviation value. Tap [Recalibration] button to do the calibration. After recalibration, if the two lines coincide, click the [OK] button. Y axis calibration completed. Creator3 User Guide | www.flashforge.com 400-699-1063… -
Page 32
Factory Reset Tap to return to factory setting. Update Tap to update the firmware version. Before use this function, you need to connect the printer to internet with WIFI or Ethernet cable first. Creator3 User Guide | www.flashforge.com 400-699-1063… -
Page 33
About It displays the basic information about the device. Note: Please provide the printer serial number to aftersales when your printer need maintenance. Creator3 User Guide | www.flashforge.com 400-699-1063… -
Page 34
Accessories Filament Power Cable Quick Start Guide USB stick Allen Wrench Screwdriver Solid Glue Stamping Wrench Unclogging Pin Tool After-sales service card Grease Teflon Tube Creator3 User Guide | www.flashforge.com 400-699-1063… -
Page 35: Chapter 3:Unpacking
Chapter 3:Unpacking This chapter will present you the whole unpacking procedure of Creator3 3D printer. (Note: Make sure you read the whole unpacking guide) (3-1) Place the packaging box on a clean work surface (Mind the upwards direction) Open the box, take out the protective foam on the top.
-
Page 36
(3-3)T , remove (3-4)Remove the box and foam on the bottom the wrapping plastic bag. Now, exterior package of Creator 3 have all been removed. (3-5) Creator3 User Guide | www.flashforge.com 400-699-1063… -
Page 37
USB stick*1, nozzle brush*2). (3-7)Remove the blue fastening tape on the front door and open front door, take out the front foam from the printer, on the front foam sheet, you can see: filament*2, Creator3 User Guide | www.flashforge.com 400-699-1063… -
Page 38
(3-9)Take out power cable and plug the power cable into the input on the back and turn on the power switch. Press the touch screen button and tap [Tools]. Creator3 User Guide | www.flashforge.com 400-699-1063… -
Page 39
Tap [Manual], then Tap [Z-] to partially elevate the build plate. (3-10) 3-11 ( 3-11 ) Remove the bottom foam pieces under the platform. Congratulations! You have unpacked your Creator3. Next, let’s move on to hardware assembly of Creator3. Creator3 User Guide | www.flashforge.com 400-699-1063… -
Page 40: Chapter 4: Hardware Assembly
Your Creator3 has been installed before leaving factory, you can start up the Creator3 for printing after mounting the filament spool and completing leveling. 4.1 Filament Installation (4-1) The filament cartridge is on both sides of Creator3. Lift the cartridge out of the Creator3. Filament Detecting Equipment in the black.
-
Page 41: Printer Start-Up
4.2 Printer Start-up (4-3) Insert the power supply into the power input on the back of the Creator3 and plug the power cord into an electrical outlet. 4.3 Loading Filament For stable filament loading and proper device protection, you need to install the filament guide tube properly.
-
Page 42
(4-6) Insert the filament from the filament guide tube into the filament intake. Next, we will load the FlashForge filament. (Note: Please lower the build plate to increase the distance between the nozzle and build plate to 50mm at least for avoiding nozzle jam.) -
Page 43: Unloading Filament
(4-10) Insert the filament into the extruder at an upright angle. Then the filament will be drawn through the extruder. Do not tap [Cancel] until the filament load the extruder steadily. 4.4 Unloading Filament 4-11 Creator3 User Guide | www.flashforge.com 400-699-1063…
-
Page 44
Note: Do not pull out the filament with force as it will damage the gears. If the melted filament has cooled down in the extruder, please repeat the steps above. Creator3 User Guide | www.flashforge.com 400-699-1063… -
Page 45: Chapter 5: Build Plate Leveling
(5-2) Tap to choose extruder adjust level: Use Left or Right extruder to do the leveling. (5-3) Wait while the extruder and platform finish initial movements, Extruder move to the first point to do the leveling. Wait for the extruder verifying distance between nozzle and plate. Creator3 User Guide | www.flashforge.com 400-699-1063…
-
Page 46
(5-6) Repeat the above steps to do the next two points leveling until you see [Finish]. Tap [Finish] to complete leveling. Note: You can skip the point’s leveling by tapping [Next Step] if you think levling is already OK, this may affect leveling result or printing effect. Creator3 User Guide | www.flashforge.com 400-699-1063… -
Page 47: Chapter 6: About Software
Chapter 6: About Software This chapter talks about the basic function of FlashPrint. For more information about advanced function, you can browse our website www.FlashForge.com. 6.1 Software Installation 6.1.1 Software Acquisition Method 1: To get the installation package from the USB stick in the toolkit.
-
Page 48
When you start FlashPrint, a dialog box will pop up. Just select FlashForge Creator3 in the machine type list and click [OK]. You can also change the machine type via clicking [Print]—[Machine type]. See graphic 6-2: 6.2.2 Software Introduction Creator3 User Guide | www.flashforge.com… -
Page 49
Load files. Enter the support edit mode Print it directly with your Creator3 or export to your USB Stick View FlashPrint home screen from one of six viewing angles Move model around on XY-plane; shift+click to move along Z axis… -
Page 50
Bottom thickness: For tube, canister and lamp to set up bottom thickness Top diameter: For tube, canister lamp and seal to set up the top diameter Bottom diameter: For tube, canister, lamp and seal to set up the bottom diameter Creator3 User Guide | www.flashforge.com 400-699-1063… -
Page 51
Plane (6-5) Tube(6-6) Canister (6-7) Creator3 User Guide | www.flashforge.com 400-699-1063… -
Page 52
Change model views by moving, rotating, scaling. ● Drag Click the [View] icon and then you can move the object by the following three methods: Method 1: Hold down the left mouse button and drag. Creator3 User Guide | www.flashforge.com 400-699-1063… -
Page 53
[Reset]. ④Show Model Outline Click [View]—[Show Model Outline], it will highlight the yellow border of the object Creator3 User Guide | www.flashforge.com 400-699-1063… -
Page 54
In this way, you could make the model rotate on X/Y/Z axis. Method 2: Click the [Rotate] icon on the left, and then enter into rotating angel values in X/Y/Z axes positioning. Click [Reset] to reset rotating angel values. Creator3 User Guide | www.flashforge.com 400-699-1063… -
Page 55
6.2.8 [Cut] Left-click on the model to select it and double-click on the icon to set the cut plane. The direction and position are available for setting. ①Draw with Mouse ②X Plane Creator3 User Guide | www.flashforge.com 400-699-1063… -
Page 56
③Y Plane ④Z Plane 6.2.9 Extruder Choose to use Left/Right extruder to print the model, first tap the model twice and tap extruder button in FlashPrint twice, then choose Left/Right extruder to print the model. Creator3 User Guide | www.flashforge.com 400-699-1063… -
Page 57
Creator3 can print two identical models simultaneously: Tap and choose the model, then tap [Use Dual Extruder(Duplicate)] to auto duplicate model to two same models, the two models are aligned in the same direction and extruders are moving in the same direction; Tap [Use Dual Extruder(Mirror)] to auto mirror duplicate the model to two models, the two models are aligned in the opposite direction and extruders are moving along the X axis, doing mirror movements. -
Page 58
Creator3 can print a model with two extruders cooperating with each other, tap to choose Left/Right extruder when slicing. NOTE: Before using dual extruder duplicate or mirror printing, Creator3 must do Z axis calibration first; Before using two extruders cooperate to print a model, Creator3 must do Z axis, X axis and Y axis calibration first. -
Page 59
(if support surface doesn’t need support or the support column angle is too large, will Creator3 User Guide | www.flashforge.com 400-699-1063… -
Page 60
6.2.11 Print 6-12 ①Preview: Choose to enter preview interface or not ②Print when slice done: Print or not when slice done Creator3 User Guide | www.flashforge.com 400-699-1063… -
Page 61
● Shells: Contains the outside shell value, capping layer value (under vase pattern, top solid layer setting is invalid.) a. Perimeter Shells: Maximum is 10. b.Top Solid Layer: Maximum is 30, minimum is 1. Bottom Solid Layer: Maximum is 30, minimum is 1. Creator3 User Guide | www.flashforge.com 400-699-1063… -
Page 62
Pause At Heights: Allows users to pre-set a height in which the print will suspend automatically. The function usually applied when you want to change the Creator3 User Guide | www.flashforge.com 400-699-1063… -
Page 63
Method 1: [File]—[Save Project] Click in the menu bar to save the file as a project file with the “.fpp” suffix, all models in the scene (include support) are independent. After Creator3 User Guide | www.flashforge.com 400-699-1063… -
Page 64
● Auto layout newly-imported model: Set Yes or No. ● Preferred Extruder: Right/Left Extruder. ● Printing Window Type: Including Basic Mode and Expert Mode Creator3 User Guide | www.flashforge.com 400-699-1063… -
Page 65
Select the object and duplicate the object through the following two methods: Method 1: Click [Edit]—[Duplicate] Method 2: Press the shortcut Ctrl+D ⑥ Delete Select the object and delete the object through the following two methods: Creator3 User Guide | www.flashforge.com 400-699-1063… -
Page 66
[Edit]—[Supports] to enter supports setting interface. 6.2.14 Print Menus ① Connect Machine You can connect the Creator3 with your PC via Ethernet Cable or WiFi. Note: The machine icon on the bottom right displays the connection status: Connected Disconnected Method 1:Connect Via Ethernet Cable a. -
Page 67
Method 2:Connect Via WiFi ①Connect Creator3 with your PC under AP mode a.Turn on your Creator3 b. Tap [Tools]-[Setting]-[WLan hotspot]-[WLan hotspot ON]. c. Click on the wireless network setting in your computer, and find the wireless [Connect] signal-“Creator3”. Click to connect your computer with Creator3 via Wlan hotspot. -
Page 68
②Connect Creator3 with your PC under STA mode a. Tap [Tools]-[Setting]-[WiFi]-[WiFi ON] to turn on the WiFi of Creator3 and connect your computer and Creator3 with the same WiFi signal. [Print]-[Connect Machine] b. Click on FlashPrint. Then the following dialog box pops up. -
Page 69
③Check for Updates : Click [Help]—[Check for Update] to detect the available updates online. ④ About FlashPrint : Click [Help]—[About FlashPrint], the software information box will pop up. The contents include the current software version and copyright information. Creator3 User Guide | www.flashforge.com 400-699-1063… -
Page 70: Chapter 7: Basic Printing
FlashForge Creator3 (7-2) Click to select [Load] (7-3)Click the icon to load a .stl model file and the object will display on the build area. [Edit]—[Surface to Platform] to make your model perfectly positioned (7-4)Click Creator3 User Guide | www.flashforge.com 400-699-1063…
-
Page 71
Note: If you’ve place your model in a right place, you can skip the step above.(7-5) Click the [Print] icon on the top, you should make some setups for your print job. Creator3 User Guide | www.flashforge.com 400-699-1063… -
Page 72
Gcode file. Note: .gx files are available for preview while the .g files are not. They are displaying as follows: g. Files gx. Files Next, we are going to print the model. Creator3 User Guide | www.flashforge.com 400-699-1063… -
Page 73: Print Methods
7.2 Print Methods After generating the Gcode file, you can transfer it to your Creator3. You can transfer the file through Ethernet Cable or WiFi or USB stick. 7.2.1 Print from Computer ( Ethernet Cable connection) ①Connect your Creator3 with your PC via a Ethernet cable.(Please refer to 6.2.13 ) ②Turn on your Creator3, level the build plate and load the filament.
-
Page 74: Print From Computer (Wifi Connection)
7.2.2 Print from Computer (WiFi connection) ① Connect your Creator3 with your PC via WiFi. Enter into the IP Address shown on your Creator3 interface and then click [Connect]. ② Turn on your Creator3, level the build plate and load the filament.
-
Page 75
● Click the [Print] button, the PC will transfer the Gcode file to the printer. 7-10 7-10 Creator3 User Guide | www.flashforge.com 400-699-1063… -
Page 76: Print From Usb Stick
7-11 7.2.3 Print from USB Stick ①Insert your USB stick with target .g or .gx file to your Creator3. . ②Turn on the Creator3. Make sure the build plate has been leveled and the filament is loaded. [Print] USB Stick ③…
-
Page 77: Chapter 8: Supports And Service
FlashForge team is on standby and ready to help you with any challenges you may have with your Creator3. If the issues or questions are not covered in this User Guide, you can seek for solutions on our official website or contact us via telephone.
инструкцияFlashforge Creator 3 Pro

This guide is only applicable to FLASHFORGE Creator 3 Pro 3D printer
本手册仅适用于闪铸科技 金刚狼3 Pro 3D打印机
中文P30
用户使用手册
USER GUIDE
CN/EN-A01
Creator 3 Pro 金刚狼3 Pro
Посмотреть инструкция для Flashforge Creator 3 Pro бесплатно. Руководство относится к категории 3D-принтеры, 2 человек(а) дали ему среднюю оценку 8. Руководство доступно на следующих языках: английский. У вас есть вопрос о Flashforge Creator 3 Pro или вам нужна помощь? Задайте свой вопрос здесь

Главная
| Flashforge | |
| Creator 3 Pro | 10000656001 | |
| 3D-принтер | |
| 6971940409984 | |
| английский | |
| Руководство пользователя (PDF), Краткое руководство пользователя (PDF), Инструкция по установке (PDF) |
Печать
| Точность | 0.2 mm |
| Максимальные размеры печати (ШхГхВ) | 300 x 250 x 200 mm |
| Ширина насадки | 0.4 mm |
| Материал печати | ABS, HIPS, PVA, Polycarbonate (PC), Polyethylene Terephthalate Glycol (PETG), Polylactic acid (PLA) |
| Толщина слоя (мин.) | — mm |
| Толщина слоя (макс.) | — mm |
| Технология печати | — |
Производительность
| Максимальная температура наконечника экструдера | 320 °C |
| Максимальная температура платформы для печати | 120 °C |
| Нагреваемая платформа для печати | Да |
| Встроенный экран | Да |
| Сенсорный экран | Да |
| Смотровое окно | Да |
| Цвет товара | Черный |
| Страна производства | Китай |
Порты и интерфейсы
| USB порт | Да |
| Wi-Fi | Да |
| Подключение Ethernet | Да |
| Встроенный кардридер | — |
Сканирование
Гравирование
Вес и размеры
| Ширина | 620 mm |
| Глубина | 630 mm |
| Высота | 490 mm |
| Вес | 38000 g |
Данные об упаковке
| Ширина упаковки | 780 mm |
| Глубина упаковки | 760 mm |
| Высота упаковки | 650 mm |
| Масса брутто | 52000 g |
показать больше
Не можете найти ответ на свой вопрос в руководстве? Вы можете найти ответ на свой вопрос ниже, в разделе часто задаваемых вопросов о Flashforge Creator 3 Pro.
Какой вес Flashforge Creator 3 Pro?
Какая высота Flashforge Creator 3 Pro?
Какая ширина Flashforge Creator 3 Pro?
Какая толщина Flashforge Creator 3 Pro?
Инструкция Flashforge Creator 3 Pro доступно в русский?
Не нашли свой вопрос? Задайте свой вопрос здесь
Смотреть руководство для Flashforge Creator 3 ниже. Все руководства на ManualsCat.com могут просматриваться абсолютно бесплатно. Нажав кнопку «Выбор языка» вы можете изменить язык руководства, которое хотите просмотреть.

MANUALSCAT | RU
Вопросы и ответы
У вас есть вопрос о Flashforge Creator 3, но вы не можете найти ответ в пользовательском руководстве? Возможно, пользователи ManualsCat.com смогут помочь вам и ответят на ваш вопрос. Заполните форму ниже — и ваш вопрос будет отображаться под руководством для Flashforge Creator 3. Пожалуйста, убедитесь, что вы опишите свои трудности с Flashforge Creator 3 как можно более детально. Чем более детальным является ваш вопрос, тем более высоки шансы, что другой пользователь быстро ответит на него. Вам будет автоматически отправлено электронное письмо, чтобы проинформировать вас, когда кто-то из пользователей ответит на ваш вопрос.
Задать вопрос о Flashforge Creator 3
- Бренд:
- Flashforge
- Продукт:
- 3D-принтеры
- Модель/название:
- Creator 3
- Тип файла:
- Доступные языки:
- английский, китайский
Сопутствующие товары Flashforge Creator 3
3D принтер Flashforge Creator 3
PJP/FDM/FFF, пластик — Flex, PETG, ABS, PLA, слой — 0.05 мм, LAN, USB, Wi-Fi
подробнее

5
Код товара: 1380825
Время на прочтение
4 мин
Количество просмотров 12K
Всем привет. Сегодня мы подготовили обзор на две модели 3D-принтеров — FlashForge Dreamer и FlashForge Creator Pro.
- FlashForge –это китайская компания Zhejiang Flashforge 3D Technology Co., Ltd. Созданная в 2011 году и на сегодняшний день являющаяся одной из крупнейших в Китае. В прошлом году компания произвела 30 тысяч 3D-принтеров и заняла 4-е место по объему продаж 3D-принтеров в мире.
- FlashForge Dreamer и FlashForge Creator Pro – принтер входящий в 10-ку лучших на сайте энтузиастов 3D-печати 3DHUBS.
На 3DHUBS очень много положительных отзывов как от новичков, так и от продвинутых пользователей. Эти принтеры ценят за очень удачное соотношение цены и качества.

Технические характеристики
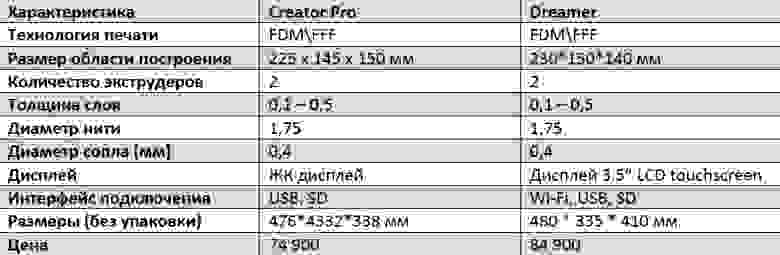
Как видно из технических характеристик принтеры почти ничем не отличаются. Разве что Dreamer — более новая и продвинутая модель, с кучей небольших улучшений, которые могут быть полезны пользователю.
Внешний вид.
Во внешнем виде отличий больше. Dreamer по сравнению с Creator Pro стал более компактным.
Катушки с пластиком убираются внутрь принтера, а не вешаются снаружи. С одной стороны — это позволяет дополнительно просушивать пластик внутри камеры принтера, с другой катушку от 1кг и больше будет впихнуть проблематично. А если «заводить» пластик снаружи придется снимать крышку.
В FlashForge Creator Pro такой проблемы нет. Можно повесить катушки на корпус или распечатать держатель катушки. В крышке предусмотренно пространство для подачи пластика вне камеры.
Механика.
Кинематика принтеров аналогична и сделана по наиболее популярной схеме. Здесь ничего нового.
Головка движется по осям X и Y, платформа по оси Z.

Печатающая голова как небольшой бегемот – тяжелая, но всеядная. Принтер без проблем печатает не только ABS и PLA, но и более капризными, мягкими видами пластика.
Или допустим Woodforce от Fiber Force.
Кстати пластик оказался очень интересным. Сопло не забивает и пахнет деревом. Очень легко шкурится.

Самое интересное это обдув Dreamer. С виду кожух обдува стоит только на левом сопле. И никаких больше отличий от того же Flash Forge Greater Pro нет.

Основное отличие стало заметно при первой печати. Сзади у принтера расположены 2 достаточно больших вентилятора. Они выдувают воздух из камеры.

С боков находятся решетки вентиляции, через которые внутрь принтера засасывается воздух.
Получается, внутри камеры при печати постоянно циркулирует воздух. На удивление это оказалось отличным решением для печати PLA. Обдув происходит со всех сторон печатающейся детали. Даже небольшие детали получаются отлично, без «подтеков».

Creator Pro такой стабильностью похвастаться не может. В жаркую погоду небольшим изделиям из PLA может не хватать обдува.
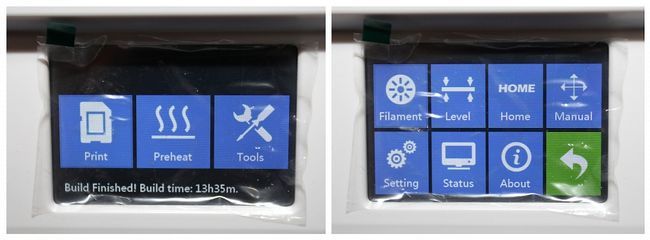
До кучи FlashForge Dreamer оснастили удобным сенсорным дисплеем и Wi-FI.
Слайсер.
В качестве слайсера предлагается использовать FlashPrint. Достаточно удобная программа с приятным интерфейсом, к тому же частично русифицированная. Это может стать большим плюсом для начинающих печатников.

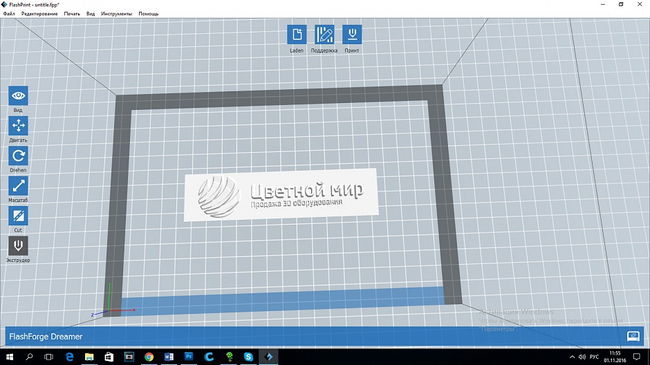
В программе есть несколько достаточно полезных функций. Например возможность разрезать модель.

Плоскость разреза можно задать мышкой или по одной из осей.


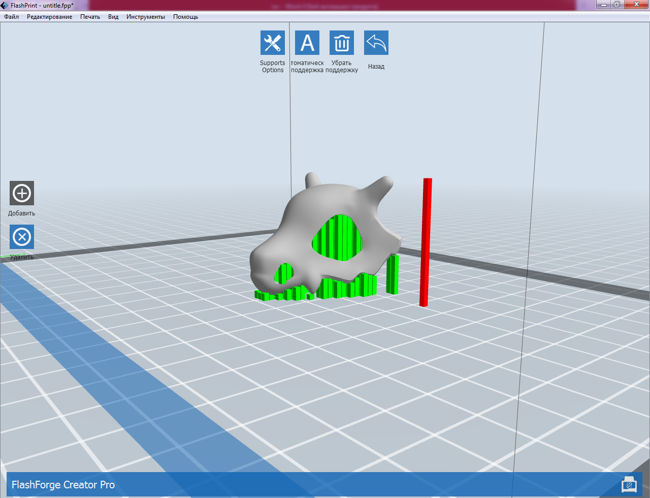
Возможность расставить поддержки вручную – это то чего так часто не хватало мне в Cura. Поддержки есть 2 видов.
Трубки (они стоят по умолчанию)
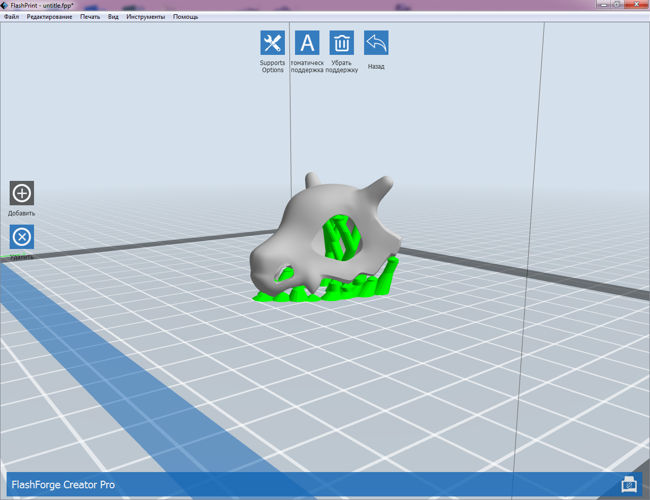
И столбики.
НО самая интересная на мой взгляд функция — это, возможность преобразования рисунков в объемные барельефы.
В программе есть быстрые настройки печати. (низкое – 0,30мм стандарт – 0,18мм и высокое – 0,14мм. При выборе PLA пластика появляется наилучшее качество печати это слой 0,08мм.). Это будет удобно новичкам во время первых шагов.
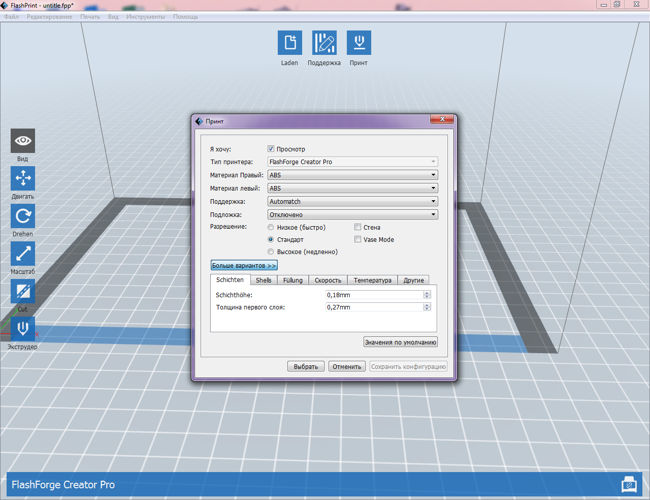
Есть и расширенные настройки для более точной настройки параметров печати. Что бы включить расширенные настройки нужно открыть вкладку файл — настройки и переключится с Basic Mode на Expert Mode.
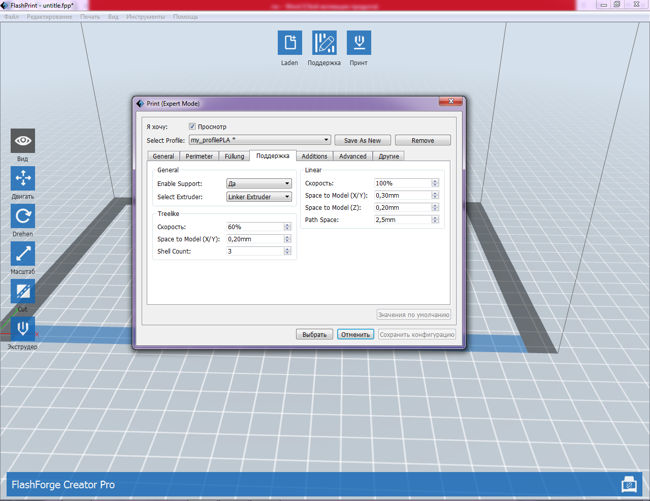
Настройки ретракта, скорости печати поддержки, ширины стенки для чистки сопла при печати двумя видами пластика и многое другое.
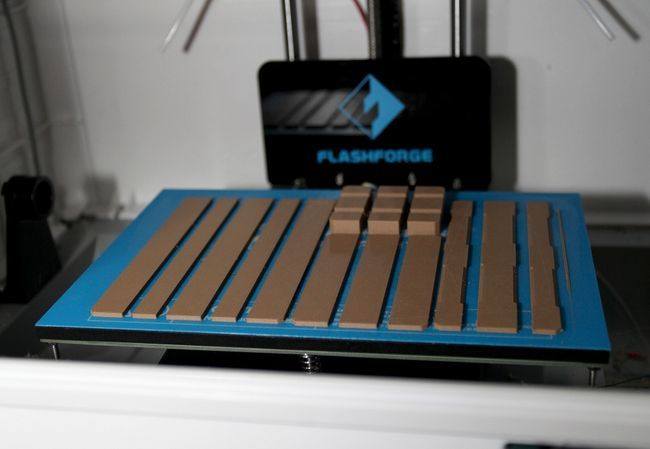
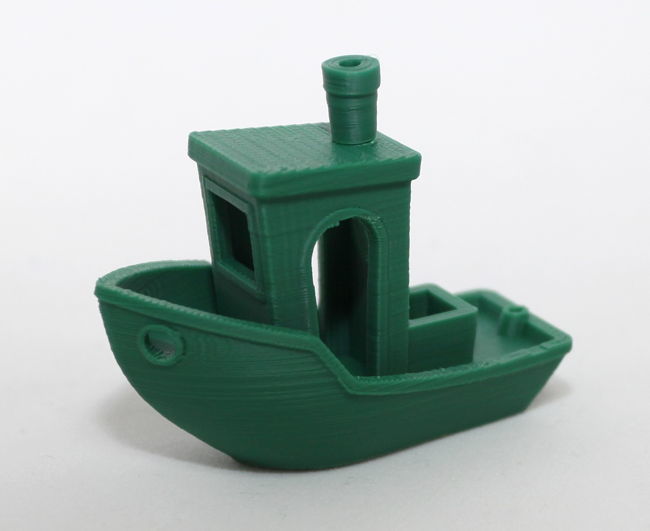
Печатные тесты
Ну и конечно обзор не был бы полным без печатных тестов.
FlashForge Creator Pro
ABS от ESUN, слой 0,15.

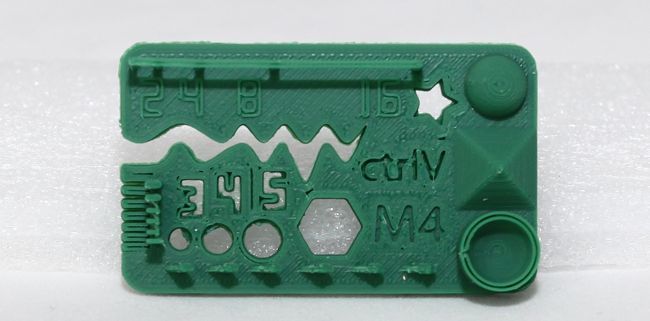
PLA от ESUN, слой 0,15.


И самое интересное — печать с поддержками.
ABS+HIPS

PLA+PVA
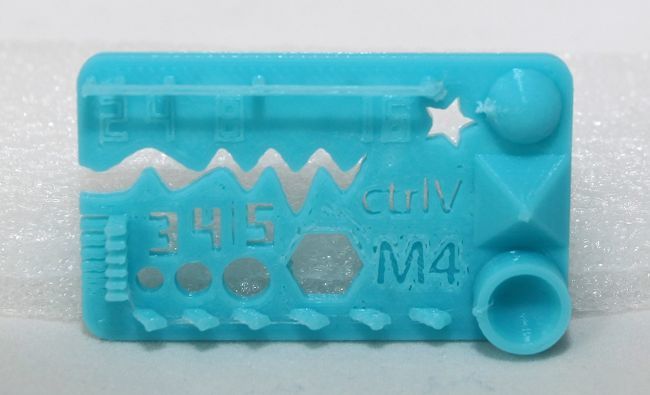
FlashForge Dreamer
ABS+HIPS от ESUN, слой 0,15.

PLA+PVA
CARBON FIBER фирмы NYLFORCE, толщина слоя 0,15
PLA, цвет Bronze, фирма Esun, толщина слоя 0,14

Пластик Woodforce фирмы Fiber Force и синий PLA фирмы ESUN, толщина слоя 0,18

Постапокалиптическая уточка из мягкого Cheetah фирмы Ninjatek, толщина слоя 0,18, заполнение 0%

Слой 0,18, принтер Flashforge Dreamer. Пластик eCopper и eAlfill фирмы Esun.
Итоги
Оба принтера на удивление выдают очень достойный результат печати «из коробки» без всяких «допиливаний» и шаманских настроек.
FLASHFORGE Creator Pro по качеству печати не отстает от своего старшего брата FlashForge Dreamer. Максимум к чему можно придраться это недостаточный обдув небольших моделей из PLA у Creator Pro.
Визуально же FlashForge Dreamer на мой взгляд более «домашний» принтер. Аккуратный, компактный. Плюс возможность подключения по WI-FI что бы не тянуть лишних проводов. Но тут уже каждый решит сам стоит ли переплачивать за эстетику и комфорт или нет.
По традиции минутка рекламы)
Покупая оборудование в нашей компании, вы получаете 10 преимуществ:
1. Возможность воспользоваться программой Trade In.
2. Гарантия — 12 месяцев
3. Инструкция на русском языке
4. Техническая поддержка в течении всего срока эксплуатации
5. Вы покупаете 3D-принтер у официального дистрибьютора в России
6. Бесплатная доставка.
7. Бесплатное обучение в нашем офисе.
8. Возможность купить принтер в кредит через банки ТКС, ОТП, Ренессанс.
9. 10% скидка на пластик навсегда.
10. Возможность ознакомиться с принтером в нашем демо-зале.
Обзор подготовлен специалистом по 3D-печати компании Цветной Мир, Панфиловой Анной.
Подписывайтесь на наши группы в Facebook и VK, чтобы быть в курсе последних событий.
www.facebook.com/groups/cvetmir3d
vk.com/cvetmir3d
www.youtube.com/channel/UCnfeyFh3TKIVpMCMi1zd0fA