-
Contents
-
Table of Contents
-
Troubleshooting
-
Bookmarks
Quick Links
eWON
Installation Guide
IG 010 / Rev 1.3
This short guide explains how to install eWON COSY 141 and to get
started with the embedded configuration web site.
eWON COSY 141 —
Installation Guide
Related Manuals for eWON COSY 141
Summary of Contents for eWON COSY 141
-
Page 1: Installation Guide
Installation Guide IG 010 / Rev 1.3 eWON COSY 141 — Installation Guide This short guide explains how to install eWON COSY 141 and to get started with the embedded configuration web site.
-
Page 2: Table Of Contents
3.1 Factory default IP settings ………………….12 3.2 Selecting the appropriate LAN IP address …………….. 12 3.3 Setting the eWON COSY Machine LAN IP address …………..13 3.4 eWON COSY’s web interface ………………..14 3.4.1 Accessing the eWON COSY ………………14 3.4.2 Going through the 1-2-3 Setup Wizard …………….
-
Page 3: Foreword
Foreword 1. Foreword The present Installation Guide describes the hardware and software features of the eWON COSY. It does not address the 1-2-3 Setup procedure that is explained in 3 hands-on videos you can watch on eWON Website 2. Hardware description Housing interfaces Power supply (polarity sensitive, see label).
-
Page 4: Markings
Chapter 2. Hardware description Markings The identification label of the eWON is placed at the left hand side of the housing. The different parts of the label are shown below: Device type and interfaces Serial number 1145 = year+week 0062 = sequential number…
-
Page 5: Mechanical Outline
Chapter 2. Hardware description Mechanical outline The recommended free space in the cabinet for the eWON should be at least: 40-mm wide x 200-mm high x 160-mm deep (includes space for smooth cable bending). Latch for Omega-shape DIN rail to EN50022.
-
Page 6: Mounting And Environmental Conditions
Hardware description Mounting and environmental conditions The eWON COSY unit has an IP30 protection grade. It is therefore not suited for outdoor mounting. The design of the unit is such that it has to be integrated in an enclosed electrical cabinet, protected from excessive heat humidity and dust.
-
Page 7: Front Panel Status Leds
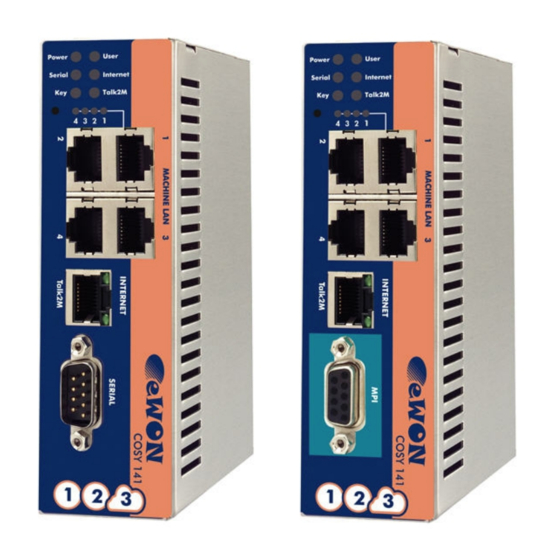
Flashing green = life (20 secs after power on) Internet access configuration (green = OK) VPN-tunnel status (green = OK, DO = 1) Ethernet ports By default, only the LAN Ethernet interface of the eWON COSY can be used to access the internal web site. 2.8.1 Machine LAN The Machine LAN interface consists of a four port autosense Ethernet switch (10/100 Mb).
-
Page 8: Serial-Ports
RS232/422/485 (no galvanic isolation) Polarization 680 Ω (if polarization & termination is activated) Termination 120 Ω (if polarization & termination is activated) Pin # RS232 RS485 RS422 SUBD9 connector pinout eWON COSY 141 — Installation Guide (How to) Page 8/20…
-
Page 9: Mpi Port
Chapter 2. Hardware description 2.9.2 MPI port The MPI version of the eWON COSY is easily identifiable with its light turquoise square surrounding the SUBD9 female DB9 connector. Characteristic Value Physical mode MPI (no galvanic isolation) Baud rates From 9,6 kBauds to 12,0 MBauds Polarization 100 kΩ…
-
Page 10: Digital Input — Digital Output
2.10 Digital input – Digital output The eWON COSY features one Digital Input (DI) to enable/disable the Internet port from outside and one Digital Output (DO) that returns the status of the VPN tunnel connection. The DI and DO cannot be allocated to other functions.
-
Page 11
Chapter 2. Hardware description (*) when the eWON COSY reboots, a short phase of ON state is part of the starting process. The digital output is activated by an open drain MOSFET transistor driven by an optocoupler. The maximum current flow into this transistor has a characteristic above the value specified in the eWON, in order to cope with the switching power losses. -
Page 12: Software Configuration
IP ranges of involved networks. Example of networks involved during the remote access : To allow routing to the devices connected to the eWON Machine LAN, following conditions must be complied: Network 1 <> Network 3: Company LAN address range must differ from eWON Machine LAN address range.
-
Page 13: Setting The Ewon Cosy Machine Lan Ip Address
(ask the network administrator). Knowing the ranges in use at the Company and Site side, you must select for the eWON Cosy Machine LAN a range outside these networks.
-
Page 14: Ewon Cosy’s Web Interface
Connect your PC with one of the LAN ports, make sure your PC has an IP address in the same range as the one of the eWON COSY, open your Internet Browser and, in the URL address field, enter the actual LAN address you configured in the eWON COSY:…
-
Page 15: Going Through The 1-2-3 Setup Wizard
3.4.2 Going through the 1-2-3 Setup Wizard After login, on a new eWON that was not yet configured the Quick Launch Wizard page opens: Button to access the Status page for each setup aspect (appears on all pages) Button allowing to return to this starting page (appears on all pages)
-
Page 16: Status
Chapter 3. Software configuration After going through each the wizard, the info bar of the eWON COSY shows checked boxes for each aspect that has been configured. The present installation guide does not cover all setup aspects in details. Each step of the 1-2-3 Setup is documented by a hands-on video tutorial. Go to the eWON COSY support page http://support.ewon.biz/cosy.htm…
-
Page 17
The example below shows how the same Status page looks when the Internet connection locked by the digital input (switch open). To access the detailed Status page, click the button in the message box: Note: access to this page requires to be logged-in. eWON COSY 141 — Installation Guide (How to) Page 17/20… -
Page 18: Troubleshooting
Note: you absolutely have to wait until the full auto test procedure is completed without interrupting it. If the auto test is interrupted, the flash memory of the eWON will contain random data likely to make it unstable. In such a case you have to redo the second level reset procedure from scratch and wait until it is totally completed.
-
Page 19: General Characteristics Of Ewon Cosy
Chapter 4. Troubleshooting When performing a second level reset, the eWON does NOT restart in normal mode by itself and remains running in diagnose mode. Power the eWON OFF and ON again to restart in normal mode. As described before, the eWON returns to its default COM parameters and factory IP addresses after this level 2 reset is performed.
-
Page 20: Revision History
No part of this handbook can be reproduced, transmitted or copied in any way without written consent from the manufacturer and/or the authors of this handbook eWON sa eWON COSY 141 — Installation Guide (How to) Page 20/20…
| Шаг 1: Создайте и сконфигурируйте ваш Talk2M аккаунт | |
| 1.1 Скачайте и установите eCatcher (ссылка). | |
 |
1.2 Создайте аккаунт кликнув “Create a Free+ Account”. Для завершения процесса вам будет необходимо кликнуть на URL, отправленный вам на email. |
|
|
1.3 Войдите в свою учетную запись в eCatcher и добавьте ваш eWON кликнув на кнопку “Add”. Продолжайте, следуя указаниям Мастера ( Wizard’a). Он будет использован при конфигурировании eWON в Шаге 2. |
| 1.4 Закройте приложение eCatcher. | |
| Шаг 2: Сконфигурируйте ваш eWON | |
| 2.1 Скачайте и установите eBuddy (ссылка). | |
 |
2.2 Подключите Ethernet кабель от вашего компьютера к LAN порту №1 вашего eWON. Оба варианта кабеля (прямой и кроссовый) будут работать. |
 |
2.3 Запустите eBuddy и выберите “Set IP Address” для смены IP адреса со стороны LAN вашего eWON. Используйте IP адрес, который не будет конфликтовать с WAN, или удаленного компьютера. |
 |
2.4 Задайте IP адрес вашего компьютера из той же подсети что и LAN IP вашего eWON. |
|
2.5 Запустите браузер и откройте адрес LAN IP вашего eWON. По умолчанию пользователь и пароль “adm”. |
|
 |
2.6 Нажмите кнопку “Settings” и запустите «Quick Launch Wizard» для конфигурирования настроек относительно системы, коммуникаций и Talk2M подключения. Подключите Internet кабель к WAN порту. Во время работы мастера подключения Talk2M вам будет необходимо ввести Activation Key, который вы скопировали ранее. |
|
2.7 По завершению настроек отключите Ethernet кабель между eWON и вашим компьютером. Верните IP адресу вашего компьютера прежнее значение. |
|
| Шаг 3: Подключитесь к вашему удаленному устройству | |
 |
3.1 Когда ваш компьютер подключен к Internet, запустите eCatcher. Статус вашего eWON должен быть “Online”. Просто выберите свой eWON и нажмите кнопку “Connect”. |
 |
3.2 Когда подключитесь, если ваше Ethernet устройство подключено к LAN порту вашего eWON COSY’s, вы сможете проверить связь с ним командой ping. |


Роутеры eWON на нашем сайте по ссылке
Table of Contents for eWON COSY 141:
-
Software configuration Chapter 3. Log into the web site (user/password defaults are adm/adm): 3.4.2 Going through the 1-2-3 Setup Wizard After login, on a new eWON that was not yet configured the Quick Launch Wizard page opens: Button to access the Status page for each setup aspect (appears on all pages) Button allowing to return to this starting page (appears on all pages) Direct access to each setup aspect + status check boxes (all unchecked before starting) Click this button to go through all steps (follow instructions) eWON
-
Hardware description Chapter 2. 2.10 Digital input – Digital output The eWON COSY features one Digital Input (DI) to enable/disable the Internet port from outside and one Digital Output (DO) that returns the status of the VPN tunnel connection. The DI and DO cannot be allocated to other functions. Characteristic Value DI state (requires configuration to operate) OFF state = Internet port is disabled ON state = Internet port is enabled DI voltage range 0 to 24 VDC DI voltage max. (varistor protection) 33 VDC
-
Hardware description Chapter 2. 2.4 Mechanical outline The recommended free space in the cabinet for the eWON should be at least: 40-mm wide x 200-mm high x 160-mm deep (includes space for smooth cable bending). eWON COSY 141 — Installation Guide (How to) Page 5/20 Latch for Omega-shape DIN rail to EN50022. Hook unit on upper slider edge and move down until latch clicks.
-
Hardware description Chapter 2. 2.9 Serial-ports 2.9.1 Configurable serial port The configuration of the physical serial mode is done by a set of 4 dip switches located on left side of the unit. The settings of the switches are shown in the table below: Dip switch positions Serial mode RS232 RS422, RS485 without polarization and termination resistors RS422, RS485 with polarization (680 Ω) and termination (120 Ω) resistors Note: the 3 switch configurations shown above are the only functional configurations. Characteristic Value Physical mod
-
Table of Contents 1. Foreword …………………………………………………………………………………………………………………………. 3 2. Hardware description …………………………….
-
Software configuration Chapter 3. The company network address ranges (Company LAN and Site LAN in the example above) are specified and managed by the respective network administrators. These ranges simply cannot be changed. Most of the time the IP addresses are defined by DHCP servers. IP parameters always have to be defined in full agreement with network policies applicable within the network organization (ask the network administrator). Know
-
Software configuration Chapter 3. 3. Software configuration 3.1 Factory default IP settings Characteristic Value Machine LAN IP address 10.0.0.53 Machine LAN Subnet Mask 255.255.255.0 Internet port IP address 10.1.0.53 Internet port Subnet Mask 255.255.255.0 Internet port Gateway 0.0.0.0 3.2 Selecting the appropriate LAN IP address Configuring remote access with our Talk2M solution is simple. However, you need to pay attention to the different IP ranges of involved networks. Example of networks involved during the remote access :
-
Software configuration Chapter 3. The example below shows how the same Status page looks when the Internet connection locked by the digital input (switch open). To access the detailed Status page, click the button in the message box: Note: access to this page requires to be logged-in. eWON COSY 141 — Installation Guide (How to) Page 17/20
-
Troubleshooting Chapter 4. When performing a second level reset, the eWON does NOT restart in normal mode by itself and remains running in diagnose mode. Power the eWON OFF and ON again to restart in normal mode. As described before, the eWON returns to its default COM parameters and factory IP addresses after this level 2 reset is performed. 5. General characteristics of eWON COSY Characteristic Value Processor ARM clocked @ 75Mhz SDR
-
eWON COSY 141 — Installation Guide Contents This short guide explains how to install eWON COSY 141 and to get started with the embedded configuration web site. eWON Installation Guide IG 010 / Rev 1.3
-
Hardware description Chapter 2. (*) when the eWON COSY reboots, a short phase of ON state is part of the starting process. The digital output is activated by an open drain MOSFET transistor driven by an optocoupler. The maximum current flow into this transistor has a characteristic above the value specified in the eWON, in order to cope with the switching power losses. The transistor used is in an open drain type
-
Revision history Revision Level Date Description 1.0 05/01/12 First officially released version 1.1 28/01/12 Changed wizard screen + add § on IP configuration + eBuddy + minor corrections after review 1.2 17/04/12 Correction pinout RS232, page 8 1.3 27/07/2016 Update of Legal References i Document build number: 59 Note concerning the warranty and the rights of ownership: The information contained in this document is subject to modification without notice. The vendo
-
Foreword Chapter 1. 1. Foreword The present Installation Guide describes the hardware and software features of the eWON COSY. It does not address the 1-2-3 Setup procedure that is explained in 3 hands-on videos you can watch on eWON Website 2. Hardware description 2.1 Housing interfaces Power supply (polarity sensitive, see label). See External power supply characteristics. Digital IO (Internet port control & s
-
Software configuration Chapter 3. After going through each the wizard, the info bar of the eWON COSY shows checked boxes for each aspect that has been configured. The present installation guide does not cover all setup aspects in details. Each step of the 1-2-3 Setup is documented by a hands-on video tutorial. Go to the eWON COSY support page http://support.ewon.biz/cosy.htm to view these videos. 3.5 Status pages The short form Status page that looks like this: As soon as an eWON COSY has been configured, this short form Status page
-
Hardware description Chapter 2. 2.5 Mounting and environmental conditions The eWON COSY unit has an IP30 protection grade. It is therefore not suited for outdoor mounting. The design of the unit is such that it has to be integrated in an enclosed electrical cabinet, protected from excessive heat humidity and dust. The eWON COSY complies to the CE-marking requirements regarding electromagnetic compatibility (EMC) within an ind
Questions, Opinions and Exploitation Impressions:
You can ask a question, express your opinion or share our experience of eWON COSY 141 device using right now.
1. Foreword …………………………………………………………………………………………………………………………. 3
2. Hardware description ……………………………………………………………………………………………………….. 3
2.1 Housing interfaces ………………………………………………………………………………………………………. 3
2.2 Markings ……………………………………………………………………………………………………………………. 4
2.4 Mechanical outline ………………………………………………………………………………………………………. 5
2.7 Front panel status LEDs ……………………………………………………………………………………………….. 7
2.8 Ethernet ports ……………………………………………………………………………………………………………… 7
2.8.1 Machine LAN ……………………………………………………………………………………………………. 7
2.8.2 Internet port ………………………………………………………………………………………………………. 7
2.9 Serial-ports …………………………………………………………………………………………………………………. 8
2.9.1 Configurable serial port ………………………………………………………………………………………. 8
2.9.2 MPI port …………………………………………………………………………………………………………… 9
3. Software configuration ……………………………………………………………………………………………………. 12
3.1 Factory default IP settings …………………………………………………………………………………………… 12
3.4 eWON COSY’s web interface ……………………………………………………………………………………… 14
3.4.1 Accessing the eWON COSY ……………………………………………………………………………… 14
3.5 Status pages …………………………………………………………………………………………………………….. 16
4. Troubleshooting …………………………………………………………………………………………………………….. 18
4.1 Resetting the eWON COSY ………………………………………………………………………………………… 18
4.2 First level reset ………………………………………………………………………………………………………….. 18
4.3 Second level reset ……………………………………………………………………………………………………… 18
Revision history ……………………………………………………………………………………………………………………. 20
i
eWON COSY 141 — Installation Guide (How to)
Page 2/20
 |
[Page 1] eWON COSY 141 eWON COSY 141 — Installation Guide Contents This short guide explains how to install eWON COSY 141 and to get started with the embedded configuration web site. eWON Installation Guide IG 010 / Rev 1.3 |
 |
[Page 2] eWON COSY 141 Table of Contents 1. Foreword …………………………………………………………………… |
 |
[Page 3] eWON COSY 141 Foreword Chapter 1. 1. Foreword The present Installation Guide describes the hardware and software features of the eWON COSY. It does not address the 1-2-3 Setup procedure that is explained in 3 hands-on videos you can watch on eWON Website 2. Hard… |
 |
[Page 4] eWON COSY 141 Hardware description Chapter 2. 2.2 Markings The identification label of the eWON is placed at the left hand side of the housing. The different parts of the label are shown below: Device type and interfaces Serial n… |
 |
[Page 5] eWON COSY 141 Hardware description Chapter 2. 2.4 Mechanical outline The recommended free space in the cabinet for the eWON should be at least: 40-mm wide x 200-mm high x 160-mm deep (includes space for smooth cable bending). eWON COSY 141 — Installation Guide… |
 |
[Page 6] eWON COSY 141 Hardware description Chapter 2. 2.5 Mounting and environmental conditions The eWON COSY unit has an IP30 protection grade. It is therefore not suited for outdoor mounting. The design of the unit is such that it has to be integrated in an enclosed … |
 |
[Page 7] eWON COSY 141 Hardware description Chapter 2. 2.7 Front panel status LEDs Power (green = VDC present) Serial/MPI port activity (green = RX) Ethernet port key status (green = ON, DI = 1) Activity on LAN-ports (green steady = = TX) User = device life status … |
 |
[Page 8] eWON COSY 141 Hardware description Chapter 2. 2.9 Serial-ports 2.9.1 Configurable serial port The configuration of the physical serial mode is done by a set of 4 dip switches located on left side of the unit. The settings of the switches are shown in the table… |
 |
[Page 9] eWON COSY 141 Hardware description Chapter 2. 2.9.2 MPI port The MPI version of the eWON COSY is easily identifiable with its light turquoise square surrounding the SUBD9 female DB9 connector. Characteristic Value Physical mode MPI (n… |
 |
[Page 10] eWON COSY 141 Hardware description Chapter 2. 2.10 Digital input – Digital output The eWON COSY features one Digital Input (DI) to enable/disable the Internet port from outside and one Digital Output (DO) that returns the status of the VPN tunnel connection. T… |
 |
[Page 11] eWON COSY 141 Hardware description Chapter 2. (*) when the eWON COSY reboots, a short phase of ON state is part of the starting process. The digital output is activated by an open drain MOSFET transistor driven by an optocoupler. The maximum current flow into this… |
 |
[Page 12] eWON COSY 141 Software configuration Chapter 3. 3. Software configuration 3.1 Factory default IP settings Characteristic Value Machine LAN IP address 10.0.0.53 Machine LAN Subnet Mask 255.255.255.0 Internet port IP address 10.1.0.53 Internet port Subnet Mask 255… |
 |
[Page 13] eWON COSY 141 Software configuration Chapter 3. The company network address ranges (Company LAN and Site LAN in the example above) are specified and managed by the respective network administrators. These ranges simply cannot be changed. Most of the time the IP ad… |
 |
[Page 14] eWON COSY 141 Software configuration Chapter 3. 3.4 eWON COSY’s web interface This section covers only the basic principles of the eWON COSY 1-2-3 Setup. Each step of the 1-2-3 Setup is documented by a hands-on video tutorial. Watch on eWON Website … |
 |
[Page 15] eWON COSY 141 Software configuration Chapter 3. Log into the web site (user/password defaults are adm/adm): 3.4.2 Going through the 1-2-3 Setup Wizard After login, on a new eWON that was not yet configured the Quick Launch Wizard page opens: Button to access th… |
 |
[Page 16] eWON COSY 141 Software configuration Chapter 3. After going through each the wizard, the info bar of the eWON COSY shows checked boxes for each aspect that has been configured. The present installation guide does not cover all setup aspects in… |
 |
[Page 17] eWON COSY 141 Software configuration Chapter 3. The example below shows how the same Status page looks when the Internet connection locked by the digital input (switch open). To access the detailed Status page, click the button in the message box: Note: access t… |
 |
[Page 18] eWON COSY 141 Troubleshooting Chapter 4. 4. Troubleshooting 4.1 Resetting the eWON COSY You need a thin tip like an unfolded paper clip to actuate the reset button through the corresponding hole in the front panel. Location, see H… |
 |
[Page 19] eWON COSY 141 Troubleshooting Chapter 4. When performing a second level reset, the eWON does NOT restart in normal mode by itself and remains running in diagnose mode. Power the eWON OFF and ON again to restart in normal mode. As described before, the eWON returns… |
 |
[Page 20] eWON COSY 141 Revision history Revision Level Date Description 1.0 05/01/12 First officially released version 1.1 28/01/12 Changed wizard screen + add § on IP configuration + eBuddy + minor corrections after review 1.2 17/04/12 Correction pinout RS232, page 8 1…. |