Посмотреть инструкция для DJI FPV Remote Controller 2 бесплатно. Руководство относится к категории контроллеры, 1 человек(а) дали ему среднюю оценку 7.5. Руководство доступно на следующих языках: английский. У вас есть вопрос о DJI FPV Remote Controller 2 или вам нужна помощь? Задайте свой вопрос здесь
Не можете найти ответ на свой вопрос в руководстве? Вы можете найти ответ на свой вопрос ниже, в разделе часто задаваемых вопросов о DJI FPV Remote Controller 2.
Аккумулятор в моем устройстве контроллер начал ржаветь. Безопасно ли пользоваться устройством?
Продукт безопасен для использования после надлежащей очистки. Извлеките аккумулятор, надев перчатки, и очистите аккумуляторный отсек зубной щеткой, смоченной уксусом. После высыхания установите в устройство новые аккумуляторы.
Инструкция DJI FPV Remote Controller 2 доступно в русский?
К сожалению, у нас нет руководства для DJI FPV Remote Controller 2, доступного в русский. Это руководство доступно в английский.
Не нашли свой вопрос? Задайте свой вопрос здесь
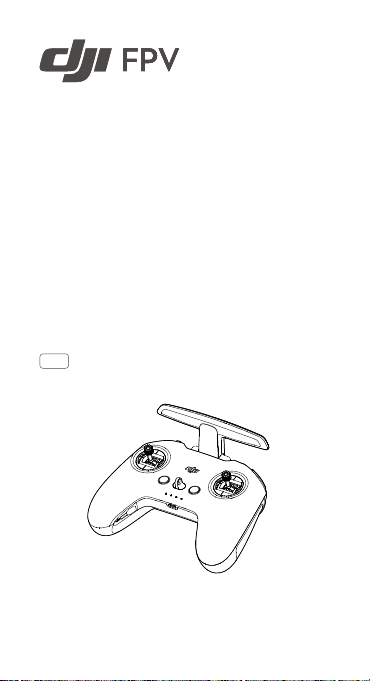
dji FPV Remote Controller 2 User Guide


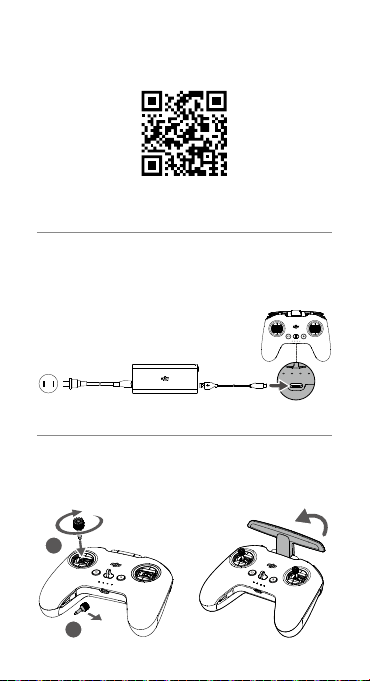
www.dji.com/dji-fpv/video


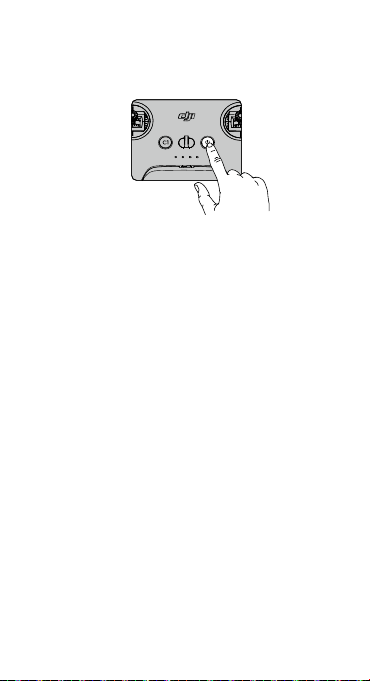
Press once to check the battery level. Press, then press and hold to turn on/off.
Linking
Ensure that all devices are powered on.
a. Aircraft + Goggles

- Press the link button on the goggles. The goggles will beep continually.
- Press and hold the power button of the aircraft until the battery level indicator blinks in sequence.
- The battery level indicator of the aircraft turns solid and displays the battery level. The goggles stop beeping when they are successfully linked and the video display is normal.
b. Aircraft + Remote Controller

- Press and hold the power button of the aircraft until the battery level indicator blinks in sequence.
- Press and hold the power button of the remote controller until it beeps continually and the battery level indicator blinks in sequence.
- The remote controller stops beeping when successfully linked and both the battery level indicators turn solid and display the battery level.
 The aircraft must be linked with the goggles before the remote controller.

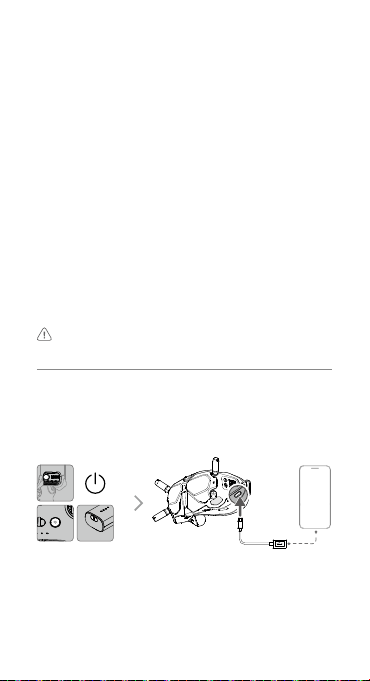
Connect the USB-C port of the goggles to the mobile device, run DJI Fly, and follow the prompt to activate.
Disclaimer and Warning
Please read this entire document and all safe and lawful practices DJITM provided carefully before use. Failure to read and follow instructions and warnings may result in serious injury to yourself or others, damage to your DJI product, or damage to other objects in the vicinity. By using this product, you hereby signify that you have read this disclaimer and warning carefully and that you understand and agree to abide by the terms and conditions herein. You agree that you are solely responsible for your own conduct while using this product, and for any consequences thereof. DJI accepts no liability for damage, injury or any legal responsibility incurred directly or indirectly from the use of this product.
DJI is a trademark of SZ DJI TECHNOLOGY CO., LTD. (abbreviated as “DJI”) and its affiliated companies. Names of products, brands, etc., appearing in this document are trademarks or registered trademarks of their respective owner companies. This product and document are copyrighted by DJI with all rights reserved. No part of this product or document shall be reproduced in any form without the prior written consent or authorization of DJI.
This document and all other collateral documents are subject to change at the sole discretion of DJI. For up to date product information, visit http://www.dji.com and click on the product page for this product.
This disclaimer is available in various languages. In the event of divergence among different versions, the English version shall prevail.
Usage
Visit http://www.dji.com/dji-fpv (User Manual) to learn more about how to use this product.
Specifications


Please refer to http://www.dji.com/service for after-sales service for your product where applicable.
DJI shall mean SZ DJI TECHNOLOGY CO., LTD. and/or its
affiliated companies where applicable.
Compliance Information
FCC Compliance Notice
This device complies with Part 15 of the FCC Rules. Operation is subject to the following two conditions: (1) This device may not cause harmful interference, and (2) This device must accept any interference received, including interference that may cause undesired operation. Any changes or modifications not expressly approved by the party responsible for compliance could void the user’s authority to operate the equipment.
This equipment has been tested and found to comply with the limits for a Class B digital device, pursuant to part 15 of the FCC Rules. These limits are designed to provide reasonable protection against harmful interference in a residential installation. This equipment generates, uses and can radiate radio frequency energy and, if not installed and used in accordance with the instructions, may cause harmful interference to radio communications. However, there is no guarantee that interference will not occur in a particular installation. If this equipment does cause harmful interference to radio or television reception, which can be determined by turning the equipment off and on, the user is encouraged to try to correct the interference by one or more of the following measures:
–Reorient or relocate the receiving antenna.
–Increase the separation between the equipment and receiver.
–Connect the equipment into an outlet on a circuit different from that to which the receiver is connected.
–Consult the dealer or an experienced radio/TV technician for help.
This equipment complies with FCC radiation exposure limits set forth for an uncontrolled environment. End user must follow the specific operating instructions for satisfying RF exposure compliance. This transmitter must not be co-located or operating in conjunction with any other antenna or transmitter.
The portable device is designed to meet the requirements for exposure to radio waves established by the Federal Communications Commission (USA). These requirements set a SAR limit of 1.6 W/kg averaged over one gram of tissue. The highest SAR value reported under this standard during product certification for use when properly worn on the body.
ISED Compliance Notice
This device contains license-exempt transmitter(s)/receiver(s) that comply with Innovation, Science and Economic Development Canada’s license-exempt RSS(s). Operation is subject to the following two conditions: (1)This device may not cause interference.(2)This device must accept any interference, including interference that may cause undesired operation of the device.
This equipment complies with RSS-102 radiation exposure limits set forth for an uncontrolled environment. This equipment should be installed and operated with minimum distance 20cm between the radiator and your body. This transmitter must not be collocated or operating in conjunction with any other antenna or transmitter.
This equipment complies with ISED radiation exposure limits set forth for an uncontrolled environment. End user must follow the specific operating instructions for satisfying RF exposure compliance. This transmitter must not be co-located or operating in conjunction with any other antenna or transmitter. The portable device is designed to meet the requirements for exposure to radio waves established by the ISED.
These requirements set a SAR limit of 1.6 W/kg averaged over one gram of tissue. The highest SAR value reported under this standard during product certification for use when properly worn on the body.
![]()
EU Compliance Statement: SZ DJI TECHNOLOGY CO., LTD. hereby declares that this device is in compliance with the essential requirements and other relevant provisions of the Directive 2014/53/EU. A copy of the EU Declaration of Conformity is available online at www.dji.com/eurocompliance
GB Compliance Statement: SZ DJI TECHNOLOGY CO., LTD. hereby declares that this device is in compliance with the essential requirements and other relevant provisions of Radio Equipment Regulations 2017. A copy of the GB Declaration of Conformity is available online at www.dji.com/eurocompliance
Environmentally friendly disposal![]() Old electrical appliances must not be disposed of together with the residual waste, but have to be disposed of separately. The disposal at the communal collecting point via private persons is for free. The owner of old appliances is responsible to bring the appliances to these collecting points or to similar collection points. With this little personal effort, you contribute to recycle valuable raw materials and the treatment of toxic substances.
Old electrical appliances must not be disposed of together with the residual waste, but have to be disposed of separately. The disposal at the communal collecting point via private persons is for free. The owner of old appliances is responsible to bring the appliances to these collecting points or to similar collection points. With this little personal effort, you contribute to recycle valuable raw materials and the treatment of toxic substances.
![]()
DJI is a trademark of DJI.
Copyright © 2021 DJI All Rights Reserved.
Printed in China
Documents / Resources
References
Remote Controller 2
User Guide
使用说明
使用說明
ユーザーガイド
사용자 가이드
Bedienungsanleitung
Guía de usuario
Guide de l’utilisateur
Guida dell’utente
Gebruiksaanwijzing
Manual do utilizador
Guia do usuário
Руководство пользователя
2021.01v1.0
1
1
2
3
www.dji.com/dji-fpv/video
2
1
2
4
EN Press once to check the battery level.
Press, then press and hold to turn on/off.
CHS 短按一次检查电量。
短按一次,再长按 2 秒可开启、关闭。
CHT 短按一次可檢查電量。
短按一次,再長按
2
秒可開啟、關閉。
JP
ボタンを
1
回押すと、バッテリー残量を確認できま
す。
ボタンを
1
回押した後、長押しすると、電源をオン
/オフにします。
KR
배터리
잔량을
확인하려면
한
번
누릅니다
.
한
번
누른
다음
다시
길게
누르면
켜지거나
꺼집니다
.
DE Drück die Taste einmal, um den Akkustand zu
überprüfen.
Drück die Taste einmal, dann noch einmal und halt
diese gedrückt, um ein- oder auszuschalten.
ES
Pulse una vez para comprobar el nivel de batería.
Pulse, vuelva a pulsar y mantenga pulsado para
encender o apagar.
FR
Appuyez une fois pour vérier le niveau de batterie.
Appuyez une fois, puis une fois de plus et maintenez
le bouton enfoncé pour allumer/éteindre.
IT Premere una volta per vericare il livello di carica
della batteria.

3
Premere, quindi premere e tenere premuto per
accendere/spegnere.
NL Druk eenmaal om het batterijniveau te controleren.
Druk en druk vervolgens en houd vast om aan/uit te
zetten.
PT Prima uma vez para vericar o nível da bateria.
Prima e, em seguida, prima de forma contínua para
ligar/desligar.
PT-BR Pressione uma vez para vericar o nível da bateria.
Pressione uma vez; em seguida, pressione
novamente e segure para ligar/desligar.
RU
Нажмите один раз для проверки уровня заряда
аккумулятора.
Нажмите, затем нажмите и удерживайте для
включения/выключения.
5
a.
b.

4
Linking
Ensure that all devices are powered on.
a. Aircraft + Goggles
1) Press the link button on the goggles. The goggles will
beep continually.
2) Press and hold the power button of the aircraft until the
battery level indicator blinks in sequence.
3) The battery level indicator of the aircraft turns solid and
displays the battery level. The goggles stop beeping
when they are successfully linked and the video display
is normal.
b. Aircraft + Remote Controller
1) Press and hold the power button of the aircraft until the
battery level indicator blinks in sequence.
2) Press and hold the power button of the remote controller
until it beeps continually and the battery level indicator
blinks in sequence.
3) The remote controller stops beeping when successfully
linked and both the battery level indicators turn solid and
display the battery level.
The aircraft must be linked with the goggles before the
remote controller.
对 频
对频前请确保所有设备均已开启。
a.
飞行器
+
飞行眼镜
1) 按下飞行眼镜的对频按键,飞行眼镜响起嘀 — 嘀…的
提示音。
2) 长按飞行器的电源按键直至电池电量指示灯循环闪烁。
3) 对频成功后,飞行器的电池电量指示灯常亮显示电量,
飞行眼镜提示音停止并显示图传。
b.
飞行器
+
遥控器
1) 长按飞行器的电源按键直至电池电量指示灯循环闪烁。
2) 长按遥控器的电源按键直至响起嘀 — 嘀…的提示音,且
电池电量指示灯循环闪烁。
3) 对频成功后,飞行器及遥控器的电池电量指示灯均常
亮显示电量,遥控器提示音停止。
飞行器需先完成与飞行眼镜的对频,再进行和遥控器的对频。

5
配 對
配對前請確保所有裝置均已開啟。
a. 航拍機 + 飛行眼鏡
1) 按下飛行眼鏡的配對按鍵,飛行眼鏡響起嘀 — 嘀…的提
示音。
2) 長按航拍機的電源按鍵直至電池電量指示燈循環閃爍。
3) 配對成功後,航拍機的電池電量指示燈恆亮顯示電量,
飛行眼鏡提示音停止並顯示影像傳輸。
b. 航拍機 + 遙控器
1) 長按航拍機的電源按鍵直至電池電量指示燈循環閃爍。
2) 長按遙控器的電源按鍵直至響起嘀 — 嘀…的提示音,且
電池電量指示燈循環閃爍。
3) 配對成功後,航拍機及遙控器的電池電量指示燈均恆
亮顯示電量,遙控器提示音停止。
航拍機需先完成與飛行眼鏡的配對,再進行和遙控器的配對。
リンク
すべての機器の電源が入っていることを確認します。
a. 機体 + ゴーグル
1) ゴーグルのリンクボタンを押します。ゴーグルからビ
ープ音が連続して鳴ります。
2) バッテリー残量インジケーターが順に点滅するまで
機体の電源ボタンを長押しします。
3) 機体のバッテリー残量インジケーターが点灯し、電池
残量を表示します。正常にリンクされ、動画ディスプ
レイが正常になると、ゴーグルのビープ音が止まります。
b. 機体 + 送信機
1) バッテリー残量インジケーターが順に点滅するまで
機体の電源ボタンを長押しします。
2) ビープ音が連続して鳴り、バッテリー残量インジケー
ターが順に点滅するまで、送信機の電源ボタンを長押
しします。
3) リンク作業が正常に終了し、両方のバッテリー残量イ
ンジケーターが点灯してバッテリー残量を表示され
ると、送信機のビープ音は止まります。
機体は送信機より前にゴーグルとリンクしておく必要があ
ります。

6
연동
모든 기기의 전원이 켜졌는지 확인합니다 .
a. 기체 + 고글
1) 고글의 연동 버튼을 누릅니다 . 고글은 계속 신호음 소리를 냅
니다 .
2) 배터리 잔량 표시기가 순차적으로 깜박일 때까지 기체의 전원
버튼을 길게 누릅니다 .
3) 기체의 배터리 잔량 표시기가 켜진 상태로 배터리 잔량을 표시
합니다 . 성공적으로 연동되고 동영상 디스플레이가 정상이면 ,
고글 신호음이 멈춥니다 .
b. 기체 + 조종기
1) 배터리 잔량 표시기가 순차적으로 깜박일 때까지 기체의 전원
버튼을 길게 누릅니다 .
2) 조종기가 계속해서 신호음을 내고 배터리 잔량 표시기가 순차
적으로 깜박일 때까지 조종기의 전원 버튼을 길게 누릅니다 .
3) 성공적으로 연동되면 조종기가 깜박임을 중단하고 두 배터리
잔량 표시기가 모두 켜지며 배터리 잔량을 표시합니다 .
기체를
고글과
먼저
연동한
후
조종기와
연동해야
합니다
.
Koppeln
Stell sicher, dass alle Geräte eingeschaltet sind.
a. Fluggerät + Goggles
1) Drück die Kopplungstaste auf den Goggles. Die
Goggles piepsen kontinuierlich.
2) Halt den Einschaltknopf des Fluggeräts gedrückt, bis
die Akkustandanzeige blinkt.
3) Die Akkustandsanzeige auf dem Fluggerät leuchtet
ständig und zeigt den Akkustand an. Die Goggles hören
auf zu piepen, sobald sie erfolgreich gekoppelt wurden
und die Videowiedergabe normal angezeigt wird.
b. Fluggerät + Fernsteuerung
1) Halt den Einschaltknopf des Fluggeräts gedrückt, bis
die Akkustandanzeige blinkt.
2) Halt den Einschaltknopf der Fernsteuerung
gedrückt, bis diese kontinuierlich piepst und die
Akkustandsanzeige blinkt.
3) Die Fernbedienung hört auf zu piepsen, wenn die
Verbindung erfolgreich hergestellt wurde und die
beiden Akkustandsanzeigen leuchten ständig und

7
zeigen den Akkustand an.
Das Fluggerät muss mit den Goggles vor der Fernsteuerung
verbunden werden.
Vinculación
Asegúrese de que todos los dispositivos estén encendidos.
a. Aeronave + Gafas
1) Presione el botón de enlace en las gafas. Las gafas
emitirán un pitido continuo.
2) Mantenga presionado el botón de encendido de la
aeronave hasta que el indicador del nivel de batería
parpadee en secuencia.
3) El indicador del nivel de batería de la aeronave se
vuelve fijo y muestra el nivel de batería. Las gafas
dejarán de pitar cuando se enlacen correctamente y la
visualización del vídeo sea normal.
b. Aeronave + Control remoto
1) Mantenga presionado el botón de encendido de la
aeronave hasta que el indicador del nivel de batería
parpadee en secuencia.
2) Mantenga presionado el botón de encendido del
control remoto hasta que emita un pitido continuo y el
indicador del nivel de batería parpadee en secuencia.
3) El control remoto deja de pitar cuando se conecta
correctamente y ambos indicadores del nivel de batería
se vuelven jos y muestran el nivel de batería.
La aeronave debe vincularse a las gafas antes que el control
remoto.
Appairage
Assurez-vous que tous les dispositifs sont sous tension.
a. Appareil + Casque
1) Appuyez sur le bouton d’appairage du casque. Le
casque émet alors un bip continu.
2) Maintenez le bouton d’alimentation de l’appareil
enfoncé jusqu’à ce que l’indicateur de niveau de
batterie clignote en séquence.
3) L’indicateur de niveau de batterie de l’appareil brille
de façon continue et affiche le niveau de batterie.
Le casque cessent de biper lorsqu’il est appairé et

8
l’afchage vidéo est normal.
b. Appareil + Radiocommande
1) Maintenez le bouton d’alimentation de l’appareil
enfoncé jusqu’à ce que l’indicateur de niveau de
batterie clignote en séquence.
2) Maintenez le bouton d’alimentation de la
radiocommande enfoncé jusqu’à ce qu’elle émette un
bip continu et que l’indicateur de niveau de batterie
clignote en séquence.
3) La radiocommande arrête de biper quand elle est
correctement appairée et que l’indicateur du niveau de
batterie passe au xe et afche le niveau de batterie.
L’appareil doit être appairé au casque avant la radiocommande.
Collegamento
Accertarsi che tutti i dispositivi siano accesi.
a. Aeromobile + visore
1) Premere il pulsante di collegamento sul visore. Il visore
emetterà un bip continuo.
2) Premere e tenere premuto il pulsante di accensione
dell’aeromobile fino a quando l’indicatore del livello
della batteria lampeggia in sequenza.
3) L’indicatore del livello della batteria dell’aeromobile si
illumina di luce ssa e visualizza il livello della batteria.
Gli occhiali smetteranno di lampeggiare quando
collegati correttamente e la visualizzazione delle
immagini si stabilizza.
b. Aeromobile + radiocomando
1) Premere e tenere premuto il pulsante di accensione
dell’aeromobile fino a quando l’indicatore del livello
della batteria lampeggia in sequenza.
2) Premere e tenere premuto il pulsante di accensione sul
radiocomando no a quando emette un bip continuo
e l’indicatore del livello della batteria lampeggia in
sequenza.
3) Il radiocomando smette di emettere il bip una volta
eseguito il collegamento ed entrambi gli indicatori
del livello della batteria si illuminano di luce fissa e
visualizzano il livello della batteria.
È necessario collegare l’aeromobile al visore prima del
radiocomando.

9
Koppelen
Zorg ervoor dat alle apparaten zijn ingeschakeld.
a. Drone + bril
1) Druk op de verbindingsknop op de bril. De bril piept
continu.
2) Druk en houd de aan-/uitknop van de drone ingedrukt
totdat de indicator van de accu in volgorde knippert.
3) De indicator voor het accuniveau van de drone brandt
constant en geeft het accuniveau weer. De bril stopt
met piepen wanneer deze met succes is gekoppeld en
het videoscherm normaal is.
b. Drone + afstandsbediening
1) Druk en houd de aan-/uitknop van de drone ingedrukt
totdat de indicator van de accu in volgorde knippert.
2) Druk en houd de aan-/uitknop van de afstandsbediening
ingedrukt totdat deze continu piept en de indicator voor
het accuniveau op volgorde knippert.
3) De afstandsbediening stopt met piepen wanneer deze
met succes is gekoppeld. Beide indicatoren voor het
accuniveau worden constant en geven het accuniveau
weer.
De drone moet vóór de afstandsbediening met de bril worden
gekoppeld.
Ligação
Assegure-se de que todos os dispositivos estão ligados.
a. Aeronave + Goggles
1) Prima o botão de ligação nos goggles. Os goggles
emitirão um sinal sonoro contínuo.
2) Prima e mantenha premido o botão de alimentação
da aeronave até que o indicador de nível de bateria
pisque sequencialmente.
3) O indicador de nível da bateria da aeronave ca sólido
e mostra o nível da bateria. Os óculos param de emitir
sinais sonoros quando ligados com êxito e o visor de
vídeo é normal.
b. Aeronave + Telecomando
1) Prima e mantenha premido o botão de alimentação
da aeronave até que o indicador de nível de bateria
pisque sequencialmente.

10
2) Prima e mantenha premido o botão do telecomando
até emitir um sinal sonoro contínuo e o indicador do
nível da bateria piscar em sequência.
3) O telecomando deixa de emitir um sinal sonoro quando
for ligado com êxito e ambos os indicadores do nível de
bateria carem sólidos e mostrarem o nível da bateria.
A aeronave tem de ser ligada aos goggles antes do
telecomando.
Vinculação
Verique se todos os dispositivos estão ligados.
a. Aeronave + óculos
1) Pressione o botão de vinculação nos óculos. Os óculos
emitirão um sinal sonoro contínuo.
2) Mantenha pressionado o botão liga/desliga da
aeronave até que o indicador de nível da bateria pisque
em sequência.
3) O indicador de nível da bateria da aeronave ficará
aceso e exibirá o nível da bateria. Os óculos de
proteção param de emitir sinal sonoro quando forem
vinculados com êxito e a exibição do vídeo for normal.
b. Aeronave + controle remoto
1) Mantenha pressionado o botão liga/desliga da
aeronave até que o indicador de nível da bateria pisque
em sequência.
2) Mantenha pressionado o botão liga/desliga do controle
remoto até ouvir um bipe contínuo e o indicador de
nível da bateria piscar em sequência.
3) O controle remoto vai parar de emitir sinal sonoro
quando vinculado com êxito e os dois indicadores de
nível da bateria carem acesos e exibirem o nível da
bateria.
A aeronave deve ser vinculada aos óculos antes do controle
remoto.
Сопряжение
Убедитесь, что все устройства включены.
а. Дрон + очки
1) Нажмите кнопку сопряжения на очках. Устройство
начнет издавать непрерывный звуковой сигнал.
11
2) Нажмите и удерживайте кнопку питания дрона до тех
пор, пока индикатор уровня заряда аккумулятора не
начнет последовательно мигать.
3) Индикатор уровня заряда аккумулятора дрона
начнет светиться и отобразит его оставшийся заряд.
Очки перестанут издавать звуковой сигнал при
успешном сопряжении, а изображение на экране
нормализуется.
б. Дрон + пульт управления
1) Нажмите и удерживайте кнопку питания дрона, пока
индикатор уровня заряда не начнет последовательно
мигать.
2) Нажмите и удерживайте кнопку питания пульта
управления, пока устройство не начнет издавать
непрерывный звуковой сигнал, а индикатор уровня
заряда аккумулятора – последовательно мигать.
3) Звуковой сигнал пульта управления прекратится
после успешного сопряжения, индикатор уровня
заряда аккумулятора начнет светиться и отобразит
оставшийся заряд.
Дрон сначала должен быть сопряжен сначала с очками,
а затем с пультом управления.
6
DJI Fly
App
Connect the USB-C port of the goggles to the mobile
device, run DJI Fly, and follow the prompt to activate.
 Loading…
, Digital FPV System, FPV Remote Controller Инструкция по применению | Manualzz") Loading…
Loading…
2019.06
Contents
2
CHS
6
CHT
快速入門指南
10
JP
14
KR
18
DE
22
ES
26
FR
30
IT
34
NL
Snelstartgids
38
PT
42
PT-BR
46
Краткое руководство пользователя
50
EN
RU
54
1
1. Power Button
2. C Button (customizable)
3. Control Sticks
9
11
3
4
1
10
5
8
2
6
7
15
16 17
10. SC Switch
11. Antennas
EN
10
24
11
12
15
11
12 13 14
15
16 17
18
19
13 14
16 17
24 20
18 a
b
20
a b
21 22
a
22
23
b
21
a b
25
19
23
25
USB Adapter
3
2
Low
High
Strong
Weak
4
765 g
5.725 - 5.850 GHz
FCC/SRRC: 4 km; CE: 0.7 km
Operating Current/Voltage
0.6 A @ 7.6 V
Operating Temperature
Charging Temperature
5° to 40° C (41° to 104° F)
LiPo 2S
4920 mAh
Voltage
7.6 V
Energy
37.39 Wh
5
EN
1. 电源按键
9
11
3
4
1
10
5
8
2
6
7
15
16 17
8. USB-C 接口
9. 三档开关 SB
CHS
10
24
11
12
15
11
12 13 14
15
16 17
18
19
13 14
16 17
24 20
18 a
b
20
a b
21 22
a
22
23
b
21
a b
25
19
23
25
12. 左拨轮
13. 录像按键
16. 三档开关 SD
17. 返回按键
交流电源
USB 充电器
USB-C 连接线
遥控器
(100-240V)
推荐使用 DJI Goggles RE、RONINTM-S、SPARKTM 配备的 USB 充电器或其他支持
QC 2.0 快充并符合 FCC/CE 标准的 USB 充电器。
7
2. 安装电池
CHS
2
3 合上仓盖。
低
高
强
弱
展开天线
8
5. 激 活
遥控器需在开机状态下通过 USB-C 接口连接至电脑并运行 DJI ASSISTANTTM 2 调参软
CHS
件进行激活。
(调参软件下载地址:https://www.dji.com/fpv/downloads)
765 g
5.725 - 5.850 GHz
锂离子电池
容量
4920 mAh
电压
能量
7.6 V
37.39 Wh
9
免責聲明
感謝您購買 DJI™ 產品。本文所提及的內容關係到您的安全以及合法權益與責任。使用本產品
之前,請仔細閱讀本文以確保已對產品進行正確的設定。若未遵循和未按照本文的說明與警
CHT
告來操作,可能會對您和周圍的人造成傷害,損壞本產品或其它鄰近的物品。本文件及本產
品所有相關文件的最終解釋權歸大疆 ™ 創新(DJI)所有。如有更新,恕不另行通知。請前往
www.dji.com 官方網站以取得最新的產品資訊。
一旦使用本產品,即視為您已經仔細閱讀本免責聲明與警告,理解、認可和接受本聲明全部條
款和內容。您承諾對使用本產品及可能帶來的後果負全部責任。您承諾僅出於正當目的使用本
產品,並且同意本條款以及大疆創新(DJI)制定的任何相關條例、政策和指南。大疆創新(DJI)
對於直接或間接使用本產品而造成的損壞、傷害及任何法律責任概不負責。使用者應遵循包括
但不限於本文提及的所有安全指南。
即使存在上述規定,消費者權益依然受當地法律法規所保障,並不受本免責聲明影響。
DJI 是深圳市大疆創新科技有限公司及其附屬公司的商標。本文出現的產品名稱、品牌等,均
為其所屬公司的商標或註冊商標。本產品及手冊之版權為大疆創新所有。未經許可,不得以任
何形式複製翻印。
簡介
DJI FPV 遙控器採用 DJI FPV 高清低延時數位影像傳輸技術,可大幅增強抗干擾能力以提高影
像傳輸的流暢性與穩定性,延時低至 7 ms,配合完備的功能按鍵可在最大 4 km* 通訊距離內完
成飛行器的各種操作和設定。
遙控器電池採用可更換設計,方便日常使用及維護保養。遙控器背部配備搖桿鬆緊調節螺絲,
無需拆卸即可調整搖桿手感。
1. 電源按鍵
2. 自訂按鍵 C
3. 搖桿
9
11
3
4
1
10
5
8
2
6
7
4. 吊帶掛鈎
12
5. 遙控器狀態指示燈
6. 遙控器電量指示燈
14 PPM 連接埠
7.13
模擬器
15
16 17
8. USB-C 連接埠
9. 三檔開關 SB
10. 三檔開關 SC
11. 天線
* 在開闊無遮蔽、無電磁波干擾的環境飛行,並且飛行高度為 120 m 左右,在 FCC 標準下遙控器可以
達到最大通訊距離。
10
12
15
11
12 13 14
15
16 17
18
19
13 14
16 17
CHT
10
24
11
24 20
18 a
b
20
a b
21 22
a
22
23
b
21
a b
25
19
23
25
12. 左轉盤
13. 錄影按鍵
14. 三檔開關 SA
15. 右轉盤
16. 三檔開關 SD
21. 油門鬆緊調節螺絲 *(美國手,Mode 2)
17. 返回按鈕
a. 順滑感調節螺絲
18. 右搖桿鬆緊調節螺絲(左右)
b. 棘輪感調節螺絲
19. 右搖桿鬆緊調節螺絲(上下)
20. 油門鬆緊調節螺絲 *(日本手,Mode 1)
a. 棘輪感調節螺絲
b. 順滑感調節螺絲
22. 左搖桿鬆緊調節螺絲(上下)
23. 左搖桿鬆緊調節螺絲(左右)
24. 電池匣蓋
25. 電池匣蓋鎖扣
* 油門桿的鬆緊只能由遙控器目前的搖桿操控方式所對應的油門鬆緊調節螺絲來調節,此時該搖桿對應
的上下方向的鬆緊調節螺絲無效。
1. 充 電
首次使用時,務必將電池充滿電以啟動電池。
交流電源
USB 充電器
USB-C 連接線
遙控器
(100-240V)
推薦使用 DJI Goggles RE、RONINTM-S、SPARKTM 配備的 USB 充電器或其他支援
QC 2.0 快充並符合 FCC/CE 標準的 USB 充電器。
11
2. 安裝電池
3
CHT
1 下滑遙控器背面的電池匣蓋鎖扣以打開匣蓋。
2 將智慧電池裝入電池匣,並向上推到頂。
電池解鎖
按鈕
2
3 關上匣蓋。
如需取下智慧電池,請打開匣蓋,按住電池解鎖按鈕,然後向下推動智慧電池將其取出。
3. 檢查電量與開啓 / 關閉
短按一次可檢查電量。
低
短按一次,再長按 2 秒可開啟、
高
關閉遙控器。
4. 調整天線
展開並調整遙控器天線,不同的天線位置接收到的訊號強度不同。
強
弱
展開天線
操控航拍機時,務必使航拍機處於最佳通
訊範圍內。適時調整操作者與航拍機之間
的方位或距離,以確保航拍機始終位於最
佳通訊範圍內。
最佳通訊範圍
12
5. 啟 動
遙控器需在開機狀態下透過 USB-C 連接埠連接至電腦並運行 DJI ASSISTANTTM 2 調參軟
體進行啟動。
CHT
(調參軟體下載網址:https://www.dji.com/fpv/downloads)
6. 配 對
1. 開啟天空端及遙控器。
2. 先按下天空端的配對按鍵,再同時按下遙控器的錄影按鍵、自定義按鍵 C 和右轉盤。*
3. 配對成功後,天空端和遙控器的配對狀態指示燈均為綠燈常亮。
* 等待配對時:
天空端 —— 配對狀態指示燈紅燈常亮
遙控器 —— 響起嘀 - 嘀 ... 的提示音,且藍色狀態指示燈閃爍
若同時使用 DJI FPV 飛行眼鏡和遙控器,天空端需先完成與飛行眼鏡的配對,再進行
和遙控器的配對。
產品規格
遙控器
重量
運轉頻率
765 g
5.725 - 5.850 GHz
最大訊號有效距離(無干擾、無遮蔽) FCC/SRRC:4 km;CE:0.7 km
發射功率(EIRP)
運作電流 / 電壓
操作溫度
充電環境溫度
遙控器智慧電池 (WB37-4920mAh-7.6V)
電池類型
鋰電池
容量
4920 mAh
電壓
能量
7.6 V
37.39 Wh
13
免責事項
JP
はじめに
1. 電源ボタン
9
11
3
4
1
10
5
8
2
6
7
15
12
15
11
12 13 14
13 14
15
16 17
18
19
16 17
24 20
18 a
b
20
a b
21 22
a
JP
10
24
11
22
23
b
21
a b
25
19
23
25
17. 戻るボタン
送信機
2
JP
3
3
2
低
高
強
弱
16
JP
仕様
送信機
重量
動作周波数
765 g
5.650~5.755 GHz
電力量
LiPo 2S
4920 mAh
7.6 V
37.39 Wh
17
KR
1. 전원 버튼
9
11
3
4
1
10
5
8
2
6
7
15
16 17
12
15
11
12 13 14
15
16 17
18
19
13 14
24 20
18 a
b
20
a b
21 22
a
16 17
22
KR
10
24
11
23
b
21
a b
25
19
23
25
KR
17. 뒤로 버튼
조종기
3
2
KR
높음
강함
약함
20
5. 활성화
6. 연동
765 g
5.725~5.850 GHz
작동 온도
0~40 °C
충전 온도
5~40 °C
0.6 A @ 7.6 V
LiPo 2S
용량
4920 mAh
전압
7.6 V
에너지
37.39 Wh
21
KR
9
11
3
4
1
10
5
8
2
6
7
22
10
24
11
12
15
11
12 13 14
15
16 17
16 17
22
23
b
21
DE
18
19
13 14
24 20
18 a
b
20
a b
21 22
a
a b
25
19
23
25
Steckdose
USB-Adapter
USB-C-Kabel
23
3
Akkufreigabetaste
2
Niedrig
Hoch
Stark
Ausklappen der Antennen
24
765 g
Betriebsfrequenz
5,725 - 5,850 GHz
FCC/SRRC: 4 km; CE: 0,7 km
0,6 A bei 7,6 V
Betriebstemperatur
0 °C bis 40 °C
Ladetemperatur
5 °C bis 40 °C
LiPo 2S
Kapazität
4920 mAh
Spannung
7,6 V
37,39 Wh
25
DE
ES
9
11
3
4
1
10
5
8
2
6
7
10
24
11
12
15
11
12 13 14
15
16 17
18
19
13 14
22
23
b
21
a b
25
19
ES
16 17
24 20
18 a
b
20
a b
21 22
a
23
25
Cable USB-C
2
Baja
Alta
Fuerte
Débil
28
765 g
5.725 - 5.850 GHz
De 0 °C a 40 °C (32 °F a 104 °F)
De 0,6 A a 7,6 V
LiPo 2S
4920 mAh
Voltaje
7.6 V
37,39 Wh
29
ES
FR
9
11
3
4
1
10
5
8
2
6
7
30
10
24
11
12
15
11
12 13 14
15
16 17
18
19
13 14
16 17
24 20
18 a
b
20
a b
21 22
a
22
23
b
21
a b
25
19
23
FR
25
Adaptateur USB
Câble USB-C
100-240 V
31
3
2
FR
Élevée
Fort
32
765 g
5,725 à 5,850 GHz
FCC/SRRC : 4 km ; CE : 0,7 km
0,6 A à 7,6 V
LiPo 2S
Capacité
4920 mAh
7,6 V
37,39 Wh
33
9
11
3
4
1
10
5
8
2
6
7
34
10
24
11
12
15
11
12 13 14
15
16 17
18
19
13 14
16 17
24 20
18 a
b
20
a b
21 22
a
22
23
b
21
a b
25
19
23
25
IT
35
2
Minimo
Massimo
Forte
Debole
36
765 g
5.725 - 5.850 GHz
0,6 A a 7,6 V
LiPo 2S
4920 mAh
7,6 V
37,39 Wh
37
Disclaimer
Inleiding
9
11
3
4
1
10
5
8
2
6
7
15
16 17
38
10
24
11
12
15
11
12 13 14
15
16 17
18
19
13 14
16 17
24 20
18 a
b
20
a b
21 22
a
22
23
b
21
a b
25
19
23
25
NL
USB-adapter
USB-C-kabel
Afstandsbediening
3
Batterijontgrendelknop
2
NL
Laag
Hoog
Sterk
Zwak
40
NL
765 g
Gebruiksfrequentie
5.725 – 5.850 GHz
0,6 A bij 7,6 V
5 ° tot 40 °C (41 ° tot 104 °F)
Afstandsbediening Intelligent Battery (WB37-4920mAh-7,6V)
Batterijtype
LiPo 2S
Capaciteit
4920 mAh
Spanning
7,6 V
37,39 Wh
41
PT
9
11
3
4
1
10
5
8
2
6
7
15
16 17
42
10
24
11
12
15
11
12 13 14
15
16 17
18
19
13 14
16 17
24 20
18 a
b
20
a b
21 22
a
22
23
b
21
a b
25
19
23
25
Tomada elétrica
100-240 V
Cabo USB-C
43
PT
2. Montagem da bateria
1
2
3
2
Baixo
Alto
Forte
Fraco
Desdobrar as antenas
44
PT
765 g
5,725 - 5,850 GHz
0° a 40° C (32° a 104° F)
0° a 40° C (32° a 104° F)
0,6 A a 7,6 V
Bateria inteligente do telecomando (WB37-4920mAh-7,6V)
Tipo de bateria
LiPo 2S
4920 mAh
7,6 V
37,39 Wh
45
9
11
3
4
1
10
5
8
2
6
7
46
10
24
11
12
15
11
12 13 14
15
16 17
18
19
13 14
16 17
24 20
18 a
b
20
a b
21 22
a
22
23
b
21
a b
25
19
23
25
Tomada elétrica
100-240 V
Cabo USB-C
PT-BR
2
Pressione uma vez para verificar o nível
da bateria.
Baixo
Alto
Forte
Fraco
48
PT-BR
Se você precisar usar o DJI FPV Goggles e o controle remoto juntos, a Unidade Aérea
deverá ser vinculada aos Goggles antes do controle remoto.
765 g
Frequência de funcionamento
5.725 a 5.850 GHz
FCC/SRRC: 4 km; CE: 0,7 km
0 a 40 °C
5° a 40° C
0,6 A a 7,6 V
LiPo 2S
4.920 mAh
7,6 V
37,39 Wh
49
Отказ от ответственности
Поздравляем с приобретением нового продукта DJI™! Информация, содержащаяся в этом
документе, касается вашей безопасности, законных прав и обязанностей. Чтобы должным
образом настроить продукт перед его использованием, внимательно ознакомьтесь с полным
содержанием данного документа. Пренебрежение содержимым данного документа и
несоблюдение мер безопасности может привести к серьезным травмам, повреждению продукта
DJI или другого имущества, находящегося поблизости. Компания DJI вправе единолично вносить
изменения в содержание данного и всех сопутствующих документов. Для получения последней
информации по продукту посетите веб-сайт www.dji.com.
Используя данный продукт, вы подтверждаете, что внимательно ознакомились с заявлением
об отказе от ответственности и предупреждением и соглашаетесь выполнять содержащееся
в данном документе пользовательское соглашение. Вы несете полную ответственность
за эксплуатацию данного продукта и все возможные последствия его использования.
Вы соглашаетесь использовать данный продукт только в правомерных целях и в полном
соответствии с применимым законодательством, правилами и предписаниями, а также всеми
условиями, мерами предосторожности, установками, курсами и руководствами, которые были
предоставлены и могут быть предоставлены в будущем компанией DJI.
DJI не несет ответственность за повреждения, травмы или любую юридическую ответственность,
прямо или косвенно вызванную использованием данного продукта. На пользователя возлагается
обязанность соблюдать правила техники безопасности и дозволенные законом практики, в
частности, изложенные в настоящем документе.
RU
Независимо от изложенного выше, данное заявление об отказе от ответственности не влияет на
законные права клиента, гарантируемые применимым национальным законодательством.
DJI – это товарный знак компании SZ DJI TECHNOLOGY CO., LTD. (сокращенно «DJI») и ее
дочерних компаний. Названия продуктов, торговых марок и т.д., содержащиеся в данном
документе, являются товарными знаками или зарегистрированными товарными знаками
соответствующих компаний. Этот продукт и документ DJI охраняются авторским правом. Все
права защищены. Никакая часть данного продукта или документа не может быть воспроизведена
в какой-либо форме без предварительного письменного согласия или разрешения DJI.
Введение
В пульте управления DJI FPV используется современная технология передачи DJI HDL
FPV с дальностью передачи сигнала до 4 км* и задержкой сигнала до 7 мс, что повышает
помехозащищенность и улучшает плавность и стабильность передачи видео. Пульт управления
оснащен аккумуляторами, которые можно быстро заменить, а также настраиваемыми кнопками.
Регулировочные винты позволяют легко настроить плавность хода джойстиков в соответствии с
предпочтениями пользователей.
9
11
3
4
1
10
5
8
2
6
7
1. Кнопка питания
2. Кнопка C (настраиваемая)
3. Джойстики
4. Отверстие для ремня
5. Светодиодный
индикатор состояния
12
15
6. Светодиодные индикаторы уровня
заряда аккумулятора
14симулятора
7. Порт13
PPM
16 17
8. Порт USB-C
9. Переключатель SB
10. Переключатель SC
11. Антенны
* Пульт управления может обеспечить приблизительную максимальную дальность передачи сигнала (FCC)
при работе на открытом пространстве без электромагнитных помех при высоте полета около 120 м.
50
10
24
11
12
15
11
12 13 14
15
16 17
18
19
13 14
16 17
24 20
18 a
b
20
a b
21 22
a
22
23
b
21
a b
25
19
23
25
21. Р егулировочные винты джойстика тяги*
(режим 2)
a. Регулировочный винт плавной
регулировки тяги
б. Регулировочный винт прерывистой
регулировки тяги
22. Регулировочный винт левого джойстика
(вертикальный)
23. Регулировочный винт левого джойстика
(горизонтальный)
24. Крышка отсека аккумулятора
25. Фиксатор крышки отсека аккумулятора
* Для выбора между прерывистой и плавной регулировкой тяги необходимо регулировать тот винт
джойстика тяги, который соответствует текущему режиму управления. В зависимости от режима
управления, соответствующий регулировочный винт джойстика вертикального движения будет
недоступен.
1. Зарядка аккумулятора
Полностью зарядите аккумулятор перед первым использованием.
Розетка
100–240 В
USB-адаптер
Кабель USB-C
Пульт управления
Рекомендуется использовать USB-адаптер для DJI Goggles RE, RONIN™-S, SPARK™ или любой
сертифицированный FCC/CE USB-адаптер, поддерживающий технологию Quick Charge 2.0.
51
RU
12. Левое колесико
13. Кнопка записи
14. Переключатель SA
15. Правое колесико
16. Переключатель SD
17. Кнопка возврата
18. Р егулировочный винт правого джойстика
(горизонтальный)
19. Р егулировочный винт правого джойстика
(вертикальный)
20. Р егулировочные винты джойстика тяги*
(режим 1)
a. Регулировочный винт прерывистой
регулировки тяги
б. Регулировочный винт плавной
регулировки тяги
2. Установка аккумулятора
1 Сдвиньте фиксатор на обратной стороне
пульта управления вниз, чтобы открыть
крышку.
2 Вставьте аккумулятор Intelligent Battery в
отсек и надавите на него до щелчка.
3
Кнопка
отсоединения
аккумулятора
2
3 Закройте крышку.
Чтобы снять аккумулятор Intelligent Battery, откройте крышку, нажмите и удерживайте
кнопку отсоединения аккумулятора и надавите на аккумулятор вниз.
3. П роверка уровня заряда аккумулятора и включение/
выключение питания
RU
Нажмите один раз для проверки уровня
заряда аккумулятора.
Нажмите на кнопку один раз, затем
нажмите снова и удерживайте в
течение двух секунд для включения или
выключения.
Низкий
Высокий
4. Подготовка антенн
Разложите и отрегулируйте положение антенн пульта управления. Мощность сигнала зависит
от положения антенн.
Сильный
Слабый
Раскладывание антенн
Следите за тем, чтобы дрон оставался в
пределах оптимальной дальности передачи
сигнала. Если сигнал слабый, отрегулируйте
положение антенн или подведите дрон
ближе.
Оптимальная дальность
передачи сигнала
52
5. Активация
При включенном питании пульта управления подключите его через порт USB-C к компьютеру
и запустите приложение DJI ASSISTANTTM 2 для активации.
Загрузите приложение DJI Assistant 2 по ссылке https://www.dji.com/fpv/downloads
6. Сопряжение
1. Включите воздушный модуль и пульт управления DJI FPV.
2. Нажмите кнопку сопряжения на воздушном модуле, а затем одновременно нажмите кнопку
записи, кнопку C и правое колесико на пульте управления*.
3. При успешном сопряжении оба индикатора состояния сопряжения начнут непрерывно
светиться зеленым цветом.
RU
* Состояние готовности устройств обозначается следующим образом:
Воздушный модуль: индикатор состояния сопряжения воздушного модуля светится красным цветом.
Пульт управления: пульт управления издает непрерывный звуковой сигнал, а индикатор состояния мигает
синим.
В случае необходимости совместного использования очков DJI FPV и пульта управления
необходимо выполнить сопряжение воздушного модуля с очками до сопряжения с пультом
управления.
Технические характеристики
Пульт управления
Масса
Макс. дальность передачи сигнала
(при отсутствии препятствий и помех)
765 г
Мощность передатчика (ЭИИМ)
Рабочий ток/напряжение
FCC: <30 дБм; CE: <14 дБм; SRRC: <19 дБм
Диапазон рабочих температур
0...+40°C
Диапазон температур зарядки
FCC/SRRC: 4 км; CE: 0,7 км
0,6 А при 7,6 В
Аккумулятор Intelligent Battery для пульта управления (WB37-4920 мАч-7,6 В)
Тип аккумулятора
Литий-полимерный 2S
Емкость
4920 мАч
Напряжение
7,6 В
Энергия
37,39 Вт ⋅ ч
53
54
55
Umweltfreundliche Entsorgung
Elektro-Altgeräte dürfen nicht mit gewöhnlichem Abfall entsorgt werden und müssen separat entsorgt werden. Die
Entsorgung an kommunalen Sammelstellen ist für Privatpersonen kostenlos. Die Eigentümer der Altgeräte sind für den
Transport zu den Sammelstellen verantwortlich. Durch diesen geringen Aufwand können Sie zur Wiederverwertung von
wertvollen Rohmaterialien beitragen und dafür sorgen, dass umweltschädliche und giftige Substanzen ordnungsgemäß
unschädlich gemacht werden.
Tratamiento de residuos responsable con el medio ambiente
Los aparatos eléctricos viejos no pueden desecharse junto con los residuos orgánicos, sino que deben ser desechados
por separado. Existen puntos limpios donde los ciudadanos pueden dejar estos aparatos gratis. El propietario de los
aparatos viejos es responsable de llevarlos a estos puntos limpios o similares puntos de recogida. Con este pequeño
esfuerzo estás contribuyendo a reciclar valiosas materias primas y al tratamiento de residuos tóxicos.
Mise au rebut écologique
Les appareils électriques usagés ne doivent pas être éliminés avec les déchets résiduels. Ils doivent être éliminés
séparément. La mise au rebut au point de collecte municipal par l'intermédiaire de particuliers est gratuite. Il incombe au
propriétaire des appareils usagés de les apporter à ces points de collecte ou à des points de collecte similaires. Avec ce
petit effort personnel, vous contribuez au recyclage de matières premières précieuses et au traitement des substances
toxiques.
Smaltimento ecologico
I vecchi dispositivi elettrici non devono essere smaltiti insieme ai rifiuti residui, ma devono essere smaltiti separatamente.
Lo smaltimento da parte di soggetti privati presso i punti di raccolta pubblici è gratis. È responsabilità del proprietario
dei vecchi dispositivi portarli presso tali punti di raccolta o punti di raccolta analoghi. Grazie a questo piccolo impegno
personale contribuirete al riciclo di materie prime preziose e al corretto trattamento di sostanze tossiche.
Milieuvriendelijk afvoeren
Oude elektrische apparaten mogen niet worden weggegooid samen met het restafval, maar moeten afzonderlijk worden
afgevoerd. Afvoeren via het gemeentelijke inzamelpunt is gratis voor particulieren. De eigenaar van oude toestellen
is verantwoordelijk voor het inleveren van de apparaten op deze of vergelijkbare inzamelpunten. Met deze kleine
persoonlijke inspanning lever je een bijdrage aan de recycling van waardevolle grondstoffen en de verwerking van giftige
stoffen.
Eliminação ecológica
Os aparelhos elétricos antigos não podem ser eliminados juntamente com os materiais residuais. Têm de ser
eliminados separadamente. A eliminação no ponto de recolha público através de entidades particulares é gratuita. É
da responsabilidade do proprietário de aparelhos antigos levá-los a estes pontos de recolha ou a pontos de recolha
semelhantes. Com este pequeno esforço pessoal, contribui para a reciclagem de matérias-primas úteis e para o
tratamento de substâncias tóxicas.
Thailand Warning message
เครื่องโทรคมนาคมและอุปกรณ์นี้ มีความสอดคล้องตามข้อกำ�หนดของ กทช.
有害物质
部件名称
铅
(Pb)
汞
(Hg)
镉
(Cd)
六价铬
(Cr+6)
多溴联苯
(PBB)
多溴二苯醚
(PBDE)
线路板
×
○
○
○
○
○
外壳
×
○
○
○
○
○
×
○
○
○
○
○
内部线材
×
○
○
○
○
○
其他配件
×
○
○
○
○
○
56
DJI Support
DJI 技术支持
DJI 技術支援
DJI サポート
DJI 고객지원
DJI Support
Asistencia técnica de DJI
Service client DJI
Assistenza DJI
DJI-ondersteuning
Assistência da DJI
Suporte DJI
Техническая поддержка DJI
https://www.dji.com/support
https://www.dji.com/fpv
1HMDRCGS02TY