Introduction: Delta Trike With Front Wheel Drive
This trike is a long wheelbase, semi-recumbent, rear steering delta. I have built five delta trikes so far. This one was number three and it is still my favorite one to ride.
There are three main parts to the trike: the front power wheel (Steps 1-4), the main frame with seat (Steps 5-6), the rear steering wheels (Steps 7-11), rigging (12) and the optional cargo rack (13). The trike is built from parts from three donor bikes I got at a bike coop as I described in this «Ible»: https://www.instructables.com/id/How-I-Get-Free-Bike-Parts-Legally/ A parts list is on its way (14).
Welding is required and the cost for purchased parts was roughly $100.
Some specs:
Front wheel 24″
Rear wheels 20″
Width of track 31″
Wheelbase 54″
Length overall 78″
Weight 56#
Step 1: Front Wheel Drive
Front wheel drive has some advantages and some disadvantages. I like it because it is simpler than a rear wheel drive delta trike (no differential is required) and there is not a long chain run.
The two main disadvantages are that it loses traction going up hills because most of your weight is to the rear of the trike and that you probably will want to steer with the rear wheels.
Step 2: Harvest a Rear Fork With Pedals
Choose a rear fork that has a derailleur that can be remounted upside down.
Start thinking of the old right side of the rear-facing fork as the new left side of the front-facing fork.
Cut off the top tube and bottom tube right next to the bottom bracket shell.
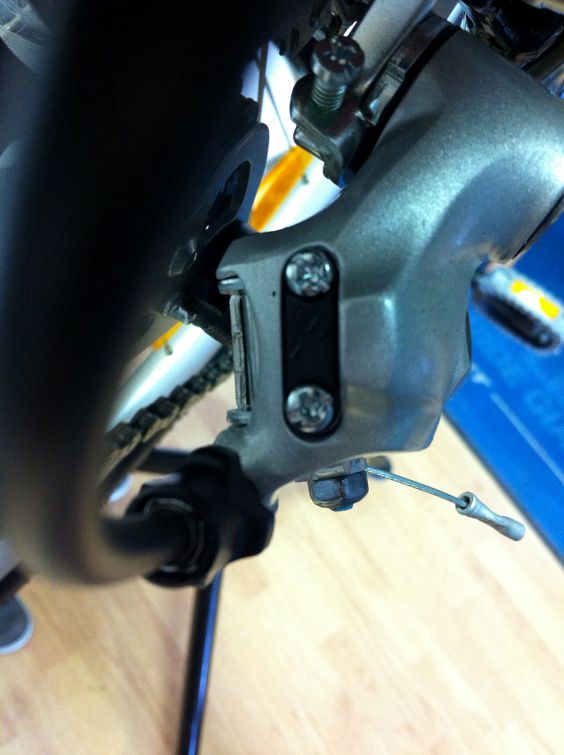
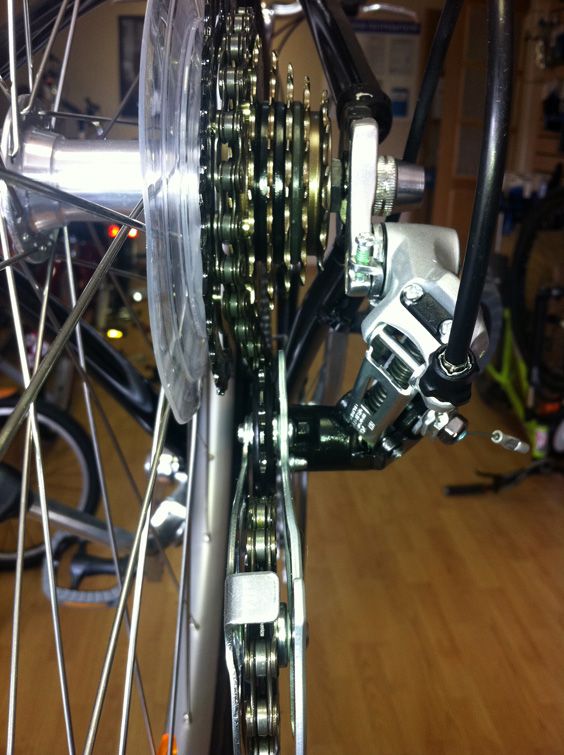
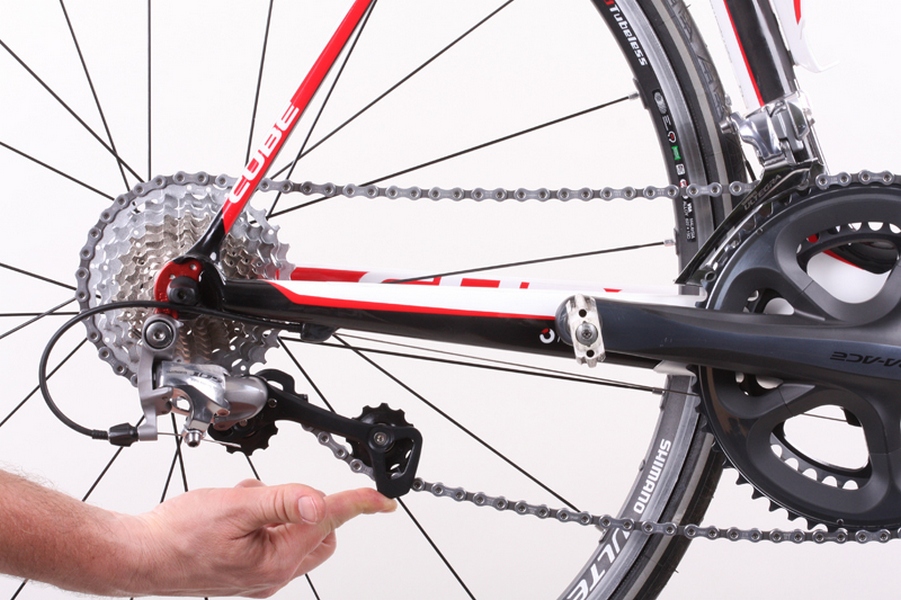
Step 3: Invert the Derailleur
This takes some getting used to. Your new trike will have a derailleur that faces upward rather than one that hangs down. The bottom loop of the chain is the power side and the top loop of chain (with the derailleur) is the slack side. Photo #2 shows a closeup of the inverted derailleur.
Step 4: Weld Main Frame to Bottom Bracket Shell
The front end of the main frame will be welded to the bottom bracket shell (BBS). It helps if you can «fish mouth» the main frame tubes (curving cuts made so that the tubes wrap around the BBS and give increased surface area for welding). Tack them in place and check the alignment.
Step 5: The Main Frame
Tubing harvested from old bicycle frames is used to build the main trike frame. Two pieces of tubing are welded to the bottom bracket shell (previous step). The top piece still had a head tube attached to it which served as a nice place to link the tubing segments (Photo #1, #2 and #3). The rear part of the main frame is two tubes, one on top of the other.
The completed lower part of the frame is 40″ long. At the rear the main tube makes a right angle turn upward (Photo #4) and then is 23″ tall. The upright tube is double for about half its height (Photo #5).
Step 6: Seating
I have used two different kinds of fishing boat seats on this trike. The first was a cushioned seat that was nice, but heavy and expensive (Photo #1). The second was a lighter plastic seat that was only about $20 (Photo #2).
Photo #3 shows the location of the seat attachment. Up close (Photo #4) you can see that both seats were attached to 1″ angle iron pieces welded to the main frame of the trike. The two pieces of angle iron that are at right angle to the main frame tubes were for the first cushy seat. The two pieces of angle iron that are joined and run along the long axis of the main frame were for the second lighter seat. You don’t need both attachments — choose one way or the other.
Photo #5 shows the underside of the new seat. There are two pieces of 1″ angle iron welded to half of a rotating seat mount. I drilled out the center rivet of the seat mount and separated the two black metal plates. I spaced the angle iron mounts so they fit along the outside of the angle iron pieces welded to the main frame and welded them to the black metal plate. Then I drilled three 1/4″ holes through all four angle iron pieces to hold the seat to the frame (Photo #6 and #7).
Step 7: Harvest Two Matching Front Frames
Harvest two front frames from donor bikes that match each other. You want the two top tubes and the two bottom tubes to line up with each other when the head tubes are parallel. This will give you a symmetrical rear end (Photo #2 and #3). Cut the top and bottom tubes of each front frame so the cut ends are parallel with the head tube and the same lengths on both frames. The easy way to test this is to stand the cut frames on the floor to see if the head tubes are parallel with the floor and identical (Photo #4)
The two front forks need to match too. You can swap matching front forks in place of unmatched ones if needed (Photo #5).
I refer to these two side frames as «wings».
Step 8: Weld Wings to Main Frame
The two front frames prepared in the previous step are welded to the main frame vertical tube. Tack the frames in place and check all your alignments.
The two head tubes should be exactly vertical and thus parallel with each other. The two «wings» (side frames) on each side of the main vertical tube should be in line with each other. When everything is true and square weld it solidly together.
Step 9: Weld Steering Arms to Forks
I used 1″ angle iron to make steering arms that projected 6″ from the forks. I ended up putting an arm facing forward and back on each of my forks so i could try different rakes by turning the wheels around.
I ended
Step 10: Add Steering Linkage
Photo #1 shows the steering linkage. This is a tube 24″ long with a 3/8″ nut welded to each end. Photos #2 and #3 show the two ends of the linkage tube with carriage bolts threaded into the nuts.
A 2″ long 3/8″ hex head bolt is welded at right angles to the carriage bolt and is bolted through a 3/8″ hold in the end of the steering arm with two more nuts (Photo #4).
Step 11: Add Tillers
The tillers are 3/4″ EMT conduit each 28.5″ long. BMX head tube fittings are used to hold the tillers.
The tillers move in tandem because the two forks are linked together by the steering linkage. Moving the tillers to the left turns the trike to the right (and vice versa) just like a tiller on a sailboat. This will seem strange at first but soon becomes second nature.
Step 12: Rigging
The rear derailleur (Well, it is actually the front one now!) cable (Photo #1) loops back to a shifter mounted on the main frame top tube (Photo #2). The other device on the main tube in Photo #2 is a computer to give me speed and mileage readings.
I have brakes only on the front wheel. The cable from the brake (Photo #3) loops back under the seat and up to the right tiller (this should probably be on the left tiller to be standard) (Photo #4). I have an inner tube tie around the brake lever to act as a parking brake in this Photo.
Rear brakes will eventually be added, but they need to be synchronized on both rear wheels or they will pull the bike as it stops.
Step 13: Cargo Carrier
The optional cargo rack is a piece of chipboard that is 20″ by 30″ (Photo #1).
A piece of 3/4″ EMT conduit is welded to the top of another piece of 3/4″ EMT which slides down into the seat tube over the front wheel (Photo #2) and is bolted in place.
A second piece of 3/4″ EMT extends is welded to two 1/2″ EMT supports that extend down on each side of the front wheel stays. «J» hooks are used to secure these supports to the seat stays and chain stays (Photo #3, #4 and #5).
Please see my «Ible» on some safety tips for welding EMT if you are not familiar with the safety concerns: https://www.instructables.com/id/Welding-EMT-Conduit/
Step 14: Parts List
I am compiling this now. I will have it here soon.
Step 15: Video Ridearound
Here is a ridearound video on YouTube
Step 16: Video Walkaround
Here is a walkaround video on YouTube
Цена указана за велосипед в собранном виде, с предпродажной подготовкой. При покупке велосипеда «в коробке» предоставляется скидка.
Отзывы покупателей о товаре — 0
Комментарии
Комментариев нет
Описание
Колёса == 26 х 2,4″
Скорости == 7 скоростей
Навеска == Shimano TX30-7, TZ-31
Вес нетто == 29.7 кг
Размер коробки 70 см х 112 см х 26 см
Как купить
Для покупки товара в нашем интернет-магазине выберите понравившийся товар и добавьте его в корзину. Далее перейдите в Корзину и нажмите на «Оформить заказ» или «Быстрый заказ».
Когда оформляете быстрый заказ, напишите ФИО, телефон и e-mail. Вам перезвонит менеджер и уточнит условия заказа. По результатам разговора вам придет подтверждение оформления товара на почту или через СМС. Теперь останется только ждать доставки и радоваться новой покупке.
Оформление заказа в стандартном режиме выглядит следующим образом. Заполняете полностью форму по последовательным этапам: адрес, способ доставки, оплаты, данные о себе. Советуем в комментарии к заказу написать информацию, которая поможет курьеру вас найти. Нажмите кнопку «Оформить заказ».
Оплата
Оплачивайте покупки удобным способом. В интернет-магазине доступно 4 варианта оплаты:
- Наложенный платеж. Действует только при отправке Почтой РФ и при сумме заказа до 2 тысяч рублей.
- Безналичный расчет при оформлении в интернет-магазине: карты Visa и MasterCard, МИР. Чтобы оплатить покупку, система перенаправит вас на сервер системы оплаты. Здесь нужно ввести номер карты, срок действия и имя держателя.
- Электронный счет через систему Яндекс Касса. После оформления заказа оператор перезвонит вам и выставит счет для оплаты картой на номер телефона или электронную почту.
- Бухгалтерский счет, для оплаты по реквизитам.
Доставка
Экономьте время на получении заказа. В интернет-магазине доступно 3 варианта доставки:
- Доставка транспортными компаниями СДЭК, ПЭК, Деловые Линии, КИТ, Энергия. Для отправки заказа транспортными компаниями нужна 100% предоплата за заказ.
- Самовывоз из магазина.
- Почтовая доставка через почту России. Когда заказ придет в отделение, на ваш адрес придет извещение о посылке. Перед оплатой вы можете оценить состояние коробки: вес, целостность. Вскрывать коробку самостоятельно вы можете только после оплаты заказа.
Характеристики
Навеска
—
Shimano TX30-7, TZ-31
Цвета
—
красный, черный; синий
Цена действительна только для интернет-магазина и может отличаться от цен в розничных магазинах
Велосипед 26″ 3-х колесный DELTA TRIKE (7 скоростей, корзинка спереди и сзади) (см. ЗИП) в интернет-магазине moto18.ru
Поделись ссылкой
Артикул: 36132
Технические характеристики
| Колёса: | 26 х 2,4″ |
|---|---|
| Скорости: | 7 скоростей |
| Навеска: | Shimano TX30-7, TZ-31 |
| Вес нетто: | 29.7 кг |
| Цвета: | красный, черный; синий |
Отзывы покупателей о товаре — 0
Цена указана за велосипед в собранном виде, с предпродажной подготовкой. При покупке велосипеда «в коробке» предоставляется скидка.
Описание
Размер коробки 70 см х 112 см х 26 см
Комментарии
Комментариев нет
Introduction: Delta Trike With Front Wheel Drive
This trike is a long wheelbase, semi-recumbent, rear steering delta. I have built five delta trikes so far. This one was number three and it is still my favorite one to ride.
There are three main parts to the trike: the front power wheel (Steps 1-4), the main frame with seat (Steps 5-6), the rear steering wheels (Steps 7-11), rigging (12) and the optional cargo rack (13). The trike is built from parts from three donor bikes I got at a bike coop as I described in this «Ible»: https://www.instructables.com/id/How-I-Get-Free-Bike-Parts-Legally/ A parts list is on its way (14).
Welding is required and the cost for purchased parts was roughly $100.
Some specs:
Front wheel 24″
Rear wheels 20″
Width of track 31″
Wheelbase 54″
Length overall 78″
Weight 56#
Step 1: Front Wheel Drive
Front wheel drive has some advantages and some disadvantages. I like it because it is simpler than a rear wheel drive delta trike (no differential is required) and there is not a long chain run.
The two main disadvantages are that it loses traction going up hills because most of your weight is to the rear of the trike and that you probably will want to steer with the rear wheels.
Step 2: Harvest a Rear Fork With Pedals
Choose a rear fork that has a derailleur that can be remounted upside down.
Start thinking of the old right side of the rear-facing fork as the new left side of the front-facing fork.
Cut off the top tube and bottom tube right next to the bottom bracket shell.
Step 3: Invert the Derailleur
This takes some getting used to. Your new trike will have a derailleur that faces upward rather than one that hangs down. The bottom loop of the chain is the power side and the top loop of chain (with the derailleur) is the slack side. Photo #2 shows a closeup of the inverted derailleur.
Step 4: Weld Main Frame to Bottom Bracket Shell
The front end of the main frame will be welded to the bottom bracket shell (BBS). It helps if you can «fish mouth» the main frame tubes (curving cuts made so that the tubes wrap around the BBS and give increased surface area for welding). Tack them in place and check the alignment.
Step 5: The Main Frame
Tubing harvested from old bicycle frames is used to build the main trike frame. Two pieces of tubing are welded to the bottom bracket shell (previous step). The top piece still had a head tube attached to it which served as a nice place to link the tubing segments (Photo #1, #2 and #3). The rear part of the main frame is two tubes, one on top of the other.
The completed lower part of the frame is 40″ long. At the rear the main tube makes a right angle turn upward (Photo #4) and then is 23″ tall. The upright tube is double for about half its height (Photo #5).
Step 6: Seating
I have used two different kinds of fishing boat seats on this trike. The first was a cushioned seat that was nice, but heavy and expensive (Photo #1). The second was a lighter plastic seat that was only about $20 (Photo #2).
Photo #3 shows the location of the seat attachment. Up close (Photo #4) you can see that both seats were attached to 1″ angle iron pieces welded to the main frame of the trike. The two pieces of angle iron that are at right angle to the main frame tubes were for the first cushy seat. The two pieces of angle iron that are joined and run along the long axis of the main frame were for the second lighter seat. You don’t need both attachments — choose one way or the other.
Photo #5 shows the underside of the new seat. There are two pieces of 1″ angle iron welded to half of a rotating seat mount. I drilled out the center rivet of the seat mount and separated the two black metal plates. I spaced the angle iron mounts so they fit along the outside of the angle iron pieces welded to the main frame and welded them to the black metal plate. Then I drilled three 1/4″ holes through all four angle iron pieces to hold the seat to the frame (Photo #6 and #7).
Step 7: Harvest Two Matching Front Frames
Harvest two front frames from donor bikes that match each other. You want the two top tubes and the two bottom tubes to line up with each other when the head tubes are parallel. This will give you a symmetrical rear end (Photo #2 and #3). Cut the top and bottom tubes of each front frame so the cut ends are parallel with the head tube and the same lengths on both frames. The easy way to test this is to stand the cut frames on the floor to see if the head tubes are parallel with the floor and identical (Photo #4)
The two front forks need to match too. You can swap matching front forks in place of unmatched ones if needed (Photo #5).
I refer to these two side frames as «wings».
Step 8: Weld Wings to Main Frame
The two front frames prepared in the previous step are welded to the main frame vertical tube. Tack the frames in place and check all your alignments.
The two head tubes should be exactly vertical and thus parallel with each other. The two «wings» (side frames) on each side of the main vertical tube should be in line with each other. When everything is true and square weld it solidly together.
Step 9: Weld Steering Arms to Forks
I used 1″ angle iron to make steering arms that projected 6″ from the forks. I ended up putting an arm facing forward and back on each of my forks so i could try different rakes by turning the wheels around.
I ended
Step 10: Add Steering Linkage
Photo #1 shows the steering linkage. This is a tube 24″ long with a 3/8″ nut welded to each end. Photos #2 and #3 show the two ends of the linkage tube with carriage bolts threaded into the nuts.
A 2″ long 3/8″ hex head bolt is welded at right angles to the carriage bolt and is bolted through a 3/8″ hold in the end of the steering arm with two more nuts (Photo #4).
Step 11: Add Tillers
The tillers are 3/4″ EMT conduit each 28.5″ long. BMX head tube fittings are used to hold the tillers.
The tillers move in tandem because the two forks are linked together by the steering linkage. Moving the tillers to the left turns the trike to the right (and vice versa) just like a tiller on a sailboat. This will seem strange at first but soon becomes second nature.
Step 12: Rigging
The rear derailleur (Well, it is actually the front one now!) cable (Photo #1) loops back to a shifter mounted on the main frame top tube (Photo #2). The other device on the main tube in Photo #2 is a computer to give me speed and mileage readings.
I have brakes only on the front wheel. The cable from the brake (Photo #3) loops back under the seat and up to the right tiller (this should probably be on the left tiller to be standard) (Photo #4). I have an inner tube tie around the brake lever to act as a parking brake in this Photo.
Rear brakes will eventually be added, but they need to be synchronized on both rear wheels or they will pull the bike as it stops.
Step 13: Cargo Carrier
The optional cargo rack is a piece of chipboard that is 20″ by 30″ (Photo #1).
A piece of 3/4″ EMT conduit is welded to the top of another piece of 3/4″ EMT which slides down into the seat tube over the front wheel (Photo #2) and is bolted in place.
A second piece of 3/4″ EMT extends is welded to two 1/2″ EMT supports that extend down on each side of the front wheel stays. «J» hooks are used to secure these supports to the seat stays and chain stays (Photo #3, #4 and #5).
Please see my «Ible» on some safety tips for welding EMT if you are not familiar with the safety concerns: https://www.instructables.com/id/Welding-EMT-Conduit/
Step 14: Parts List
I am compiling this now. I will have it here soon.
Step 15: Video Ridearound
Here is a ridearound video on YouTube
Step 16: Video Walkaround
Here is a walkaround video on YouTube
“Thanks for the birthday wish.”
~ George H., Texas
October 30, 2013
NEWS
AZTV
Read our blog!
TUTORIALS
Chain Link Tool
Wheel Lacing
Building a practical velomobile
This project is on hold until we find a practical place to build it!
Building the
Atomic
Zombie
Warrior
Racing Trike
By David Monk, Elwood, Utah, USA
T
he ancient Chinese philosopher Lauzi (c604
B.C. — c531 B.C.) wrote,
“A journey of a thousand miles begins with a single step.” My journey begins in about 1971 when I was a fourth grade boy without a bike. All of my friends had bikes and some even had custom bikes, but my family did not have the means to buy me a bike.
So, one spring afternoon, I walked the five or so miles across town to the city dump and began to look for pieces to build my own bike. I found a frame that looked pretty straight, handle bars, wheels and tires.
With a little help from a friend, I carried all these pieces home and began assembling my “new” bike. A few hours and a can of spray paint later I had an awesome bike. It was sized for someone closer to six feet tall, but it was mine and it was fast. I rode that bike for many years putting on hundreds of miles per year.
Although, I couldn’t sit on the seat for three years until I was tall enough to sit with my feet resting on the horizontal pedals, I still rode everywhere.
Continued on page 2)
Bicycle Autopsy
Basic Welding
1
“Hello from Italy. Very happy I found your site.”
~ Enzo P., Italy
NEWS
October 30, 2013
TUTORIALS
Chain Link Tool
Wheel Lacing
Bicycle Autopsy
Basic Welding
(Continued from page 1)
Since that time, I have owned many bikes of all types and love riding. As an adult, I have always been drawn to unconventional modes of transportation whether it is a strange car, aircraft or bike. In particular, I have always wanted a recumbent bike but could not justify the cost when I really didn’t have the need. As the years clicked by I began to think I could have a recumbent at a fraction of the cost of purchasing a factory build model if I used some of the skills obtained as a boy and built my own.
I looked at different designs and scoured the Internet for ideas but never really found anything that struck a chord. That is, until I happened upon the Atomic Zombie web site. “Wow,” I thought. There were plans for some of the coolest looking rides and the best part was I could build my own. I immediately chose six plans and made the purchase.
The one plan that was most appealing was the Warrior Racing Trike.
The winters in Northern Utah keep me inside most of the time, so I put on a coat and gloves and spent many cold evenings in the garage building my trike. I began by picking up some
Figure 1: Rolling Frame
square tubing and started haunting the local second hand stores for the needed parts. As I was trolling the Deseret
Industries store in Logan, Utah, I found a brand new, never used rear wheel already setup for disc brakes.
I found an older mountain bike with pretty decent components that I could use for the drive train. I knew
I needed head tubes that were similar for the front steering on the trike, and it turned out that there were two identical “Hello Kitty” bikes, which I snagged. My cash outlay was under $30 and I left the store that day with enough parts to get me 80% of the Warrior. Once back home, I started cutting up the bikes and fabricating the frame.
The plans are excellent and quite easy to follow, but it took some time to get comfortable working with the steel and welding. It has been quite a few years since I did any serious welding and I had to re-learn a
(Continued on page 3)
2
“Just checking in to say hi and thanks for the welcome.”
~ Steve N., New Hampshire
NEWS
October 30, 2013
TUTORIALS
Chain Link Tool
(Continued from page 2)
lot. I own an arc welder, but I also own a wire feed welder so I tried welding the thin-wall tubing with each and quickly learned that I either lacked the skill or needed help setting up the welders. I turned to the Internet and researched all I could find on both arc welding and wire feed. I concluded that with a little work (shielding gas, weld wire and settings), the MIG welder would be best suited to my skill and the project. A visit to the welding supply store for the most suitable diameter feed wire (0.023”) and an
Argon/CO2 tank, and the results were nothing short of miraculous. I was able to lay down fine looking beads without burn-through and they were very strong.
As the building of the frame progressed, there were minor cosmetic improvements made that would enhance the final look of the trike. First, to get a streamlined look, the steering head tubes were welded completely to the wings, and then the outside welds were blended to make a smooth transition from the wing tube and around the head tubes.
Wheel Lacing
Bicycle Autopsy
Basic Welding
Figure 2 (left): Steering tube and Figure 3: Nose detail
Next, as the plans suggested, I spent time to make the nice rounded nose, again, for the streamlined look. A leftover piece of head tube was used, which fit nicely inside the 1.5” square tubing, and tacked in.
Then, the sides were shaped to the radius of the head tube and all the seams welded and cleaned up.
(Continued on page 4)
3
“Got my bottom brackets—thanks!”
~ Vern N., Louisiana
NEWS
October 30, 2013
AZTV
TUTORIALS
Chain Link Tool
Wheel Lacing
Bicycle Autopsy
Basic Welding
(Continued from page 3)
By far, the most challenging aspect of building the Warrior trike was finding front wheels. Hours were spent searching the Internet trying to find a 20” rim with a 20 mm through-axle hub. I could not find what I was looking for, so I decided to learn how to lace my own wheels. I found nice hubs with the
20 mm axle through-hole and bought nice rims and spokes and built the front wheels myself. They turned out perfect, and I have one more skill in my pocket.
The next challenge was to find just the right handlebars. I tried four or five different handlebar configurations, but I didn’t like any of them. The bars from the mountain bike were too straight, and the bars from the “Hello Kitty” bikes didn’t have a wide enough straight center section so they interfered with the frame. I even tried modifying a set of handlebars by heating and bending to the shape I needed, but that didn’t work out very well. I finished building the steering and temporarily used the straight mountain bike bars, but I knew I would have to come back to the handlebars before I would be satisfied with the result. So, I left it and moved on with building the rest of the trike.
My local electronics chain store has lots of polyethylene packing material that is useful for padding on the seat, and if you ask, they are happy to give it away and save the hassle of disposal. I found some pieces about 1.25” thick that were perfect for seat padding. To get a finished look, the foam padding was rounded on the edges and a half yard of vinyl boat seat material was used to fully cover the padding, wrapped around the wood structure and stapled down the centerline of the back of the seat. This line of staples is hidden by the frame tubing.
When I was putting the finishing touches on the frame, my wife could see that I would soon complete the project, and she wisely insisted that I have a flag so that I could be seen by cars on the road.
To satisfy this request, I picked up some threaded connector nuts and welded them to the upper seat back support, then drilled them to accept the ¼” flag stick. Cable guides and mounting provisions for a rack or pannier mounts were some final details added to the frame.
Figure 4: Guides for flag sticks
One of the best stores for any bike builder is “Recycled Cycles” with several locations around the US. I was on business in Seattle,
(Continued on page 5)
4
“I guess your bike building season is coming to a close.
I’m settling in for a long winter, too. Stay warm.”
~ Oliver P., New York
October 30, 2013
NEWS
Read our blog!
TUTORIALS
Chain Link Tool
Wheel Lacing
Bicycle Autopsy
Basic Welding
(Continued from page 4)
WA and one afternoon found and visited the store there. It was like hitting the jackpot in Las Vegas! I found three identical disc brake calipers in excellent shape for all three wheels, SPD compatible clip-less pedals and a bunch of other odds and ends that were so cheap I could not believe it. Everything was coming together nicely; the end was in sight. However, still no suitable handlebars.
The style of handlebar I wanted was from the old style cruiser bikes just like I had on the “junk yard” bike I built as a kid…wait, I realized, that bike was still sitting behind the shed at my father’s house in
Idaho! A quick call and it was all arranged, the bike would arrive with a relative in a few days. Most of the bike was unusable, headset were went into the parts but the handlebars and perfect. The headset bucket for the next build and the handlebars bike building had was left was the went on the trike. My come full circle. All that paint and cabling.
The paint for my carefully to match desired was a bright satin black for the the search began trike had to be selected the other details. The green for the frame and steering components, so for the best paint for the
Figure 5: Powder coated parts
job. I could only color online and it find the right frame was an automotive grade. By the time I priced out the chemicals for preparing the surfaces, the primer, the paint and how much time it was going to take, I started looking hard at powder coating. The local powder coating company was very excited for the opportunity to help me out. They gave me a detailed tour of their facilities and explained all the prep steps that would be completed, the types of coating used and longterm advantages. I was sold, but at what cost?
We discussed the details and what color each part would be, picked out colors and finishes and timing for the job. Then they hit me with the total price…it was LESS than the cost for paint! I left a pile of parts with them and a few days later picked up the most beautiful bunch of parts I could imagine.
For assembly, I used all new cables, new grips on the handlebars and high pressure tires all around.
(Continued on page
5
“Thanks for your help, Kat. I’m better at building bikes than figuring out how to use email!”
~ Barry H., California
NEWS
October 30, 2013
Read our blog!
TUTORIALS
Chain Link Tool
Wheel Lacing
Bicycle Autopsy
Basic Welding
Head tubes and bottom brackets
Head tubes
Thanks to many requests, we are manufacturing head tubes and bottom brackets for your bike and trike projects.
This means you won’t have to dig around for a matching set of bottom brackets when you are building a trike or quad and need more than one identical head tube or bottom bracket.
AtomicZombie head tubes and bottom brackets are
«welder friendly», meaning they have a slightly thicker wall so that distortions will be kept to a minimum as you weld your frame tubing to the parts.
AtomicZombie head tubes are 3.5 inches in length so that they can be used on square tube frames without needing to be trimmed down. Head tubes will fit standard head tube cups and have a small end taper so that installation of the cups will be easy.
With a slightly larger wall thickness than a standard head tube, our parts will hold their shape after being welded to your frame tubing, making it easy to re-install the cups when your project is completed.
Bottom brackets
Our bottom bracket shells are also weld ready and will fit standard 3-piece bottom bracket hardware. There are also no side holes that need to be filled, so you can complete your bike or trike with minimal cleanup work.
(Continued on page 7)
6
“It’s great to be a member of the AZ family. Thanks for the
Facebook add.”
~ Lou D., UK
NEWS
October 30, 2013
TUTORIALS
Chain Link Tool
Wheel Lacing
Bicycle Autopsy
Basic Welding
(Continued from page 6)
These parts sell quickly, so if you need to get a few for your project, please visit our store and order your parts as soon as possible.
Huh!?
I didn’t know that!
We are manufacturing bicycle parts based on demand, and will try to ensure that we have many items in stock so that you can get your bikes and trikes on the road sooner than later; however, we cannot guarantee that every part will always be in stock. You can still place an order for backordered parts.
AtomicZombie sells bike parts?
Cool!
Sorry, but we cannot do custom orders at this time.
Once again, thanks to our community for letting us know how we can help keep your hobby in high gear!
Parts orders shipping date
Please note that the next round of parts orders will be shipped
November 9,2013
. Why?
(see video below). We expect that backordered parts will be in before this date. However, if for some reason there is a delay, those customers who have backordered parts will receive an email confirming when their order will be shipped.
Be sure to place your parts order no later than 6 pm Eastern Time on Friday,
November 8, 2013 if you want your order to ship on November 9.
When your order is ready to be shipped, you will receive an email from United States Postal
Service (USPS) with the date of shipment and tracking information (USA only).
AZTV webisode
There and back again…an
AtomicZombie’s tale
7
“Lots of great help on the forum. Making new friends and enjoying the experience.”
~ Paul H., UK.
NEWS
October 30, 2013
AZTV
TUTORIALS
Chain Link Tool
Wheel Lacing
Bicycle Autopsy
Basic Welding
(Continued from page 5)
Everything went together splendidly and, finally, the big day came. It was ready to ride.
It was a beautiful spring day and the temperatures were in the 70s. Off I rode and immediately got into a race with some neighborhood kids on their bikes (I smoked them easily).
Around the block, I was stopped by some folks walking along who commented on how cool the trike was and wanted to know if it was easy to ride. I let them sit on it and pedal around a bit, then the big
Figure 6: Blue ribbon Warrior Tadpole Trike
question came, “Could you build two for my husband and me? I suppose about $2,500 each would be reasonable?” Even with the custom built wheels and all the details including powder coating (and the welding supplies), I had spent about ¼ of that amount. This machine was a head turner everywhere I went.
The Box Elder County Fair happens the third week of August and I decided that I would enter my
Warrior Trike in the Adult Crafts section. I won a Blue Ribbon (the judges score card rated it excellent in every category), but more than that were all the positive comments from people who saw the trike on display.
Building the Atomic Zombie Warrior Trike was an amazing experience and the loads of positive feedback have exceeded my expectations in every way. If I can give any advice for anyone thinking of building any AZ design, it is this: What are you waiting for? Start building now. I can hardly wait to see
(Continued on page 9)
8
“I love being a bike building zombie! Many thanks for all the cool stuff you have online.”
~ Bruce Y., Australia
NEWS
October 30, 2013
TUTORIALS
(Continued from page
what comes out of my workshop this winter.
Chain Link Tool
David’s Warrior
Tadpole Trike
Wheel Lacing
Bicycle Autopsy
Basic Welding
Congrats, David, on your excellent build and winning a blue ribbon. Hopefully, your story will inspire others to take up this rewarding hobby. Thanks for sharing your story and pictures.
Contribute to the AZ newsletter. We welcome your stories and pictures.
Contact koolkat(at)atomiczombie.com .
9
“Having a great time building my first recumbent and learning a lot thanks to the forum.”
~ Bruno B., Italy
NEWS
October 30, 2013
Freewheel and disc brake adapters for trike & quad projects
AZTV
TUTORIALS
Chain Link Tool
Wheel Lacing
Bicycle Autopsy
Freewheel Adapter Disc Brake Adapter
Our
Delta Trike Axle Freewheel Adapter
(left) fits any Shimano style thread-on freewheel and a standard six bolt bicycle disc brake rotor. Drilled for a 3/4 inch axle and includes a 1/4 inch mounting bolt. Disc brake mounting holes are tapped for standard M5 bolts. This part will fit the following plans directly: StreetFighter Racing Quad, KyotoCruiser Tandem
Trike, LodeRunner Cargo Trike, and Aurora Delta Racing Trike.
This fits onto any 3/4 inch axle and allows the installation of a standard Shimano style threadon freewheel and bicycle disc brake rotor. With this part, you can add a pedal transmission to any trike or quadcycle using only standard bicycle components. The included locking bolt secures the part to the axle and allows for easy removal at a later time. The six disc rotor mounting holes are also tapped so you can mount your bicycle disc brake rotor using the standard M5 bolts that were supplied with it. The FDAX34 Delta Trike Axle FreeWheel Adapter is a high quality machined part made of aluminum and anodized black.
(Continued on page 11)
Basic Welding
10
“I don’t think you charge enough for your plans given the amount of detail contained in them. The 6 for $36 special is great.”
~ Scott M., Australia
NEWS
October 30, 2013
TUTORIALS
Chain Link Tool
Wheel Lacing
Bicycle Autopsy
Basic Welding
(Continued from page 10)
This part can fit the following plans with modifications: TimberWolf Suspension Trike,
DeltaWolf Racing Trike, DeltaRunner Delta Trike, Gladiator Chopper Trike.
Note: Before purchasing this part for use on these plans, read through them first so you can understand what will need to be changed in order to make them fit properly. It helps to own one or more of the above plans in order to see how the part should fit before you attempt any modifications. If you are unsure about modifying our plans to use this part, or would like to know if our parts will fit your own custom design, then visit our forum and we will answer your questions.
And, the
Delta Trike Axle Disc Brake Adapter
(right) fits any industry standard 6 bolt bicycle disc brake rotor. Drilled for a 3/4 inch axle and includes a 1/4 inch mounting bolt. Disc brake mounting holes are tapped for standard M5 bolts.
Our
Delta Trike Axle Disc Brake Adapter
fits onto any 3/4 inch axle and allows for the installation of a standard ISO standard 6 bolt bicycle disc brake rotor. With this part, you can add reliable disc brake stopping power to any trike or quadcycle using only standard bicycle components. The included locking bolt secures the part to the axle and allows for easy removal at a later time. The 6 disc rotor mounting holes are also tapped so you can mount your bicycle disc brake rotor using the standard M5 bolts that are supplied with it. The DBAX34 Delta Trike Disc
Brake Adapter is a high quality machined part made of aluminum and anodized black.
This part will fit the following plans directly: StreetFighter Recumbent Racing
QuadCycle, LodeRunner Single Rider Cargo Trike, and Aurora Delta Racing Trike.
This part can fit the following plans with modifications: TimberWolf Suspension Delta
Trike, DeltaWolf Recumbent Racing Trike, DeltaRunner Recumbent Delta Trike,
Gladiator Phat Ass Chopper Trike. Note: Before purchasing this part for use on these plans, read through them first so you can understand what will need to be changed in order to make them fit properly. It helps to own one or more of the above plans in order to see how the part should fit before you attempt any modifications. If you are unsure about modifying our plans to use this part, or would like to know if our parts will fit your own custom design, then visit our forum and we will answer your questions.
See the Plans section on our web site for more information on these and other projects.
We want to see pictures of your workshop!
Whether it’s indoors or outdoors, big or small — show us where you build your bike projects.
Visit the AZ forum and join us.
11
“Hello Brad and Kat. I sure enjoy building bikes. Thanks for the inspiration.”
~ George P., Scotland
NEWS
October 30, 2013
TUTORIALS
Chain Link Tool
Wheel Lacing
Bicycle Autopsy
Basic Welding
Hub flange discs for your bike projects
Our laser cut Hub Flange Discs will make it easier for you to build your own delta trike wheels and save you time on your project.
This Hub Flange Disc is made with 24 spoke holes so that you can build wheels directly onto any 3/4″ axle using rims with 48 spokes.
The Hub Flange Discs are made of steel and are approximately 1/8 inch thick as required by the plans. Spoke holes are 7/64″ in diameter so that standard bicycles spokes can be used.
All hub flange discs are sold as a set of
four identical discs.
AtomicZombie Hub Flange Discs come in several varieties with various spoke hole counts and axle hole diameters. Each of our
DIY plans offer a recommended axle size and spoke count, but you can certainly change this to suit your design needs or parts availability. For instance, the Aurora Trike can be built using rims with 36 spokes rather than 48 spokes, or the DeltaWolf can be made using a 3/4 inch axle rather than a 5/8 inch axle. Please make sure that you order the correct Hub Flange Disc size for your project.
To keep costs to a minimum, our Hub Flange Discs are laser cut from flat sheet metal. Each disc will have a small imperfection on the outer edge and inner edge where the laser started cutting out the disc. There is also a mill scale on the surface of the metal that will need to be removed using sandpaper or a sanding disc. Neither of these imperfections will compromise the strength of the disc, and once they are built onto your hubs and painted, the imperfections will be unnoticeable.
(Continued on page 13)
AZTV webisode
There and back again…an
AtomicZombie’s tale
12
“So many great designs to choose from!”
~ Bobby K., Australia
NEWS
October 30, 2013
Read our blog!
TUTORIALS
Chain Link Tool
Wheel Lacing
Bicycle Autopsy
Basic Welding
(Continued from page 12)
The surfaces of the Hub Flange Discs are coated with a mill scale at the factory to help protect the metal from oxidation. This coating easily be removed using a sanding disc to prepare the part for painting. The laser cut edges are also somewhat sharp, so they need to be smoothed off using the sanding disc by running it lightly around the edge once.
Once the mill scale has been removed from the Hub Flange Discs, the spoke holes will need to be beveled slightly to remove the sharp edges around the holes. This is done so that the spoke exiting the flange is not cut by the sharp edges of the hole. To bevel the spoke holes, use a
3/16 inch drill bit and push lightly into the hole until a small bevel is made. The beveled spoke holes are shown here after running pressing lightly with the 3/16 inch drill bit to remove the sharp edges. The Hub Flange Disc is now ready to be welded to your delta trike axle.
Remember, our Hub Flange Discs are sold as a set of four matching discs, and there are several versions available, so please choose the correct number of spoke holes and axle diameter for your project. These discs are manufactured to keep costs to a minimum, so you will need to bevel the spoke holes and prep the surface for painting, an operation that will only take a few minutes per disc. All of our DIY Delta Trike Plans make use of these Hub Flange
Discs, which allow you to lace a rim directly to the rear axle. By integrating the flanges directly onto the axles, you’ll save some money instead of needing to have complex and expensive machined hub parts made. Our trike plans also include instructions on how to make these parts from scratch, as well as a drawing that can be sent to a machine shop in case you want to make your own hub flanges.
Our goal is to offer parts that save you both time and money when building your own DIY bike or trike project. For more details and to order, visit the AtomicZombie store .
We want to see pictures of your workshop!
Whether it’s indoors or outdoors, big or small — show us where you build your bike projects.
Go to the AZ forum and join us.
13
From the Builders Gallery
“So, I bought my first welder. Thanks to the friends I’ve been making on the forum, I’ll be building my first recumbent soon.”
~ Walter J., Oregon
NEWS
October 30, 2013
TUTORIALS
Chain Link Tool
Wheel Lacing
Bicycle Autopsy
Basic Welding
Free Tutorial PDFs
We are converting many of our free online tutorials into PDF format so that you can print them. Since converting is a time‐consuming process, it will take at least a few weeks to get most of them online. Some are already converted and available for download.
14
TUTORIALS
Chain Link Tool
Wheel Lacing
Bicycle Autopsy
Basic Welding
“AtomicZombie is the best community on the Web.”
~ Steven H., Montana
NEWS
October 30, 2013
From the Builders Gallery
15
Submit pictures of your own homebuilt bike projects to the Builders Gallery.
Обычно сборка велосипедов без аккумулятора занимает не более 30 минут. Если вы делаете это впервые, может быть, придется повозиться целый час. Мы рекомендуем вам сделать это самостоятельно с помощью нашей статьи чтобы в будущем понимать, что и как работает в узлах вашего байка.
Как собрать велосипед за 30 минут?
Пошаговая инструкция по сборке велосипеда от экспертов «ВелоМатрикс.ру»

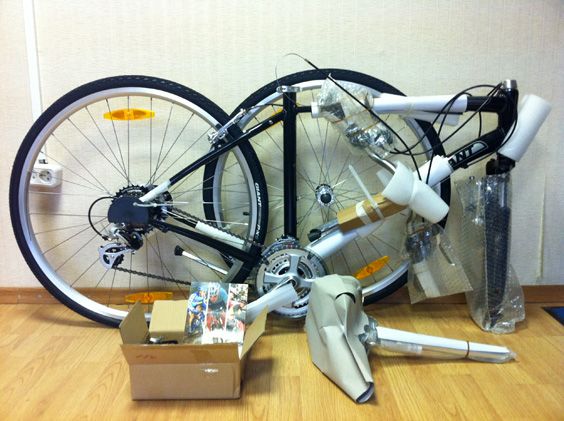
На фото: разобранный байк
Сборка велосипеда из коробки
Пришел тот час, когда ваш велобайк наконец доставили почтой или вы сами забрали его из магазина в заводской упаковке.

На фото: байк в упаковке
Теперь дело за малым — собрать его для полноценной езды. В этом пункте вопросы появляются подобно тому, как на раме байка появились узлы, требующие регулировки: тормоза и переключатели скоростей. Далее мы расскажем по пунктам, как происходит сборка велосипеда в гараже или дома.
Что нужно из инструмента?
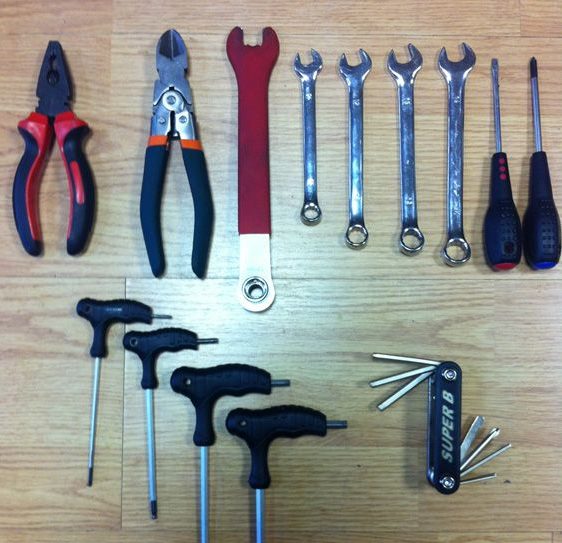
Чтобы собрать покупку, приготовьте:
- Кусачки или плоскогубцы, которыми можно перекусить тросик
- Комплект ключей-шестигранников
- Отвертка, желательно “перевертыш” (+ и — в одном корпусе)
- Педальный ключ или обычный рожковый “ключ на 15”
- Насос с манометром
Фото инструментов для сборки

Вело-бояре, помимо указанных простых инструментов, имеют собственную стойку. В этом случае регулировка велосипеда будет неутомительна.
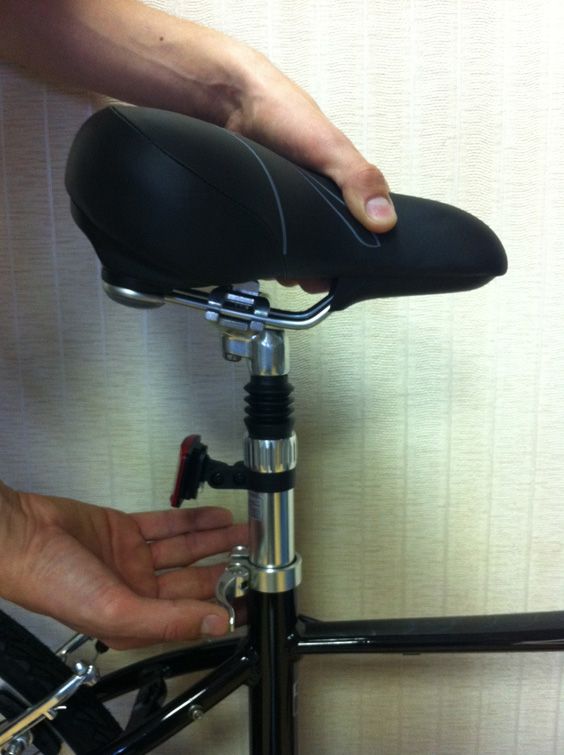
Стойка — приспособление, на котором можно закрепить велосипед за раму или подседельный штырь на уровне груди, чтобы не сидеть перед ним на корточках и не ронять во время манипуляций.

На фото: велосипедная стойка
Примечание. Если есть гараж, или балкон, то, как вариант, байк можно закрепить на крюках на стене или подвесить его на цепи.
Как собрать велосипед по запчастям
Шаг первый. Руль.
Итак, упаковка целая, комплектация полная, и вы уже выбрали место для работы. Сначала собираем руль. Первое, что мы ставим — вынос руля, на котором есть хомуты для установки самого руля.
Фото выноса

Его нужно тщательно отцентровать по меткам и постепенно зафиксировать хомуты, поочередно затягивая винты “крест-на-крест”. Ручки тормозов и манетки выставляем, но не затягиваем. Все равно потребуется регулировать их положение, когда вы оседлаете своего нового коня.
Манетка — привод переключателя скоростей на руле
Фото крепления руля

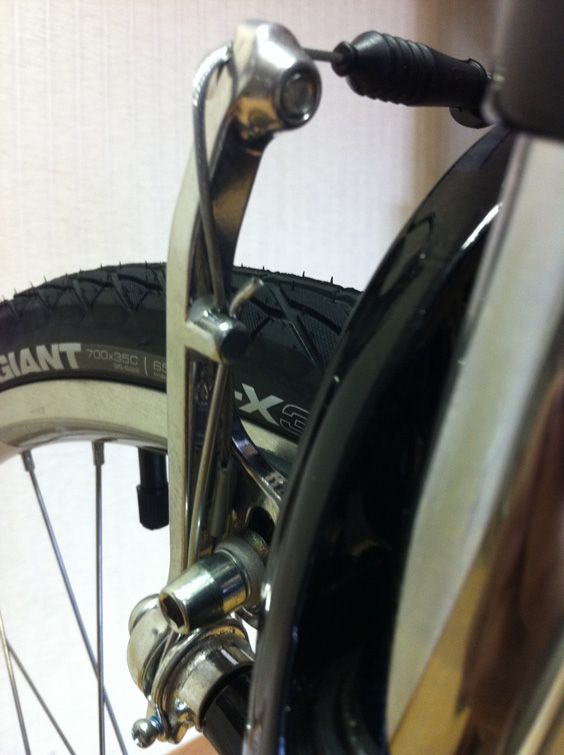
Шаг второй. Тормоза.
Тормоза мы ставим следующими, т.к. их тросики выходят из ручек, которые находятся на только что установленном руле. Их-то (тросики) мы и фиксируем к раме в первую очередь, еще до установки переднего колеса.
Фото тросики в креплении

Примечание. Система тормозов и конструкция различается у разных моделей. Это значит, что сборка велосипеда с нуля подразумевает разные крепления тросиков — хомуты на защелке, винтовые хомуты или пластиковые винтовые крепления. Ориентируйтесь по ситуации.
Далее пути, по которым идет сборка велосипедов, расходятся в зависимости от системы тормоза. Мы рассмотрим два самых популярных вида — дисковый и V-brake (Ви-брейк).
Дисковый тормоз.

На фото: дисковый тормоз
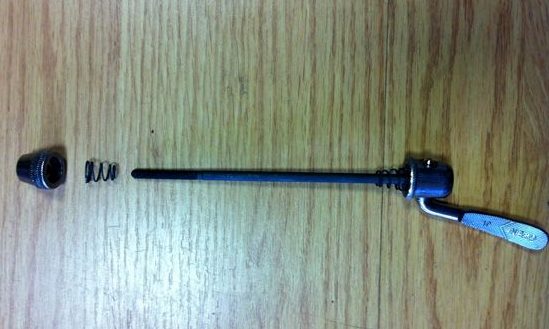
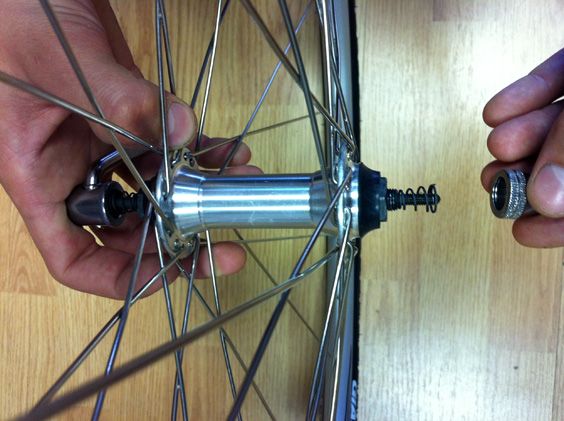
Устанавливаем штырь с эксцентриком во втулку, наживляем гайку, не забываем про пружины. При этом зажимная лапка — со стороны диска тормоза. Ставим колесо в вилку и закрепляем его гайкой, но не сильно, при этом колесо не болтается и свободно крутится.
Далее — закрепляем тормозную машинку (калипер) на вилке шестигранным ключом. Затягивать винты калипера нужно в положении, когда ручка переднего тормоза выжата полностью. Таким же образом устанавливаем задний тормоз.
Фото затяжка калипера

Как проверить правильность установки колес и дискового тормоза — диск не цепляется за калипер при вращении колеса.
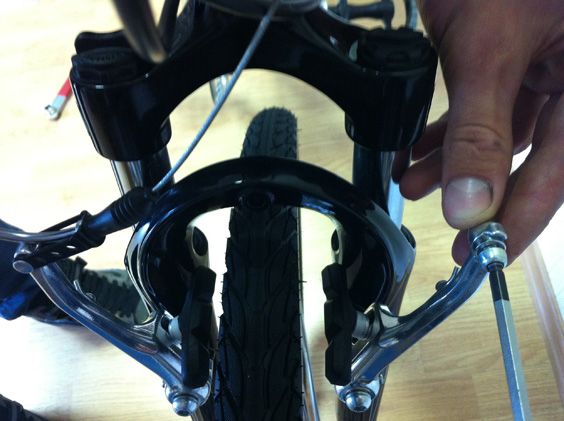
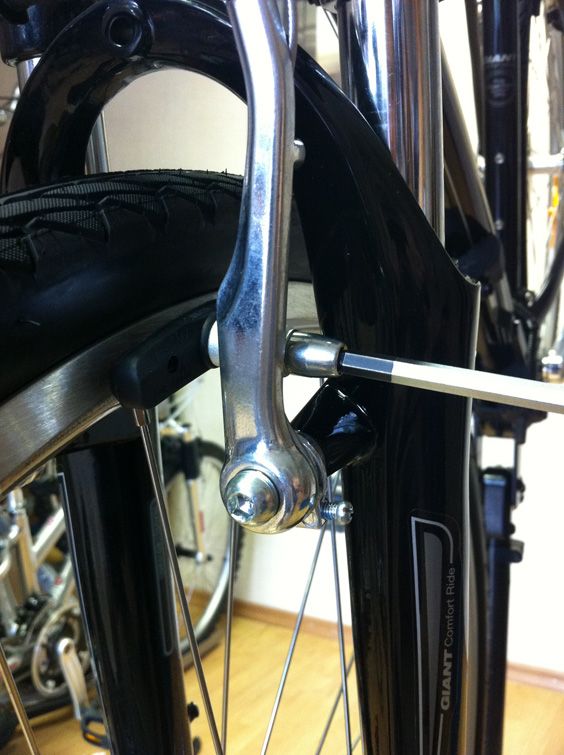
V-brake
Фото V-brake

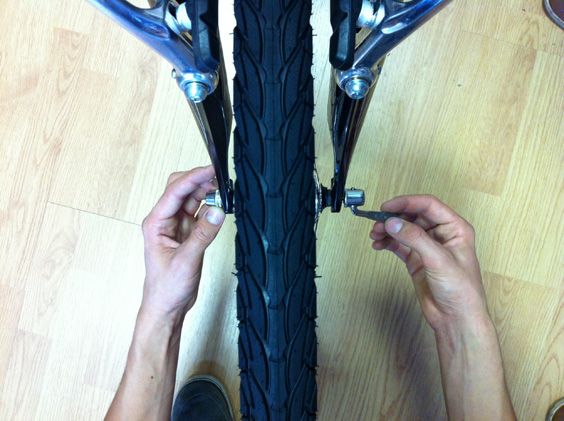
Устанавливаем рычаги тормоза в штатные крепления на раме, предварительно смазав посадочные места. Затем устанавливаем и закрепляем тормозную колодку — это деталь с резиновым бруском. Колодку выставляем так, чтобы она точно и полностью прилегала к ободу — от этого зависит качество торможения и скорость износа резины колодки.
Фото колодки V-brake

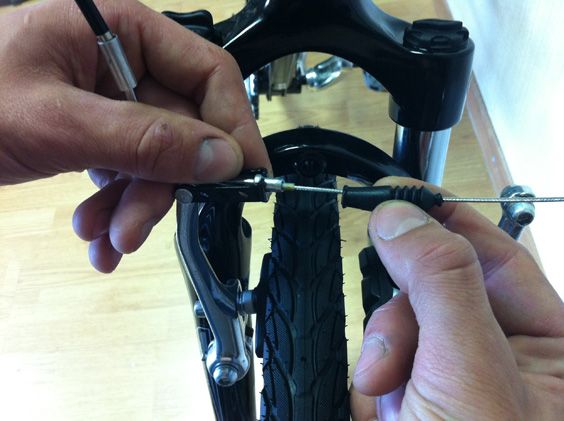
Теперь продеваем трос в рубашку (это гибкий пластиковый тоннель для троса) и устанавливаем в штатные крепления на раме.
Внимание! Старайтесь делать максимально плавные изгибы рубашки чтобы трос ходил свободно.
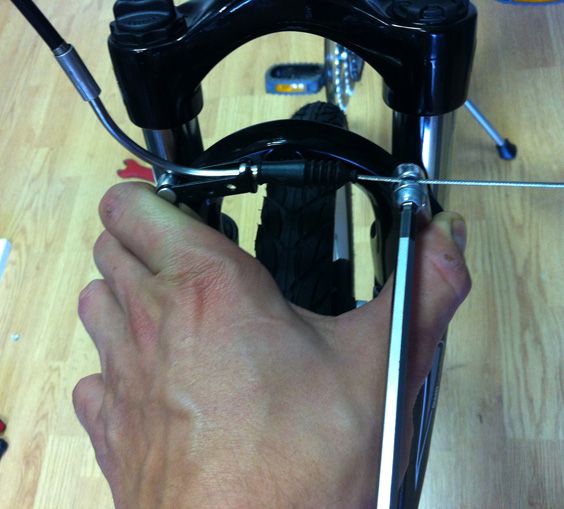
Вставляем тросик в посадочные места ви-брейка. Регулируем силу пружины винтами сбоку рычагов. Варьируем силу пружины до тех пор, пока рычаги не будут ходить равномерно, а колесо будет свободно крутиться, не задевая колодки.
Фото регулировка V-brake

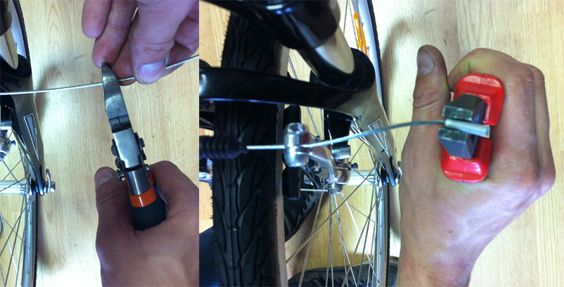
Обрезаем излишек троса, оставляя 10-15см,ставим заглушку, чтобы конец троса не расплелся и заправляем хвостик под рычаг или закрепляем пластиковым хомутом.
ВИДЕО — Как настроить V-brake?
Если регулировка тормоза удалась, то, возможно, сборка велосипеда на заказ — это ваше.
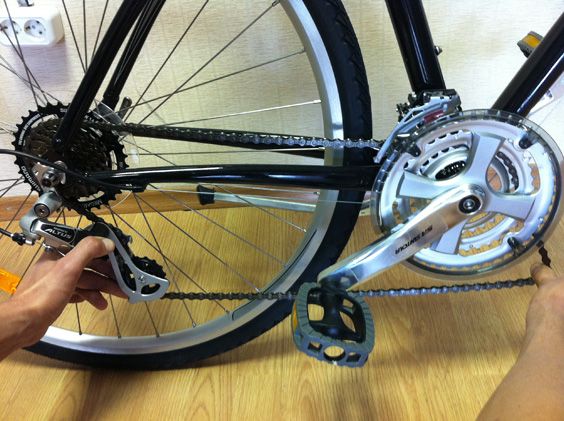
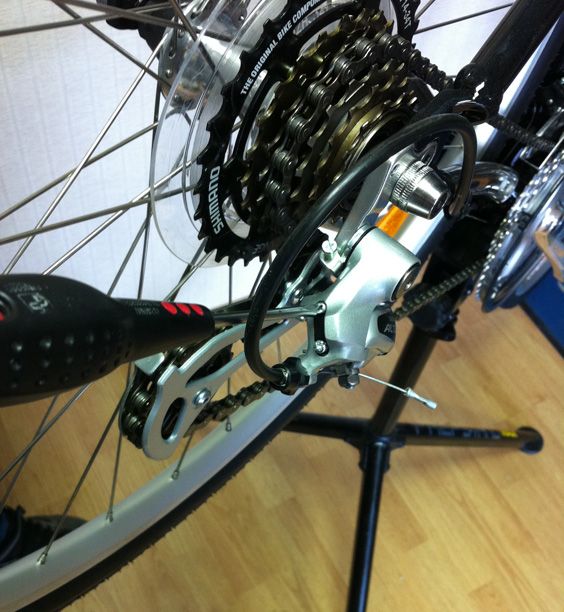
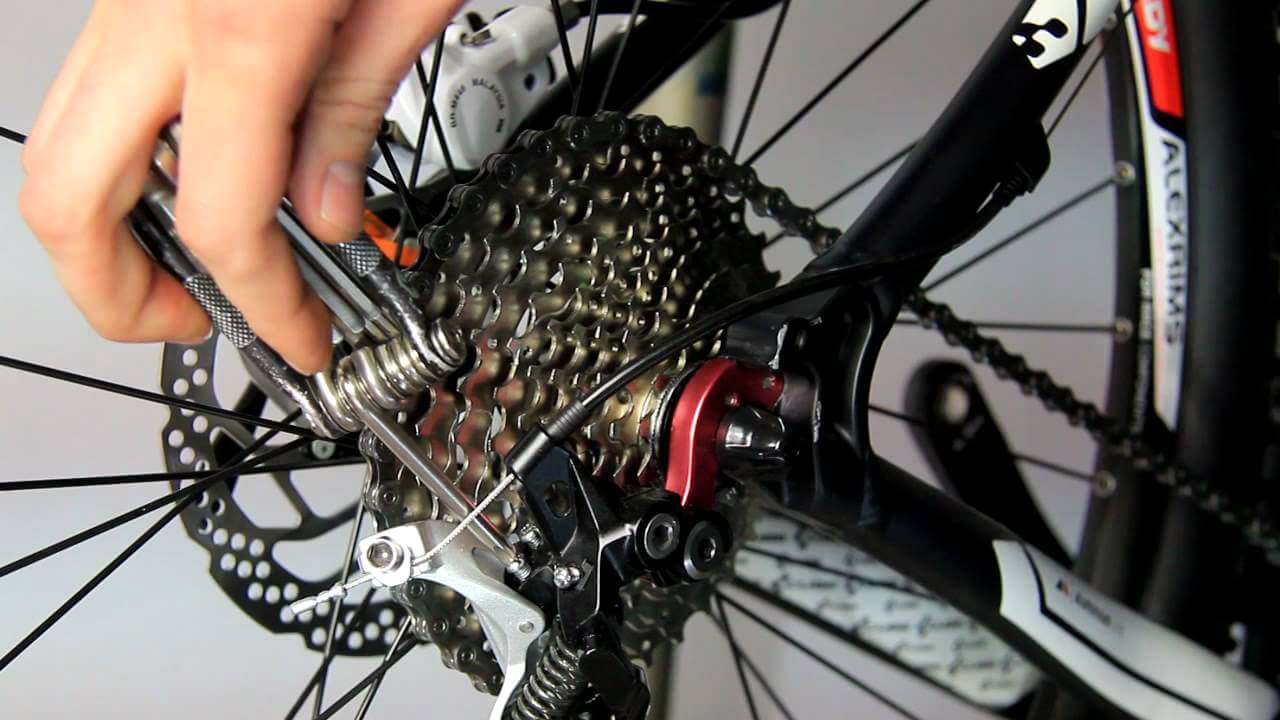
Шаг третий. Настройка переключателей скоростей
Все веломагазины стандартно присылают заводские комплекты, где переключатели уже установлены на раму. Главный общий признак трансмиссии — наличие двух винтов, расположенных рядом. Верхний — high (Н), нижний — low (L). Их регулируют по отдельности — сначала L, после — Н.
Задний переключатель
Когда цепь находится на 2-й передней звездочке, переключаем ее на малую заднюю звездочку. Если цепь переключилась сразу и четко, то регулировка не требуется. Если соскочила или не переходит, то на самой большой задней звезде ослабляем L. Затем вращаем педали и переключаемся на меньшие звезды. Если цепь не переходит на меньшие диаметры, проворачиваем L на пол-оборота по часовой стрелке. Затем проверяем работу передач, переключая их вверх.
Фото задний переключатель

Работу переключателя на руле — манетки — регулируем натяжителем троса, который расположен на самой манетке, либо на заднем переключателе.
Фото натяжитель манетки

Передний переключатель
Винт L — регулирует положение узла относительно рамы. Когда цепь на большой задней звезде, она будет, скорее всего, задевать за переключатель. Болт L сместит его к раме. Если в ситуации “цепь на большой передней и на малой задней звезде” цепь задевает за верх переключателя, подкручиваем винт Н, пока трение не исчезнет.
Фото винты переднего переключателя

Настройка трансмиссии велосипеда — самое трудоемкое занятие. Если нет времени или неохота связываться с этим делом, поинтересуйтесь, сколько стоит собрать велосипед в ближайшем веломаге или силами товарищей по велопрогулкам.
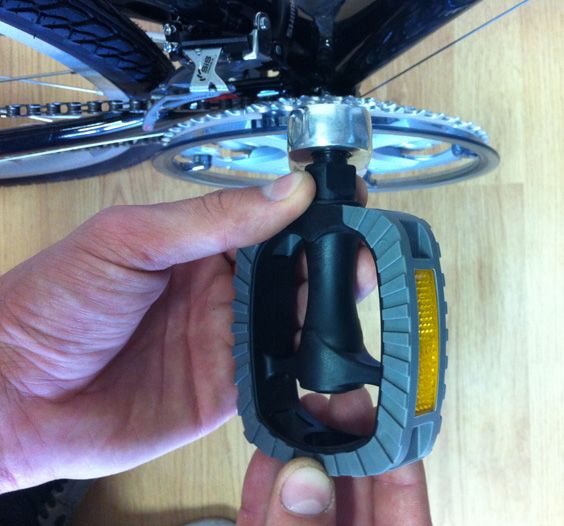
Шаг четвертый. Установка педалей, накачка колес, регулировка высоты седла.
Если вы справились с передачами, то остальное будет работой в удовольствие. Главное не перепутать педали:
- левая (L) вкручиватеся против часовой стрелки
- правая (R) — по часовой
Здесь-то нам и пригодится ключ на 15.
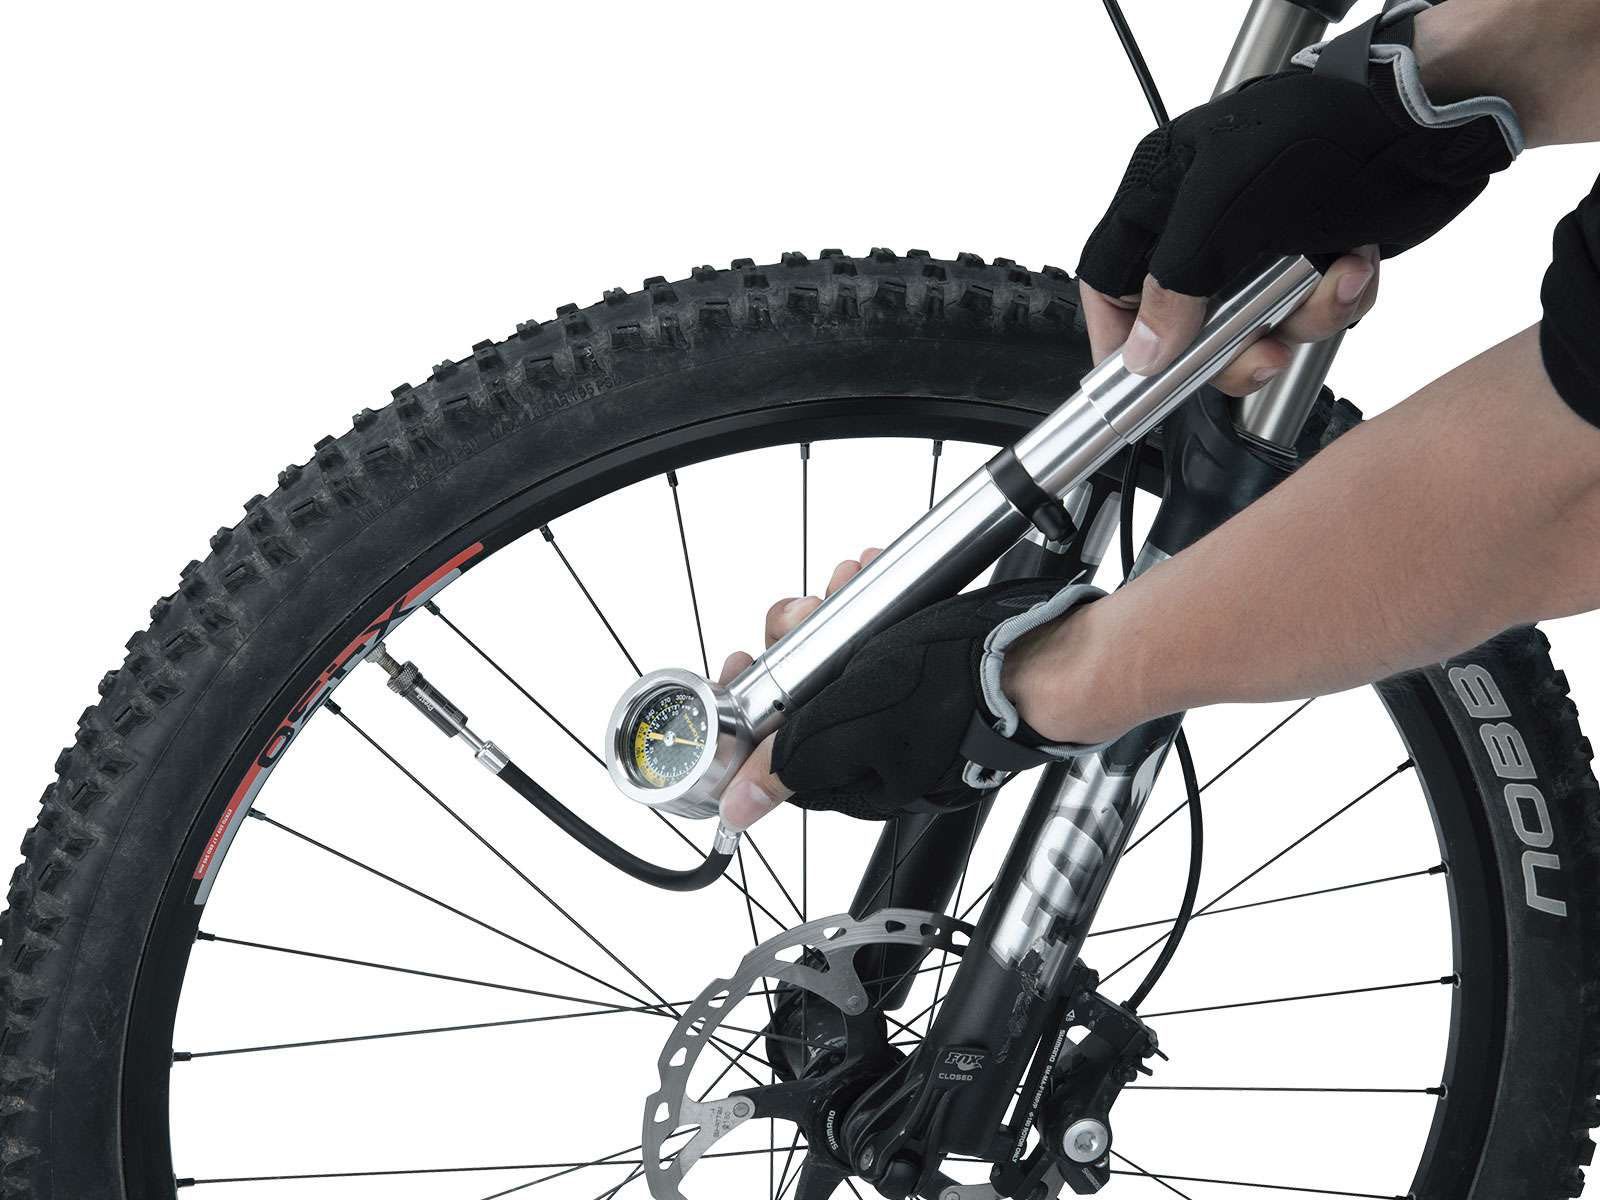
На покрышках есть обозначение давления, которое нужно поддерживать в шинах.
Фото давление от 2,8 до 4,5 бар

Накачиваем колеса, пока манометр не покажет заветные цифры. Ловите среднее давление, если катаете по ровному асфальту, ниже среднего по рыхлой дороге (шлак, песок) и выше среднего, если тянет в грязь и офф-роад.
Седло выставляем так, чтобы нога на педали в нижнем положении была согнута минимально, но не полностью выпрямлена.
Фото правильной посадки

Сейчас — самый подходящий момент чтобы затянуть все гайки, винты и болты, выставить манетки и ручки тормозов.
Пара слов о запчастях
Ни один настройщик или механик “при памяти” не посоветует вам ставить на новый, только что из коробки, велосипед (телевизор, холодильник, перфоратор и т.д.) б/у детали. Оставьте это на момент, когда вы проедете 3000-5000 км и узлы начнут просить замены (особенно если байк недорогой и сложной конструкции). Тогда, разумеется, вы будете менять узлы на новые, но постепенно, по мере выхода из строя. И тогда на вашем велосипеде будут одновременно стоять новые и старые детали. Повторимся, что заводская комплектация подразумевает, что все узлы — новые.
Приятного катания и до встречи в новых статьях!
На чтение 8 мин Просмотров 40.8к.
В последние годы двухколесный транспорт все чаще приобретают не в специализированных магазинах, а онлайн. Популярность данного способа обусловлена приемлемой стоимостью, отличным качеством сервиса, широким ассортиментом моделей. Порой сборка велосипеда из коробки вызывает трудности, поскольку работа требует наличия определенного опыта. Для решения задачи потребуются специальные инструменты, пошаговое описание каждого этапа.
Содержание
- Необходимые инструменты
- Этапы сборки
- Установка седла и подседельного штыря
- Монтаж выноса и руля
- Крепление колес и тормозов
- Установка педалей
- Настройки переключателя
- Обслуживание нового велосипеда
- Видео
Необходимые инструменты
Крутой велик, доставленный в коробке, представляет собой набор деталей и запчастей. Для сборки конструкции потребуются следующие инструменты:
- Нож, кусачки. Необходимы для снятия упаковки, разрезания пластиковых стяжек, скотча, капроновых шнурков.
- Шестигранные ключи. Служат для фиксации болтов выноса, тормозов, подседельного штыря, а также системы переключения передач.
- Гаечные ключи. Используют при установке педалей, дополнительных колесиков на детский велосипед.
- Отвертки. С их помощью регулируют переключатели, устанавливают световозвращатели.
- Пассатижи. Применяют для установки колпачка на тормозном тросе.
- Насос. Давление в заводских колесах составляет примерно 1-1,5 Атм. Это позволяет предотвратить появление трещин на поверхности при длительном хранении. После сборки необходимо подкачать камеры, соблюдая показатели, рекомендуемые производителем.
Со сборкой велосипеда из коробки способен справиться любой мужчина и даже девушка. Если возникают какие-то проблемы, всегда можно обратиться к инструкции или пошаговому описанию процесса. На тематических сайтах специалисты и опытные пользователи дают подробные разъяснения.
При выборе подходящего набора инструментов стоит отдавать предпочтение комплектам с большим количеством разных ключей. С их помощью можно с легкостью установить либо отремонтировать любой элемент велосипеда.
Этапы сборки
Для начала необходимо вытащить велосипед из коробки. Удобнее всего это делать при помощи канцелярского ножа. Все действия осуществляют аккуратно, без спешки, чтобы не повредить детали байка и не получить травм. Кусачками разрезают пластиковые хомуты, которыми соединяются некоторые компоненты. После этого достают комплектующие: светоотражатели, звонок, педали, эксцентрики. Комплектация зависит от уровня выбранной модели. Перед тем как собрать велосипед, стоит обзавестись стойкой-кронштейном, которая обеспечит удобство работы.
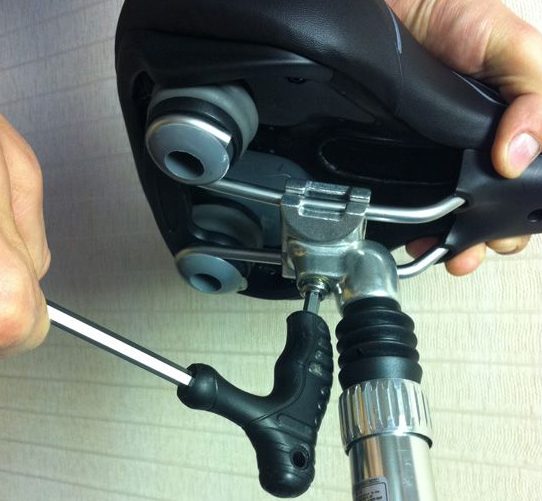
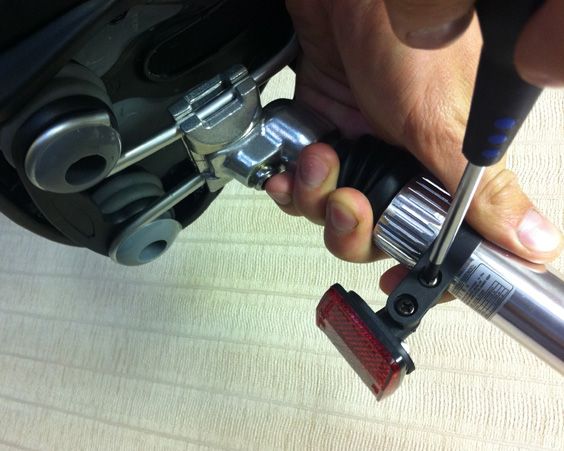
Установка седла и подседельного штыря
Сборка велосипеда начитается с установки подседельного штыря и седла. Действия выполняют поэтапно:
- штырь монтируют в раму так, чтобы он располагался параллельно поверхности, на которой стоит конструкция;
- седло регулируют, пока оно не встанет посередине крепления на штыре, фиксируют элемент при помощи ключа на 14 мм;
- подседельный штырь закрепляют на раме эксцентриком.
Оптимальную высоту сиденья можно установить после первой же поездки: опустить либо поднять, все зависит от индивидуальных параметров. Инструкция гласит, что в раму штырь должен уходить не менее чем на 10 см.
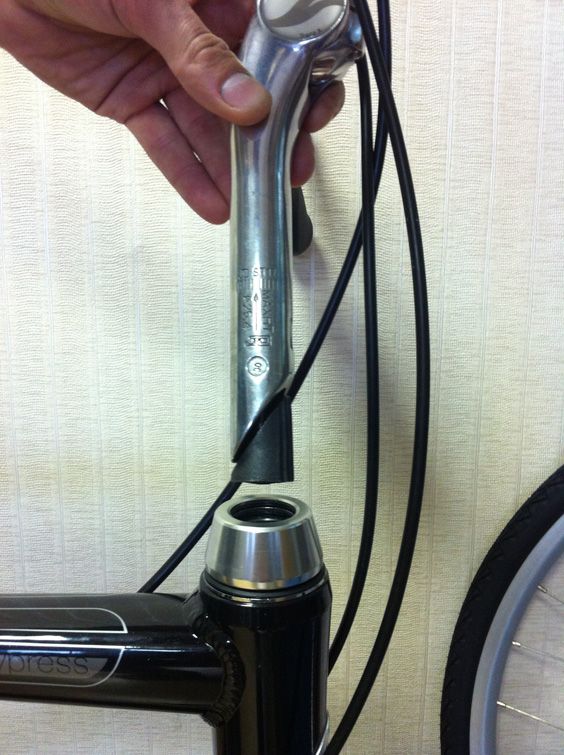
Монтаж выноса и руля
Часто вынос устанавливают на шток вилки, а руль представлен отдельным элементом. В этом случае помогут следующие рекомендации по сборке:
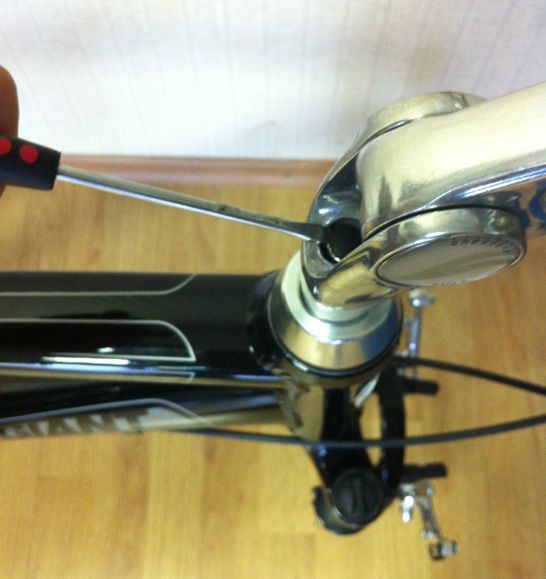
- Вынос необходимо ослабить, снять крышку, оценить затяжку многоразового якоря.
- После монтажа якоря вынос устанавливают на нужную высоту, сверху прижимают крышку. Винты, находящиеся сбоку выноса, закручивают.
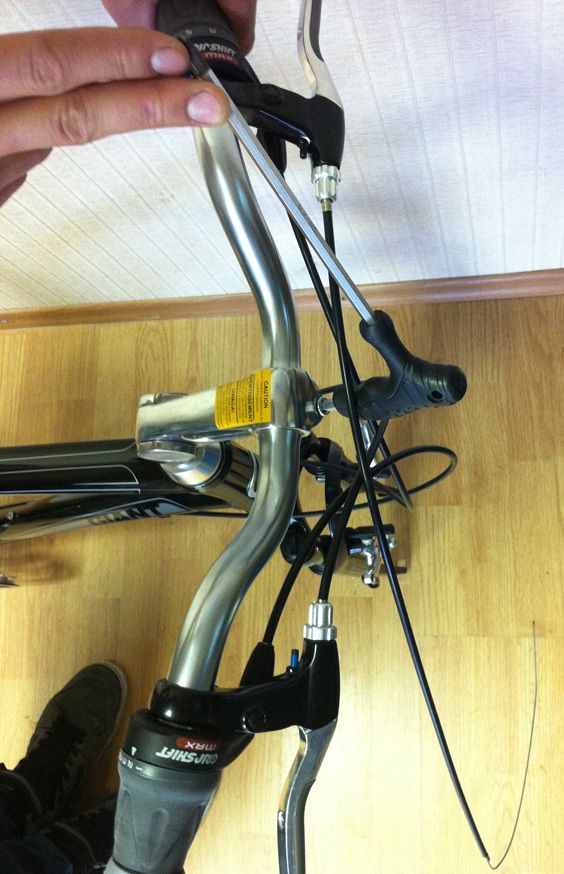
- Руль фиксируют на выносе параллельно поверхности, на которой стоит конструкция. Затяжку производят поочередно, равномерно.
- Обмотку производят с концов руля, делают небольшие нахлесты на отверстиях.
- По завершении работы обмотку фиксируют клейкой лентой либо изолентой. В отверстия вставляют заглушки.
Если спортивный руль дополнен «рогами», необходимо установить их под углом 20–30 градусов. После регулировки элементы затягивают болтами при помощи шестигранного ключа 5 мм.
Руль на детском велосипеде оснащен специальными метками, за пределы которых запрещено выходить при установке.
Крепление колес и тормозов
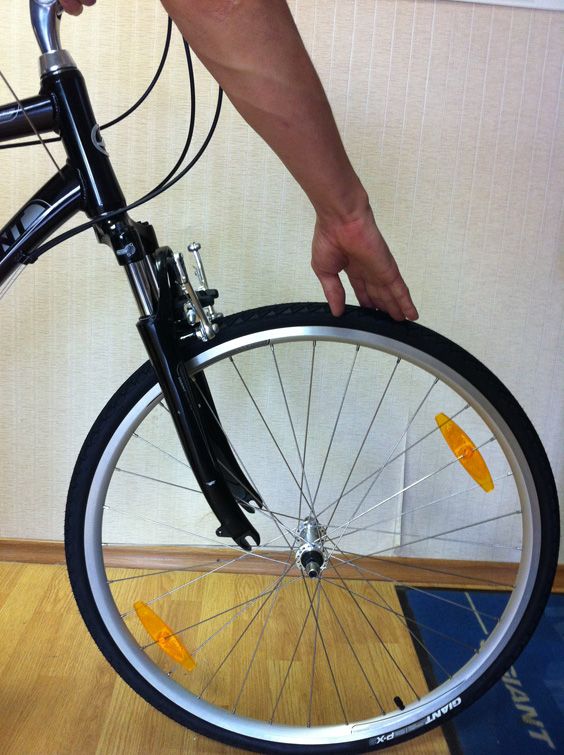
В первую очередь необходимо уточнить направление вращения переднего колеса. Многие производители дополняют свою продукцию специальными маркировками. Если никаких меток нет, можно собрать конструкцию по собственному желанию. Далее работу выполняют по инструкции:
- Переднее колесо устанавливают в вилку так, чтобы ось точно попала в пазы.
- Эксцентрик помещают в ось втулки. Лапку элемента располагают параллельно оси колеса, завинчивают гайку.
- Лапку эксцентрика зажимают. После этого велосипедное колесо должно надежно закрепиться. Изо всех сил затягивать не рекомендуется.
- Тросы тормозов предварительно смазывают Литолом, вставляют в «рубашки». Если система ободная, необходимо просто застегнуть тросики.
После того как колеса и тормоза велосипеда собраны, необходимо проверить тормозные рычаги. В случае несимметричного расположения следует проверить правильность установки, переставить эксцентрик.

Установка педалей
Сборка велосипеда завершается закручиванием педалей. Делают это против хода движения байка. У каждой детали — левой и правой — разносторонняя резьба, поэтому перепутать их невозможно. Крепления затягивают рожковыми ключами 15 мм либо шестигранником на 6, 8 мм. Фиксация должна быть крепкой, в противном случае детали могут раскрутиться.
Горный велосипед всегда собирают строго по инструкции производителя, обязательно учитывая маркировку. На педали с левой резьбой есть пометка «L», на правой — «R».

Настройки переключателя
Скоростной велосипед комплектуют переключателями. Настройку этих элементов производят поэтапно:
- лапку переключателя устанавливают на высоте 2–3 мм от цепи;
- удаляют наклейку с подсказками;
- натяжение троса регулируют на манетке;
- для настройки заднего переключателя необходимо установить цепь на большую звездочку, отрегулировать болт L;
- цепь спускают вниз, при необходимости ослабляют трос, настраивают болт Н.
После настройки можно самому проверить скорости, накидывая цепь вверх. Если полотно перемещается с помехами, нужно открутить барабан натяжения троса по направлению против часовой стрелки.
При правильной настройке переключателей цепь быстро и мягко перебрасывается с одной звездочки на другую. При этом рамки устройств не должны задевать одна другую.


Обслуживание нового велосипеда
После того как велосипед полностью собран с нуля, необходимо отрегулировать механизмы, проверить цепь, подкачать колеса. Перед первой поездкой стоит уточнить, удобно ли доставать до тормозных ручек. При необходимости расположение деталей меняют при помощи специальных винтов.
Тормоза должны находиться на равном расстоянии от обода. Если это не так, следует откорректировать положение, используя болты на креплении тросика. Обязательно стоит испытать рычаги в действии, затем настроить до идеального состояния.
Завершающим этапом обслуживания станет регулировка переключателей. Процедура проводится, если на этапе тестирования наблюдались перебои в движении цепи по звездочкам. Если настойки выполнены правильно, полотно перемещается равномерно, без перекосов и задержек.
Сколько бы ни было воздуха в камерах, колеса перед выездом обязательно подкачивают. Оптимальное давление для горного велосипеда 2,8-4,5 Bar. Если нанос не оснащен датчиком, необходимо накачать покрышки в соответствии с собственным весом. От правильности выполнения процедуры зависит безопасность велосипедиста, легкость хода, долговечность конструкции.
При самостоятельной сборке велосипеда по запчастям необходимо руководствоваться инструкцией от производителя. В ней изложены основные моменты, которые требуют внимания. Если этого недостаточно, стоит воспользоваться подробным поэтапным описанием работы.
Видео

Это мой второй электрический трик и улучшение по сравнению с моими первыми усилиями, которое можно увидеть здесь
http: //www.instructables.com/id/Custom-Electric-Tr … и здесь
Http: //www.instructables.com/id/Our-Dogs-100-Recum …
Новый трехколесный велосипед оснащен полной подвеской, задней педалью, мотором-втулкой мощностью 1000 Вт, дисковым тормозом (сзади) и даже круиз-контролем. Базовая конструкция рамы очень похожа на шаги, показанные в моих предыдущих инструкциях, и здесь не будет повторяться. Вместо этого Instructable сосредоточится на деталях изготовления, уникальных для этой конкретной сборки, которые могут быть полезны другим строителям.
Я покупаю свой моторный комплект 48 В, 1000 Вт у Yescom USA / xcceries через Ebay. В комплект входили колесо, шина, мотор-редуктор, контроллер, тормозные рычаги с электрическими выключателями, дисковый тормозной диск (без суппорта), тканевый батарейный отсек для 4 батарей 12 В, дроссельная заслонка, монтажная стойка для батарей, модуль круиз-контроля и вся необходимая проводка, за исключением перемычек аккумулятора для настройки любой аккумуляторной системы, которую вы решили использовать Стоимость комплекта с учетом доставки составила 228,76 долларов США. Я был ОЧЕНЬ доволен комплектом и отзывчивостью Yescom / xcceries, когда было обнаружено, что одна незначительная часть не была включена в оригинальную поставку. С момента завершения я проехал на велосипеде более 500 миль, и ступичный мотор работает безупречно.
Другие расходы (все включают доставку и налоги):
4 батарейки SLA 12v / 18ah от Titan за 145 долларов
3 приводных цепи KMC Z51 за 31 $
универсальный суппорт дискового тормоза ATV $ 9
2 QSC 3/8 «стержня заканчивается за $ 6,30
Shimano переключатели и кабели $ 29
2 подушки подушки ½ «подшипники $ 21
10 валовых хомутов $ 10,55
2 Ремесленные пружины сиденья трактора $ 4
Комплект тормозных тросов Bell 11 $
Разная сталь для рамы и кронштейнов $ 80
Блошиный рынок велосипедов 15 $
С несколькими другими разн. Гайки и болты, общая стоимость велосипеда составила 600 долларов.
Расходные материалы:
Шаг 1: Нижний кронштейн и передний Derilleur

Велосипед блошиного рынка бренда Giant был разрезан, чтобы спасти нижний кронштейн и стойку переключателя. ВВ был приварен к секции трубы 1,5х1,5, а затем использовался плоский шов 3/16 дюйма для изготовления кронштейна, который можно сдвигать вперед и назад по раме для размещения водителей с разной длиной ног.
Шаг 2: кадр и выпадение

Каркас состоит из каркаса 1,5 х 1,5 прямоугольной формы. Задние выемки выполнены из плоской заготовки 3/16 дюйма. Колесо двигателя ступицы имеет ось 15 мм, поэтому отверстия высверливаются на 15 мм, а прорези вырезаются для выпадения колеса. Заднее колесо без привода имеет быстрое освобождение Для обеспечения возможности быстрого расцепления необходимо предусмотреть механизм затяжки и специальные выемки. Для этого крепления используется шайба наружного диаметра с внутренним диаметром 7/8 «ID / 2». Вырежьте отверстие в шайбе, затем зажмите отверстия и колесо вместе с Быстрая разблокировка по центру шайб. Снимите закрепленный узел и приварите шайбы к выемкам.
Шаг 3: Сиденье и Подвеска

Передняя подвеска — это передняя вилочная подвеска Duo Track 7001, поставляемая в стандартной комплектации с блошиным байком бренда Giant, который я использовал для проекта. Не очень хорошая вилочная подвеска, но я буду ждать, пока я не найду лучшую на барахолке. Задняя часть подвешена путем размещения пружин сиденья садового трактора под спинкой сиденья и шарниров в передней части сиденья. Это работает на удивление хорошо, учитывая стоимость (8 долларов за пружины и петли) и обеспечивает гораздо более комфортную езду, чем твердое сиденье на моем первом велосипеде.
Шаг 4: Дистанционное управление

Трайк управляется дистанционно, устанавливая набор ручек непосредственно перед сиденьем и используя соединительную тягу для соединения со штоком передней вилки. Трубка рулевого управления была отрезана от передней вилки барахла (фото 1). Опора сиденья приварена к нижней части рулевой колонки. Конический штифт меньшего размера должен проскальзывать в рулевую трубу после удаления излишков сварного шва и мусора (фото 2). Я использовал головную трубу из того же барахла. Длина 1,5 х 1,5 квадратной трубы разрезается пополам вдоль, а затем две половины привариваются к головке трубы. Вы можете просто разглядеть шов двух половинок на фото 3.
Головка трубки приварена вертикально к раме, а рулевая труба вставлена в трубку головки вверх дном так, чтобы удлинитель стойки сиденья был направлен вверх (фото 4). Рулевой рычаг вырезан из плоской заготовки (фото 5) и приварен к рулевой трубе (фото 6). На передней вилке скользящая труба вырезана из ½ «черной трубы с угловым срезом в нижнем конце, чтобы соответствовать стандартной« затягивающей головке »и болту (фото 7). Рулевой рычаг в форме буквы« L », показанный на фото, был позже отрезать, чтобы сформировать прямой рычаг, который показан в готовой сборке (Фото 8). Этот рычаг приварен к верхнему концу трубы скольжения черной трубы (Фото 9).
Шаг 5: рулевая тяга

Тяга, соединяющая дистанционное рулевое управление с передней вилкой, выполнена с использованием ½ «кабелепровода. Шесть небольших отверстий просверлены вокруг конца кабелепровода, а 3/8» гайка с тонкой резьбой вставлена в конец кабелепровода (Фото 1) , Затем гайка привинчивается к трубопроводу через шесть небольших отверстий. Обязательно вставьте болт в гайку во время сварки, чтобы предотвратить попадание шлака на протекторы (фото 2). На фото 3 показана внутренняя гайка, приваренная на место, а затем конец стержня и крепежная гайка. Готовая рулевая тяга показана на фото 4 и установлена на фото 5.
Шаг 6: вал, домкраты и цепь

Домкрат используется для передачи мощности педали, установленной в центре, на внешнее правое заднее колесо. Это также ведущее колесо со ступичным двигателем, которое поставляется с установленным 7-звездочным зубчатым колесом. Домкрат выполнен с использованием двух опорных подшипниковых опор ½ ”, установленных на раме. В качестве приводного вала используется 12-дюймовый длинный ½-дюймовый болт, а на каждом конце ведущего вала используются двухконтурные 20-дюймовые велосипеды с педалями. Цепь от переднего переключателя к валу домкрата меняет длину при переключении передних передач Старый переключатель использовался для поддержания натяжения цепи и устранения провисания из-за переключения передач.
Шаг 7: Дисковые тормоза и задний переключатель

Комплект Hub Motor поставляется с дисковым тормозным диском, но без суппорта. Я использовал универсальный суппорт ATV и установил его с помощью кронштейна из плоского материала (см. Стрелку на фото 1). Задний переключатель не будет правильно выровнен при установке на ось ступичного двигателя. Небольшой кронштейн был приварен сразу за выпадением, а переключатель прикреплен болтами к кронштейну (фото 2).
Шаг 8: Готовый Трайк (перед покраской)


Ваш город:
Ваш город:
Москва (Москва)?
-
Главная
-
Велосипеды
-
Комфортные велосипеды
-
Комфортные велосипеды МОТОМИР
-
ВЕЛОСИПЕД 26″ 3-Х КОЛЕСНЫЙ DELTA TRIKE (6 СКОРОСТЕЙ, КОРЗИНКА СПЕРЕДИ И СЗАДИ)
—
—
—
—

4.6 Отзывы
26 сейчас просматривают
9 купили на этой неделе
+1733 Бонусных рублей
Купить в рассрочку:Ответ в течении 1 часа
2 890 руб. в мес.
Самовывоз за 15 минут из 11 магазинов сегодня бесплатно
Доставка более в чем 1117 городов РФ и СНГ от 3 дней
Аналоги
Характеристики
Гарантия
Отзывы
Как получить
Оплата
- Арт 36132_мотом
- Пол велосипедистамужской (унисекс)
- Диаметр колес (дюймы)26
- Материал рамысталь
Колёса — 26 х 2,4″
Скорости — 7 скоростей
Навеска — Shimano TX30-7, TZ-31
Вес нетто — 29.7 кг
Смотреть все
Мы гарантируем, что все товары, приобретенные у нас, соответствуют высоким стандартам качества. Мы уверены в качестве нашей продукции и предоставляем гарантию на товар на протяжении 6 месяцев с момента покупки.
В случае обнаружения любых дефектов или неисправностей в товаре в течение гарантийного периода, мы обязуемся заменить его на новый или произвести полный возврат средств.
Гарантия распространяется на любые виды неисправностей, кроме механических повреждений, являющихся результатом неправильного использования или ухода за товаром.
Чтобы воспользоваться гарантией, необходимо обратиться в наш сервисный центр, где наши квалифицированные специалисты проведут диагностику и, при необходимости, заменят или отремонтируют ваш товар.
Выбирая товары у нас, вы можете быть уверены в их высоком качестве и надежности. Наша гарантия на товар дает вам дополнительную защиту и уверенность в покупке.
Доставка заказов осуществляется во все регионы России
Нашими машинами при удаленности от филиала «Х-MOTORS» не более чем на 200 км. Отгрузка осуществляется после 100% оплаты товара.
Курьерской службой СДЭК, транспортной компанией DPD, ПЭК, GTD, Деловые линии или любой другой на ваш выбор. В данном случае вы оплачиваете 10% стоимости товара, а остаток вносите при получении в транспортной компании.
Минимальная партия товара − без ограничений.
В некоторых случаях предоставляется БЕСПЛАТНАЯ ДОСТАВКА товаров по акции: уточняйте информацию у вашего менеджера.
Способы оплаты
- Наличными или банковской картой в ближайшем филиале сети «X-MOTORS»
- По выставленному счету. Мы высылаем Вам официальный договор и выставляем счет, который можно оплатить в любом банке РФ. После оплаты заказ отгружается по условиям доставки, указанным в Договоре.
- Через сайт на карту СберБанка. Оплата происходит через авторизационный сервер Процессингового центра Банка ПАО «Сбербанк России» с использованием банковских кредитных карт платежных систем Visa, MasterCard или МИР.
- В кредит до трех лет, возможно, без первоначального взноса. Оформление через Банк.
- В рассрочку с нулевым первоначальным взносом, нулевой комиссией на полгода или 24 месяца. На некоторые товары действует рассрочка с увеличением цены на 8%, первоначальным взносом 30% и остатком на 10 месяцев. Оформление через Банк.

Нашли ошибку?