
-
Contents
-
Table of Contents
-
Troubleshooting
-
Bookmarks
Quick Links
Related Manuals for D-Link DHP-306AV
Summary of Contents for D-Link DHP-306AV
-
Page 2: Preface
Preface D-Link reserves the right to revise this publication and to make changes in the content hereof without obligation to notify any person or organization of such revisions or changes. Manual Revisions Revision Date Description April 28, 2011 • Initial release for hardware revision C1…
-
Page 3: Table Of Contents
Warranty…………….18 System Requirements …………..4 Registration…………..23 Introduction ………………. 5 Features ……………….. 5 Hardware Overview …………..6 LEDs ………………. 6 Connection …………….7 Hardware.Installation…………8 Push.Button.Security…………9 Using.the.Setup.Wizard…………10 Configuration …………….11 Security ………………13 D-Link DHP-306AV User Manual…
-
Page 4: Product.overview
Section 1 — Product Overview Product Overview Package Contents One D-Link DHP-306AV PowerLine AV Network Adapter One CAT5 Ethernet Cable CD-ROM with Software and User Manual Quick Install Guide System Requirements • Windows® 7, Windows Vista®, XP (with Service Pack 3) •…
-
Page 5: Introduction
D-Link announces a fast, 200Mbps* PowerLine AV Network Adapter that allows you to connect your home computers, networking devices and gaming devices through the most pervasive medium in your house — the electric power lines. With the DHP-306AV PowerLine AV Network Adapter, you may access the Internet, transfer files, play games, and stream HD video.
-
Page 6: Hardware Overview
• Red — The PowerLine link rate is less than 50 Mbps. • Solid — The Ethernet port is linked but there is no data traffic. Ethernet LED • Blinking — The device is transmitting data. • Off — There is no Ethernet connection. D-Link DHP-306AV User Manual…
-
Page 7: Connection
Press to secure your network. Refer to page 9 for more information. Reset Button Press and hold the button for 1 second to reset to factory default. Ethernet Port Connect the CAT5 Ethernet cable to the DHP-306AV Ethernet port. D-Link DHP-306AV User Manual…
-
Page 8: Hardware.installation
• To verify connectivity or if you are having connection problems, plug the adapters in the same room to verify whether your home’s electrical wiring is contributing to the issue. The adapters’ PowerLine LED indicators will illuminate if the connection is established. Note: A minimum of two D-Link PowerLine devices are required to create a PowerLine Network.
-
Page 9: Push.button.security
1. PowerLine AV Network Adapter Press the Simple Connect button on the DHP-306AV for no more than two seconds. The Power LED will start blinking after you release the button. The adapter will create a private, randomly generated encryption key that each Powerline AV Network Adapter will use.
-
Page 10: Using.the.setup.wizard
Using the Setup Wizard Follow the simple steps below to run the Setup Wizard to guide you quickly through the installation process. Insert the D-Link DHP-306AV CD into your CD-ROM drive. If the CD Autorun function does not automatically start on your computer, click Start > Run. In the Run command box type “D:autorun.exe”, where D: represents the drive letter of your CD-ROM.
-
Page 11: Configuration
Section 3 — Configuration Configuration After you have completed the D-Link PowerLine AV Utility installation wizard, double-click the D-Link PowerLine AV Utility icon on your desktop to start the configuration of the DHP-306AV. Double-click the D-Link PowerLine AV Utility icon The D-Link PowerLine AV Utility provides you the option of setting your own PowerLine network and the network information of connected PowerLine devices.
-
Page 12
Link Rate: Shows the link rate of the connected to the PowerLine device. MAC Address: Shows the MAC address of the connected PowerLine device. Firmware Shows the firmware version of the connected PowerLine Version: device. D-Link DHP-306AV User Manual… -
Page 13: Security
3. Select the PowerLine devices that you would like to apply the encryption key setting. Then, type your private encryption key into the Encryption Key Setting field and click Set Selected Devices. The utility will show a message once the setting has been completed. D-Link DHP-306AV User Manual…
-
Page 14
Then follow the 1 to 3 steps of “Setting your private Encryption Key”. Your PowerLine network will securely be configured with a customized encryption key and all of the devices will be able to communicate with each other after your setting. D-Link DHP-306AV User Manual… -
Page 15: Troubleshooting
If you are having problems configuring your network with two or more PowerLine adapters, please reset all of the adapters and configure them again. To test whether the electrical wiring is contributing to the problem, plug the PowerLine adapters in the same room. D-Link DHP-306AV User Manual…
-
Page 16: Technical.specifications
• CE Class B • C-Tick Storage Temperature • -10°C ~ 70°C AC Input • 100 ~ 240VAC, 50/60Hz Humidity • Operation: 10% ~ 90% RH Safety • Storage: 5% ~ 90% RH • UL, CE LVD D-Link DHP-306AV User Manual…
-
Page 17: Contacting.technical.support
• Hardware Revision (located on the label on the bottom of the product (e.g. rev C1)) • Serial Number (s/n number located on the label on the bottom of the product). You can find software updates and user documentation on the D-Link website as well as frequently asked questions and answers to technical issues.
-
Page 18: Warranty
Warranty Period or ninety (90) days, whichever is longer, and is subject to the same limitations and exclusions. If a material defect is incapable of correction, or if D-Link determines that it is not practical to repair or replace the defective Hardware, the actual price paid by the original purchaser for the defective Hardware will be refunded by D-Link upon return to D-Link of the defective Hardware.
-
Page 19
Software or to refund the portion of the actual purchase price paid that is attributable to the Software. Except as otherwise agreed by D-Link in writing, the replacement Software is provided only to the original licensee, and is subject to the terms and conditions of the license granted by D-Link for the Software. -
Page 20
God, failures due to power surge, and cosmetic damage; Any hardware, software, firmware or other products or services provided by anyone other than D-Link; and Products that have been purchased from inventory clearance or liquidation sales or other sales in which D-Link, the sellers, or the liquidators expressly disclaim their warranty obligation pertaining to the product. -
Page 21
FOR WARRANTY SERVICE) RESULTING FROM THE USE OF THE PRODUCT, RELATING TO WARRANTY SERVICE, OR ARISING OUT OF ANY BREACH OF THIS LIMITED WARRANTY, EVEN IF D-LINK HAS BEEN ADVISED OF THE POSSIBILITY OF SUCH DAMAGES. THE SOLE REMEDY FOR A BREACH OF THE FOREGOING LIMITED WARRANTY IS REPAIR, REPLACEMENT OR REFUND OF THE DEFECTIVE OR NONCONFORMING PRODUCT. -
Page 22
• Connect the equipment into an outlet on a circuit different from that to which the receiver is connected. • Consult the dealer or an experienced radio/TV technician for help. For detailed warranty information applicable to products purchased outside the United States, please contact the corresponding local D-Link office. -
Page 23: Registration
Appendix F — Registration Registration Register your product online at registration.dlink.com Product registration is entirely voluntary and failure to complete or return this form will not diminish your warranty rights. Version 3.0 April 28, 2011 D-Link DHP-306AV User Manual…
Время на прочтение
8 мин
Количество просмотров 92K
 Технология PowerLine не является чем-то новым и необычным. Однако, о подобных устройствах мало пишут и мало говорят. Мне сложно судить о зарубежном рынке, однако у нас такие адаптеры совершенно в диковинку. И это понятно: у этой технологии хватает недостатков, а устройства для построения PowerLine-сети всё-таки стоят не копейки. На момент публикации этой статьи рекомендованная цена на самый дешёвый адаптер от D-Link составляет $44. Наверное далеко не каждый в нашей стране готов заплатить более $80 за то, чтобы иметь возможность отказаться от прокладки витой пары. Не говоря о том, что это далеко не равносильная замена.
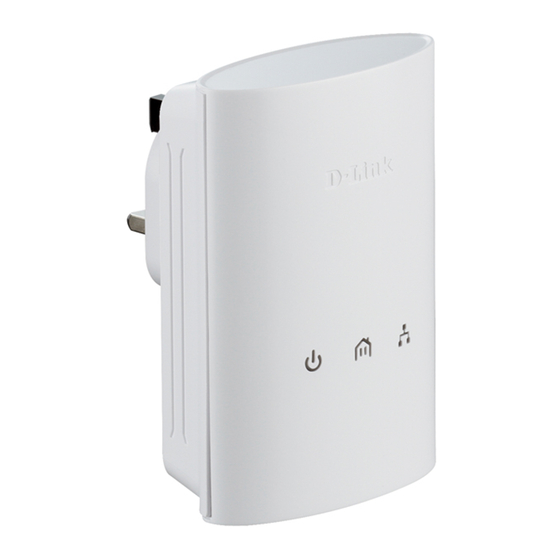
Мне в руки попали несколько устройств от D-Link для развёртывания PowerLine сети и в этой статье я постараюсь как можно более подробно описать одно (а вернее два — ведь адаптеры используются в паре) из них. Это DHP-306AV.
Немного теории.
Как я уже отмечал — технология не нова, про неё сказано и написано не мало. В Сети есть как достаточно доступные описания технологии, так и сравнительные тестирования существующих адаптеров (например: THG.ru: Строим сеть по электропроводке: тесты шести адаптеров). Поэтому я постараюсь остановиться на, как мне кажется, недостаточно освещённых вопросах.
Название технологии (PLC, Power Line Communication, а на русском — передача данных по электропроводке) можно понять неоднозначно: данные передаются не просто по электропроводке, а по реальной и работающей сети питания. Зашифрованные специальным ключом данные кодируются в аналоговый сигнал с частотой свыше 30 МГц, который в последствии и накладывается на существующую пульсацию в сети питания, которая в нашей стране составляет 50 Гц. На пальцах этот принцип представлен на этой картинке:

Это является одной из причин, по которым устройство, привезённое например из Штатов не заведётся в нашей сети, даже если подобрать подходящий переходник. Также именно поэтому такой адаптер не будет работать в сети с активной фильтрацией: любые сетевые фильтры, источники бесперебойного питания и трансформаторы безжалостно задавят информационную составляющую сигнала. С другой стороны, как показывает практика, наличие таких устройств включенных параллельно адаптеру, хоть и не желательно, однако незначительно влияет на качество сигнала.
Если говорить о скоростях, то здесь всё так же неоднозначно. С одной стороны за последние годы технология значительно шагнула вперёд: если еще 2001м году стандартом была скорость до 14 Мбит, то сегодня выпускаются устройства на коробках которых стоят цифры 200 и даже 500 Мбит. С другой стороны речь идёт о физической скорости. Реальная же скорость передачи данных сильно зависит от многих факторов и может быть в разы меньше. Качество электропроводки, скрутки в линии, её неоднородность — всё, что так присуще нашим домам, деструктивно влияет и на физическую скорость и на скорость и качество передачи данных. Заявленную производителем физическую скорость смело можно делить на 2, и вычитать по 10% за каждое силовое устройство в доме.
Ну и последнее, что зачастую вызывает вопросы, это то, как будут функционировать несколько PowerLine-устройств включенных в одну сеть. Здесь всё просто: так как адаптеры работают на физическом уровне сетевой модели OSI, то будучи включенными в одну сеть питания и синхронизированными между собой, они, по-сути, представляют из себя обычный сетевой концентратор со всеми его возможностями и недостатками.
Внешний вид и комплектация.
В комплект поставки DHP-306AV не входит ничего лишнего: устройство, патчкорд, инструкция, диск и картонная коробочка. Хотя пожалуй этого вполне достаточно.
Устройство выглядит приятно и выполнено в белом, относительно новом для D-Link, стиле. Разъём сети питания располагается прямо на корпусе, что обеспечивает возможный минимум проводов к адаптеру. Возможно я придираюсь, но в комплекте, как обычно, идёт «фирменный» синий патчкорд, который ну никак не гармонирует с аккуратным беленьким устройством.
На этикетке непосредственно на устройстве, кроме серийного номера и MAC-адреса, указан так же так называемый «PLC PWD» — уникальный пароль необходимый для настройки адаптера, который я рекомендую сразу же записать в удобном для себя месте. Сам я трижды бегал к розетке, чтобы снова и снова вводить этот пароль в утилиту настройки, которая его почему-то упорно забывала.
Индикация текущего состояния производится тремя светодиодами: первый информирует о состоянии устройства, второй — PowerLine-сети, третий — сети Ethernet. В целом такой индикации вполне достаточно, чтобы судить о состоянии устройства.
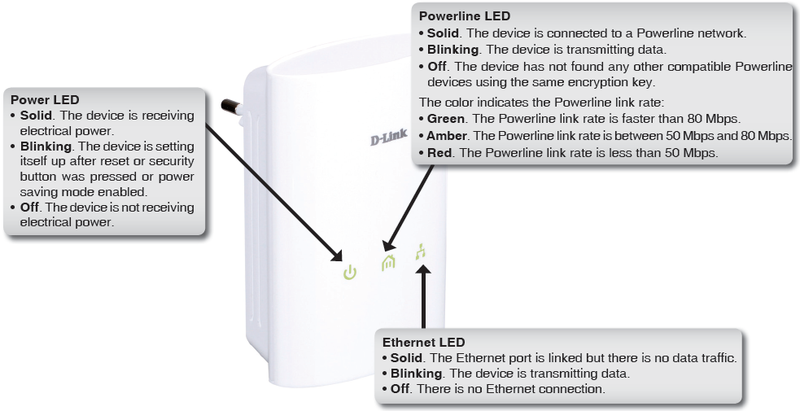
Надо сказать, что свет от индикаторов не очень яркий, приятного жёлто-зелёного цвета. Мне кажется это замечание особенно актуально, когда многие производители грешат установкой в устройства ярких режущих глаза синих светодиодов.
Все элементы управления находятся с одной стороны: это кнопка аппаратного сброса устройства на заводские настройки и кнопка синхронизации двух устройств. С этой же стороны располагается разъем 8P8C.

Программное обеспечение.
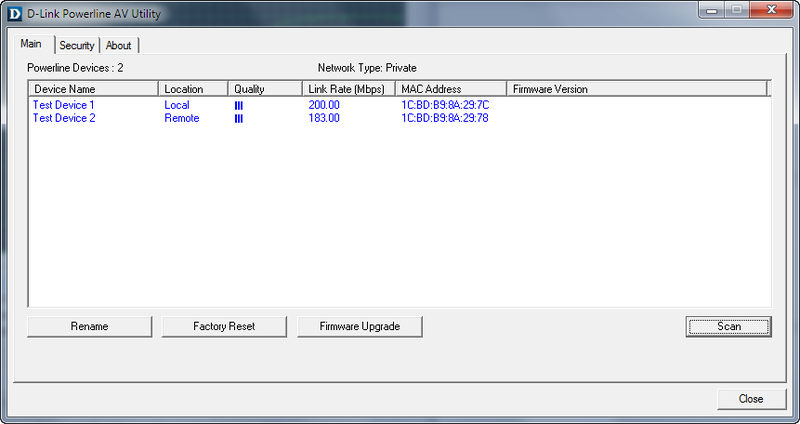
У устройств подобного рода нет какого-либо web-интерфейса, да он и не нужен: кнопки и трёх индикаторов на корпусе вполне достаточно, чтобы комфортно пользоваться адаптером. Однако стандарт HomePlug AV подразумевает удалённое управление адаптерами, а кнопка синхронизации позволяет подключить в сеть только два устройства. Поэтому обзор был не полным без обзора D-Link PowerLine AV Utility, которая доступна для скачивания с FTP D-Link.
Нужно сразу сказать, что программа мягко говоря не идеальна и, забегая вперёд, скажу, что пожалуй это единственное, что оставляет неприятное впечатление от использования устройства. Так например с порога меня встретил неприятный баг: утилита видит и может управлять только устройствами, подключенными к первому системному сетевому адаптеру. Сколько я не пытался заставить её работать не отключая основную домашнюю сеть — у меня ничего не получилось.
Вот небольшой скринкаст, описывающий все прелести этой программы:
Как видно, проблем хватает. Программа не показывает версию firmware, сканер не всегда находит устройства, нет индикаций, а сама программа изредка прикидывается зависнувшей. Столбец «Quality» у меня всегда показывал три полоски, что на полной скорости, что в самых худших условиях, а показания Link Rate, который должен отображать физическую скорость между устройствами, у меня привязать к реальной скорости соединения вообще не получилось. Есть и ряд юзабилити-ошибок: например полосочкам качества сигнала я бы предпочёл конкретные цифры затухания сигнала в линии в дБ.
Тестирование.
Тестирование устройств проводилось в обычной квартире достаточно старого здания, со всеми проблемами электропроводки. В качестве сетевого адаптера использовалась двухпортовая гигабитная сетевая карта Intel® Gigabit ET Dual Port Server.
Программно сетевой канал тестировался утилитой iperf, которая последовательно запускалась с 1, 10, 100 и 1000 одновременных подключений. Каждый тест выполнялся трижды, по 5 минут, после чего результаты усреднялись. Снимались два параметра: скорость передачи данных и пинг во время передачи данных.
Нужно отметить, что соединение сетевых портов ПК напрямую показало скорость 946 Мбит/с, а средний пинг составил 1 мс. От этих данных и можно отталкиваться в тестировании PowerLine.
Первый тест — идеальные условия.
Первый тест выполнялся в идеальных условиях: оба адаптера были включены в соседние розетки одного 20-метрового удлинителя, т.е. расстояние между адаптерами составляло около 5 см, а удалённость от ближайшего источника электрических помех составляла более 20 метров. В этот момент в сеть питания был подключен только ПК, свет также был выключен.

Утилита показала идеальное качество соединения и Link-Rate в 190 Мбит. Результаты тестирования также оказались отличными:

По этим графикам видно, что не смотря на AES шифрование трафика и его большие объемы, скорость передачи данных упирается скорее в физические параметры линии, нежели в производительность контроллера устройства. Нужно также отметить, что соединение было совершенно стабильным и потерь пакетов не наблюдалось.
Второй тест.
Второй тест выполнялся в условиях более близких к реальным: второй адаптер был перенесён в другую розетку в другой комнате. В сети по-прежнему не было других электроприборов, но в комнатах было включено около 5 энергосберегающих ламп, наличие которых, как заявляет производитель, достаточно губительно сказывается на качестве сигнала. Вот что отрапортовала утилита:
Как видно — качество сигнала осталось, якобы, идеальным, а физическая скорость снизилась незначительно. Однако при этом тестирование показало скорость 68,9 Мбит/с при среднем пинге 15 мс.
Третий тест.
Третий тест выполнялся в несколько более сложных для адаптеров условиях: второй адаптер был вынесен в самую дальнюю комнату (в моём случае — в ванную), но «эфир» в сети по-прежнему остался чистым. К этому моменту я уже перестал удивляться данным, которые предоставляла мне утилита, не удивился и теперь: она отрапортовала, что скорость стала выше:

Выполненный при этом тест показал, что всё же условия стали действительно сложнее: скорость передачи данных упала до 36,4 Мбит/с, а средний пинг вырос до 30 мс.
Четвёртый тест — максимально сложные условия.
Конечно же речь идёт о максимально сложных условиях для моей совсем небольшой квартиры: устройство осталось в самой дальней розетке, однако при этом дополнительно в сеть были включены телевизор, медиа-плеер, холодильник, стиральная машина и ионизатор, суммарной мощностью около 5 кВт.
Также в этом тесте в сеть были включены 8 энергосберегающих ламп, которые, как заявляет D-Link, очень негативно влияют на качество PowerLine-сети. Это объясняется тем, что каждая лампа имеет импульсный блок питания, который даёт помехи в общую сеть.
Утилита сообщила что ситуация выглядит так:

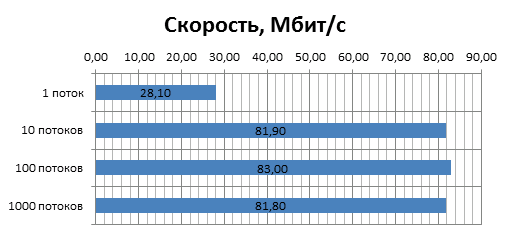
При этом скорость передачи данных уменьшилась до 27,8 Мбит/с, а средний пинг почти не изменился и составил 38 мс.
Общие результаты тестирования.
На данный момент мне не с чем сравнивать: это первое PowerLine устройство, с которым мне удалось познакомиться достаточно близко. На нижеприведенных диаграммах отображено изменение характеристик канала связи в различных условиях.

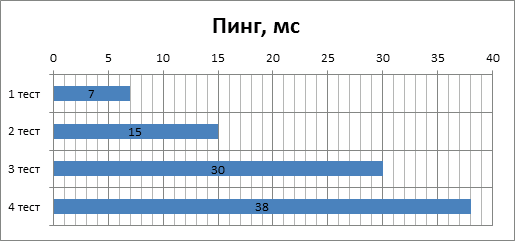
Глядя на эти диаграммы первое, что приходит в голову, это сравнение с Wi-Fi: как видно, показатели скорости вполне сравнимы. Если же сравнивать другие аспекты этих технологий, то против мобильности и удобства Wi-Fi у PowerLine есть свой козырь: высокая стабильность соединения. В ходе тестирования я с удивлением обнаружил, что ни скачки напряжения, ни включение силовых устройств не заставляют соединение оборваться. Другой немаловажный аспект — PowerLine выглядит более защищенным. Если пароль на Wi-Fi в определенных условиях вполне возможно взломать в момент аутентификации клиента, то здесь же соединение устанавливается при помощи предустановленного ключа, и взлом с теоретической точки зрения невозможен. Хотя, если вспомнить о том, какой трафик обычно гоняется по домашним сетям, возможно это и не слишком важное преимущество.
Заключение.
Для начала пара заключительных слов о PowerLine. Да, это дороже использования обычной витой пары. Да, мы не всегда получим приемлемую скорость и качество соединения. Да, есть достаточно широко распространённых беспроводных стандартов, у которых нет всех вышеозначенных проблем. Да, use-case данной технологии не очевиден. Однако, несмотря на все ограничения и проблемы использования, мне эта технология кажется интересной и достаточно полезной.
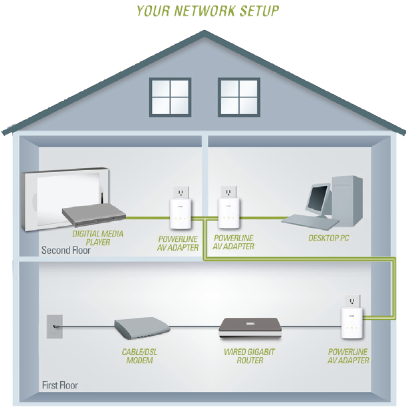
Какая сфера применения у PowerLine? Пожалуй её можно использовать в тех случаях, когда нужно предоставить доступ в ЛВС для небольших устройств, с которыми нет постоянного и активного обмена данными. Например, я пробовал подключать таким образом свой медиаплеер Asus O!Play и смотреть на нём IPTV: картинка не сыпалась, а видео ни разу не оборвалось, чего я не могу сказать о подключении по Wi-Fi. Другой, сразу приходящий в голову пример, это подключение по PowerLine VOIP-устройств. Я не пробовал, но мне кажется проблем возникнуть не должно, а вот от лишних проводов избавит.
Что касается DHP-306AV, учитывая, что это самое младшее устройство в линейке от D-Link, оно показало достаточно неплохие результаты, как по скорости соединения, так и по его качеству. В следующем обзоре я постараюсь рассмотреть более старшие модели и провести сравнение их характеристик. А пока, можно с уверенностью поставить убедительную пятёрку инженерам D-Link.
Устройства на обзор любезно предоставлены Крымским представительством D-Link в г. Симферополе.
Отдельную благодарность за помощь в проведении тестирования хочется выразить Артёму Чикалкину и Юрию Прокопенко.
-
Contents
-
Table of Contents
-
Troubleshooting
-
Bookmarks
Quick Links
Related Manuals for D-Link DHP-306AV
Summary of Contents for D-Link DHP-306AV
-
Page 2: Table Of Contents
LAN Setup — Static IP ……..36 Introduction ………….. 5 MAC Address Filter ……..37 Hardware Overview ……….6 Advanced Wireless ……..38 DHP-306AV LEDs ……….6 User Limit …………. 39 DHP-306AV Connections ……..7 Admin …………40 DHP-W306AV LEDs ………. 8 System …………
-
Page 3
What is Wireless? ……….75 Tips ……………. 77 Wireless Modes …………. 78 Networking Basics ………… 79 Check your IP address ………. 79 Statically Assign an IP address ……80 DHP-306AV …………81 Technical Specifications……….. 81 DHP-W306AV …………82 D-Link DHP-W307AV User Manual… -
Page 4: Product Overview
Section 1 — Product Overview Product Overview Package Contents • D-Link DHP-306AV Powerline AV Network Adapter • D-Link DHP-W306AV Powerline AV Wireless N Extender • CAT5 Ethernet Cable X 2 • CD-ROM with Software and User Manual • Quick Install Guide…
-
Page 5: Introduction
Luckily, the DHP-W307AV makes setting up security as easy as pushing a button. Just press the Simple Connect Button on both D-Link powerline devices, and the network will be immediately protected against wire-tapping using powerful 128-bit AES data encryption.
-
Page 6: Hardware Overview
• Off. The device is not receiving electrical power. Ethernet LED • Solid. The Ethernet port is linked but there is no data traffic. • Blinking. The device is transmitting data. • Off. There is no Ethernet connection. D-Link DHP-W307AV User Manual…
-
Page 7: Dhp-306Av Connections
8 for more information. Reset Button Press and hold the button for 1 second to reset to factory default. RJ-45 10/100BASE-TX Ethernet Port Connects to Digital Media Devices, PCs, Game Consoles, Network Storage Devices CAT5 Ethernet cable. D-Link DHP-W307AV User Manual…
-
Page 8: Dhp-W306Av Leds
• Off. The device has not found any other • Off. There is no Ethernet connection. compatible Powerline devices using the same encryption key. Wireless LED • Solid. The device is connected to a Wireless network. • Blinking. The device is transmitting data. D-Link DHP-W307AV User Manual…
-
Page 9: Dhp-W306Av Connections
Hardware Overview DHP-W306AV Connections ON / OFF button Turns the device on or off. OFF: (active / inactive) RJ-45 10/100BASE-TX Ethernet Port Connects to Digital Media Devices, PCs, Game Consoles, Network Storage Devices CAT5 Ethernet cable D-Link DHP-W307AV User Manual…
-
Page 10: Dhp-W306Av Side
120 seconds to start the WPS then will turn off. The LED will start process on another wireless device. blinking after the Encryption button is pushed. The LED will turn off once the Powerline AV is connected to a Powerline network. D-Link DHP-W307AV User Manual…
-
Page 11: Hardware Installation
Hardware Installation SET-UP DHP-306AV Plug the DHP-306AV into an AC wall outlet close to your router and connect the included CAT5 Ethernet cable to the Ethernet jack of the DHP-306AV to your router as seen in Room A. Room A…
-
Page 12: Set-Up Dhp-W306Av
2. Connect one end of the supplied CAT5 Ethernet cable to the Ethernet port of the DHP-W306AV and the other end of the cable to the Ethernet port of your computer. Room A Room B Simple Connect Button DIR-655 DHP-306AV DHP-W306AV WPS/Eny LED D-Link DHP-W307AV User Manual…
-
Page 13: Powerline Network — Quick Setup
Powerline devices added after the first device will be in the Join State when the Simple Connection Button is pressed. Ungroup state — Hold down the Simple Connection Button for more than 10 seconds to detach the device from its network group. D-Link DHP-W307AV User Manual…
-
Page 14: Powerline Installation Considerations
5. To help prevent against electrical shock, be sure to plug the power cables into properly grounded electrical outlets. 6. The Powerline device is equipped with a three-pronged plug to help ensure proper grounding. Do not use adapter plugs or remove the grounding prong from the cable. D-Link DHP-W307AV User Manual…
-
Page 15: Wireless Installation Considerations
1. Keep the number of walls and ceilings between the D-Link access point and other network devices to a minimum. Each wall or ceiling can reduce your adapter’s range from 3-90 feet (1-30 meters.) Position your devices so that the number of walls or ceilings is minimized.
-
Page 16: Using The Setup Utility
Follow the simple steps below to run the Setup Wizard to guide you quickly through the installation process. Insert the D-Link DHP-W307AV CD into your CD-ROM drive. If the CD Autorun function does not automatically start on your computer, click Start > Run.
-
Page 17: Configuration
Utility icon on your desktop to start the configuration of the DHP-306AV. Double-click the D-Link Powerline AV Utility icon The D-Link Powerline AV Utility provides you the option of setting your own Powerline network and the network information of connected Powerline devices.
-
Page 18: Main
• One square — Suitable for data and Internet activity connection. Link Rate: Shows the link rate of the connected device. MAC Address: Shows the MAC address of the connected device. Firmware Version: Shows the firmware version of the connected device. D-Link DHP-W307AV User Manual…
-
Page 19
Factory Reset Button: Select a Powerline device first and then reset to factory default encryption key and firmware version. Firmware Upgrade Button: The firmware upgrade is only for local device. Select the appropriate firmware files and then proceed. D-Link DHP-W307AV User Manual… -
Page 20: Security
• Local Device: You do not need to enter the device password before changing the encryption key. • Remote Device: You must enter the device password before changing the encryption key. Note: Each device has a unique device password on the device label. D-Link DHP-W307AV User Manual…
-
Page 21
Then follow the 1 to 4 steps of “Setting your private Encryption Key”. Your Powerline network will securely be configured with a customized encryption key and all devices can communicate with each other after your setting. D-Link DHP-W307AV User Manual… -
Page 22: Using The Web-Based Configuration Utility
Type Admin as the User Name and then enter your password. Leave the password blank by default. If you receive a “Page Cannot be Displayed” error, please refer to the Troubleshooting section on page 78 for assistance. D-Link DHP-W307AV User Manual…
-
Page 23: Plc Settings
Section 3 — Configuration PLC Settings This section will show you how to configure your new D-Link Powerline AV using the web-based configuration utility. D-Link DHP-W307AV User Manual…
-
Page 24
You can find the MAC address printed on the back of your device. Password: The Password is used to verify that you are authorized to perform changes on a device. You can find the Password printed on the back of your device. D-Link DHP-W307AV User Manual… -
Page 25
Please check its password and make sure the device is powered on. QoS Setting: You can configure your Powerline AV devices to give priority to powerline network traffic according to its unique MAC Address. D-Link DHP-W307AV User Manual… -
Page 26: Wireless Setup Wizard
To set up your wireless network, click Add Wireless Device With WPS and skip to page 38. If you would like to enter your settings without running the wizard, click Wireless Setup on the left side and skip to page 40. D-Link DHP-W307AV User Manual…
-
Page 27
Enter the Device Name of the AP and click Next to continue. This is the NetBIOS name for the AP. Changing the Device Name is recommended if there is more than one D-Link device within the same wireless network. If you would like to change the admin account password, enter a new password and click Next. -
Page 28
Click Next to continue. Click Save to save your network settings. In order for your network settings to take effect the AP will reboot automatically. When the device has finished rebooting the main screen will be displayed. D-Link DHP-W307AV User Manual… -
Page 29
This key must be entered on your wireless clients. For WEP encryption, enter a Network Key exactly 5 or 13 characters long or exactly 10 or 26 characters using 0-9 and A-F. Click Next to continue. D-Link DHP-W307AV User Manual… -
Page 30
Section 3 — Configuration The following screen will display you the network key to enter on your wireless clients. Click Save to finish the Setup Wizard. D-Link DHP-W307AV User Manual… -
Page 31: Add Wireless Device With Wps
Select PIN to use your PIN number from your wireless device to connect to your network. Click Connect to continue. Start WPS on the wireless device you are adding to you wireless network to complete the setup. D-Link DHP-W307AV User Manual…
-
Page 32
Select PBC to use Push Button Configuration in order to connect to your network. Click Connect to continue. Press the WPS Button on the wireless device that you are adding to your network to complete the setup. D-Link DHP-W307AV User Manual… -
Page 33: Wireless Setup
Select one of the following: 802.11n Only — Select if you are only using 802.11n wireless clients. Mixed 802.11n, 802.11g and 802.11b — Select if you are using a mix of 802.11n, 11g, and 11b wireless clients. D-Link DHP-W307AV User Manual…
-
Page 34
Restores the default PIN of the access point. Reset PIN to Default: Resets Wi-Fi Protected Status to Not Configured. The Vista WPS icon will only be displayed when the Wi-Fi Protected Reset to status is Not Configured. Unconfigured: D-Link DHP-W307AV User Manual… -
Page 35: Lan Setup — Dhcp
(DHCP) to automatically obtain an IP address on the LAN/private network. Device Name: Enter the Device Name of the AP. Changing the Device Name is recommended if there is more than one D-Link device within the subnet. D-Link DHP-W307AV User Manual…
-
Page 36: Lan Setup — Static Ip
Device Name: Enter the Device Name of the AP. It is recommended that you change the Device Name if there is more than one D-Link device within the subnet. You can enter the device name of the AP into your web browser to access it instead of IP address for configuration.
-
Page 37: Mac Address Filter
Save Settings. MAC Filter List: Displays the list of clients in the filter list. D-Link DHP-W307AV User Manual…
-
Page 38: Advanced Wireless
Select this checkbox to enable WLAN partition. If this feature is enabled, then there is no barrier between communication among wireless stations connecting to the Access Point. If this is disabled, wireless clients are not allowed to exchange data through the Access Point. D-Link DHP-W307AV User Manual…
-
Page 39: User Limit
Enable User Check the Enable User Limit box to enable Limit: this feature. User Limit: Enter the maximum number of clients, between 1 and 32. Save Settings: Click Save Settings to save and activate the new changes. D-Link DHP-W307AV User Manual…
-
Page 40: Admin
Graphical a distorted image displayed on the screen Authentication: to prevent online hackers and unauthorized users from gaining access to your device’s configuration. This feature is disabled by default. D-Link DHP-W307AV User Manual…
-
Page 41: System
Save button above. Note: Restoring the factory default settings will not reset the Wi-Fi Protected Status to Not Configured. Click to reboot the access point. Reboot the Device: D-Link DHP-W307AV User Manual…
-
Page 42: Firmware
Click Browse… to locate the firmware file to be used for the update. Please check the D-Link support site for firmware updates at http://support.dlink.com. You can download firmware upgrades to your hard drive from the D-Link support site.
-
Page 43: Time
Date and Time: in these fields for the Year, Month, Day, Hour, Minute, and Second and then click Save Settings. You can also click the Copy Your Computer’s Time Settings button at the bottom of the screen. D-Link DHP-W307AV User Manual…
-
Page 44: Schedules
After making your changes, click Save to save the schedule rule. Schedule Rules The list of schedules will be listed here. Click the List: Edit icon to make changes or click the Delete icon to remove the schedule. D-Link DHP-W307AV User Manual…
-
Page 45: Device Info
Displays the access point’s time and firmware version. LAN: Displays the MAC address and the private (local) IP settings for the access point. Wireless LAN: Displays the wireless MAC address and your wireless settings such as SSID and Channel. D-Link DHP-W307AV User Manual…
-
Page 46: Logs
This button directs you to the next page of the log. This button clears all current log content. Clear: This button opens a new menu where you can Log Settings: configure the log settings. This button refreshes the log. Refresh: D-Link DHP-W307AV User Manual…
-
Page 47: Statistics
The DHP-W306AV keeps statistics of the traffic that passes through it. You can view the amount of packets that pass through the LAN and wireless portions of the network. The traffic counter will reset if the access point is rebooted. D-Link DHP-W307AV User Manual…
-
Page 48: Wireless
The wireless section allows you to view the wireless clients that are connected to your wireless access point. Connection Time: Displays the amount of time the wireless client has been connected to the access point. MAC Address: Displays the Ethernet ID (MAC address) of the wireless client. D-Link DHP-W307AV User Manual…
-
Page 49: Help
Section 3 — Configuration Help D-Link DHP-W307AV User Manual…
-
Page 50: Wireless Security
ASCII format is provided so you can enter a string that is easier to remember. The ASCII string is converted to HEX for use over the network. Four keys can be defined so that you can change keys easily. D-Link DHP-W307AV User Manual…
-
Page 51: What Is Wpa
WPA/WPA2 incorporates user authentication through the Extensible Authentication Protocol (EAP). EAP is built on a more secure public key encryption system to ensure that only authorized network users can access the network. D-Link DHP-W307AV User Manual…
-
Page 52: Configure Wep
7. Click Save Settings at the top of the window to save your settings. If you are configuring the access point with a wireless adapter, you will lose connectivity until you enable WEP on your adapter and enter the same WEP key as you did on the access point. D-Link DHP-W307AV User Manual…
-
Page 53: Configure Wpa/Wpa2 Personal
6. Click Save Settings at the top of the window to save your settings. If you are configuring the access point with a wireless adapter, you will lose connectivity until you enable WPA-PSK on your adapter and enter the same passphrase as you did on the access point. D-Link DHP-W307AV User Manual…
-
Page 54: Configure Wpa/Wpa2 Enterprise
6. Next to Port, enter the port you are using with your RADIUS server. 1812 is the default port. 7. Next to Shared Secret, enter the security key. 8. Click Save Settings to save your settings. D-Link DHP-W307AV User Manual…
-
Page 55: Connect To A Wireless Network
If you are joining an existing network, you will need to know the security key or passphrase being used. 1. Click on the wireless icon in your system tray (lower-right corner). Wireless Icon 2. The utility will display any available wireless networks in your area. D-Link DHP-W307AV User Manual…
-
Page 56
If you get a good signal but cannot access the Internet, check your TCP/IP settings for your wireless adapter. Refer to the Networking Basics section in this manual for more information. 4. The following window appears while your computer tries to connect to the router. D-Link DHP-W307AV User Manual… -
Page 57
It may take 20-30 seconds to connect to the wireless network. If the connection fails, please verify that the security settings are correct. The key or passphrase must be exactly the same as on the wireless router. D-Link DHP-W307AV User Manual… -
Page 58: Configure Wps
7. Carry out the following steps to use ® Windows 7 to configure the WPS feature of the DHP-W306AV: ® 1. Click the Start button and select Computer from the Start menu. 2. Click the Network option. D-Link DHP-W307AV User Manual…
-
Page 59
3. Double-click the DHP-W306AV. 4. Input the WPS PIN number (displayed in the WPS window on the Router’s LCD screen or in the Setup > Wireless Setup menu in the Router’s Web UI) and click Next. D-Link DHP-W307AV User Manual… -
Page 60
Section 5 — Connecting to a Wireless Network 5. Type a name to identify the network. 6. To configure advanced settings, click the icon. Click Next to continue. D-Link DHP-W307AV User Manual… -
Page 61
W306AV has been setup successfully. Make a note of the security key as you may need to provide this security key if adding an older wireless device to the network in the future. 9. Click Close to complete WPS setup. D-Link DHP-W307AV User Manual… -
Page 62: Using Windows Vista
Network and Sharing Center. The utility will display any available wireless networks in your area. Click on a network (displayed using the SSID) under Select a network to connect to and then click the Connect button. D-Link DHP-W307AV User Manual…
-
Page 63
The utility will display the following window to indicate a connection is being made. The final window indicates the establishment of a successful connection. The next two pages display the windows used to connect to either a WEP or a WPA-PSK wireless network. D-Link DHP-W307AV User Manual… -
Page 64: Configure Wep
Click on a network (displayed using the SSID) using WEP under Select a network to connect to and then click the Connect button. Enter the appropriate security key or passphrase in the field provided and then click the Connect button. D-Link DHP-W307AV User Manual…
-
Page 65: Configure Wpa-Psk
Click on a network (displayed using the SSID) using WPA-PSK under Select a network to connect to and then click the Connect button. Enter the appropriate security key or passphrase in the field provided and then click the Connect button. D-Link DHP-W307AV User Manual…
-
Page 66: Using Windows ® Xp
Click on a network (displayed using the SSID) and click the Connect button. If you get a good signal, but cannot access the Internet, check you TCP/IP settings for your wireless adapter. Refer to the Networking Basics section in this manual for more information. D-Link DHP-W307AV User Manual…
-
Page 67: Configure Wep
XP Wireless Utility by right-clicking ® on the wireless computer icon in your system tray (lower-right corner of screen). Select View Available Wireless Networks. 2. Highlight the wireless network (SSID) you would like to connect to and click Connect. D-Link DHP-W307AV User Manual…
-
Page 68
It may take 20-30 seconds to connect to the wireless network. If the connection fails, please verify that the WEP settings are correct. The WEP key must be exactly the same as on the wireless access point. D-Link DHP-W307AV User Manual… -
Page 69: Configure Wpa-Psk
XP Wireless Utility by right-clicking ® on the wireless computer icon in your system tray (lower-right corner of screen). Select View Available Wireless Networks. 2. Highlight the wireless network (SSID) you would like to connect to and click Connect. D-Link DHP-W307AV User Manual…
-
Page 70
It may take 20-30 seconds to connect to the wireless network. If the connection fails, please verify that the WPA-PSK settings are correct. The WPA-PSK passphrase must be exactly the same as on the wireless access point. D-Link DHP-W307AV User Manual… -
Page 71: Troubleshooting
1. Why am I unable to access the web-based configuration utility? When entering the IP address of the D-Link access point (192.168.0.50 for example), you are not connecting to a website on the Internet or have to be connected to the Internet. The device has the utility built-in to a ROM chip in the device itself.
-
Page 72
• Close your web browser (if open) and open it. • Access the web management. Open your web browser and enter the IP address of your D-Link access point in the address bar. This should open the login page for your the web management. -
Page 73
4. I can not start my Powerline AV device. Please check your power supply is working. Powerline AV device operates from the power supplied by the home electrical wiring and can not operate without a working power supply. D-Link DHP-W307AV User Manual… -
Page 74: Wireless Basics
Strictly adhering to the IEEE standard, the D-Link wireless family of products will allow you to securely access the data you want, when and where you want it. You will be able to enjoy the freedom that wireless networking delivers.
-
Page 75: What Is Wireless
D-Link is the worldwide leader and award winning designer, developer, and manufacturer of networking products. D-Link delivers the performance you need at a price you can afford. D-Link has all the products you need to build your network.
-
Page 76
Appendix A — Wireless Basics Who uses wireless? Wireless technology has become so popular in recent years that almost everyone is using it, whether it’s for home, office, business, D-Link has a wireless solution for it. Home • Gives everyone at home broadband access •… -
Page 77: Tips
The wireless connection in public places is usually called “hotspots”. Using a D-Link Cardbus Adapter with your laptop, you can access the hotspot to connect to Internet from remote locations like: Airports, Hotels, Coffee Shops, Libraries, Restaurants, and Convention Centers.
-
Page 78: Wireless Modes
An Infrastructure network contains an Access Point or wireless bridge. All the wireless devices, or clients, will connect to the wireless bridge or access point. An Ad-Hoc network contains only clients, such as laptops with wireless cardbus adapters. All the adapters must be in Ad-Hoc mode to communicate. D-Link DHP-W307AV User Manual…
-
Page 79: Networking Basics
Check your IP address After you install your new D-Link adapter, by default, the TCP/IP settings should be set to obtain an IP address from a DHCP server (i.e. wireless router) automatically. To verify your IP address, please follow the steps below.
-
Page 80: Statically Assign An Ip Address
2000 — From the desktop, right-click My Network Places > Properties. ® Step 2 Right-click on the Local Area Connection which represents your D-Link network adapter and select Properties. Step 3 Highlight Internet Protocol (TCP/IP) and click Properties. Step 4 Click Use the following IP address and enter an IP address that is on the same subnet as your network or the LAN IP address on your router.
-
Page 81: Dhp-306Av
• CE Class B Storage Temperature • C-Tick • -10°C ~ 70°C AC Input Humidity • 100-240V AC; 50/60Hz • Operation: 10% ~ 90% RH • Storage: 5% ~ 90% RH Safety • UL • CE LVD D-Link DHP-W307AV User Manual…
-
Page 82: Dhp-W306Av
Maximum wireless signal rate derived from IEEE Standard 802.11g and 802.11n specifications. Actual data throughput will vary. Network conditions and environmental factors, including volume of network traffic, building materials and construction, and network overhead, lower actual data throughput rate. Environmental conditions will adversely affect wireless signal range. Range varies depending on country’s regulation. D-Link DHP-W307AV User Manual…
- Инструкции и руководства
- Бренды
- D-Link
- DHP-W306AV
- Справочник Пользователя
![]()