Компания Casio известна своими высококачественными часами, которые сочетают в себе надежность и функциональность. Одной из самых популярных моделей является G-Shock Casio WR20BAR.
Но даже если у вас уже есть эти часы, настройка может вызвать затруднения. В этой статье мы подробно расскажем о том, как настроить G-Shock Casio WR20BAR и использовать все его функции.
Вам не нужно быть профессиональным часовщиком, чтобы понять, как настроить эти часы. Все, что вам нужно сделать, это следовать нашим инструкциям шаг за шагом. Таким образом, вы сможете максимально эффективно использовать свои новые часы и наслаждаться их комфортным использованием.
Содержание
- Шаг 1: Разборка упаковки
- Комплектация часов G-Shock Casio WR20BAR
- Шаг 2: Настройка даты и времени
- Шаг 3: Настройка будильника
- 1. Нажмите кнопку Mode до появления символа «ALM» на дисплее
- 2. Нажмите кнопку Adjust для выбора будильника для настройки
- 3. Настройка времени срабатывания будильника
- 4. Настройка других параметров будильника
- Шаг 4: Настройка таймера обратного отсчета
- Шаг 4.1: Включите таймер обратного отсчета
- Шаг 4.2: Установите время для таймера обратного отсчета
- Шаг 4.3: Запустите таймер обратного отсчета
- Шаг 5: Настройка секундомера
- Шаг 1:
- Шаг 2:
- Шаг 3:
- Шаг 6: Рекомендации по уходу за часами
- Избегайте воздействия на часы механических ударов и вибраций
- Предотвращайте попадание воды внутрь часов
- Оставляйте свою модель часов G-Shock Casio WR20BAR на солнце
- Ухаживайте за ремешком и защитной пленкой дисплея
- Вопрос-ответ
- Как установить точное время на часах G-Shock Casio WR20BAR?
- Как настроить будильник на часах G-Shock Casio WR20BAR?
- Можно ли заменить батарею на часах G-Shock Casio WR20BAR самостоятельно?
- Как включить подсветку на часах G-Shock Casio WR20BAR?
- Можно ли настроить часы G-Shock Casio WR20BAR на отображение времени в 24-часовом формате?
- Как проверить водонепроницаемость часов G-Shock Casio WR20BAR?
Шаг 1: Разборка упаковки
Перед началом настройки часов G-Shock Casio WR20BAR необходимо распаковать упаковку и проверить на наличие всех комплектующих элементов.
Комплектация часов G-Shock Casio WR20BAR
- Само устройство — WR20BAR
- Гарантийный талон
- Инструкция пользователя
Перед началом проверки убедитесь в том, что упаковка не нарушена и не повреждена.
Если все элементы есть и нет повреждений упаковки, то можно приступать к настройке часов G-Shock Casio WR20BAR.
Шаг 2: Настройка даты и времени
1. Перейдите в режим настройки:
- Удерживайте кнопку Adjust до тех пор, пока на дисплее не появится надпись «SET».
- Нажмите кнопку Mode для перехода к настройке даты и времени.
2. Настройте дату:
- Нажмите кнопку Adjust, чтобы переключаться между днями, месяцами и годами.
- Нажмите кнопку Mode, чтобы перейти к следующему значению.
- Нажмите кнопку Adjust, чтобы изменить значение.
3. Настройте время:
- Нажмите кнопку Mode, чтобы переключаться между часами, минутами и форматом времени (12-часовой или 24-часовой).
- Нажмите кнопку Adjust, чтобы изменить значение.
- Нажмите кнопку Mode, чтобы перейти к следующему значению.
4. Сохраните настройки:
- Нажмите кнопку Adjust, чтобы завершить настройку.
- Для выхода из режима настройки нажмите кнопку Mode.
- Когда на дисплее появится текущее время и дата, значит настройка выполнена успешно.
Шаг 3: Настройка будильника
1. Нажмите кнопку Mode до появления символа «ALM» на дисплее
Для настройки будильника нужно переключиться в режим настройки будильника на часах G-Shock Casio WR20BAR. Для этого нажмите кнопку Mode несколько раз до появления символа «ALM» на дисплее.
2. Нажмите кнопку Adjust для выбора будильника для настройки
После того, как вы переключились в режим настройки будильника, нажмите кнопку Adjust для выбора нужного будильника для настройки. Будильников можно настроить до 5 штук на часах G-Shock Casio WR20BAR.
3. Настройка времени срабатывания будильника
Чтобы настроить время, когда будет срабатывать выбранный будильник, нажмите кнопку Mode, пока не начнет мигать часовая стрелка на дисплее. Затем настройте время, к которому вы хотите, чтобы сработал будильник, с помощью кнопок Adjust (установка часов) и Mode (установка минут).
4. Настройка других параметров будильника
Вы можете также настроить другие параметры будильника, такие как звуковой сигнал и повторение будильника. Для этого нажмите кнопку Adjust, чтобы переключаться между параметрами настройки, и измените их с помощью кнопок Mode и Adjust.
После того, как вы настроили все параметры, не забудьте нажать кнопку Mode для сохранения настроек.
Шаг 4: Настройка таймера обратного отсчета
Шаг 4.1: Включите таймер обратного отсчета
Нажмите кнопку «Mode» до тех пор, пока на дисплее не появится значок таймера обратного отсчета («TMR»).
Нажмите кнопку «Start/Stop» для входа в режим настройки таймера обратного отсчета.
Шаг 4.2: Установите время для таймера обратного отсчета
Используйте кнопки «Adjust» и «Format» для выбора необходимых значений. Нажмите кнопку «Mode» для перехода между значениями (часы, минуты, секунды).
Нажмите кнопку «Start/Stop» для подтверждения выбранного значения и перехода к следующему.
Шаг 4.3: Запустите таймер обратного отсчета
Нажмите кнопку «Start/Stop» для запуска таймера обратного отсчета.
Нажмите кнопку «Start/Stop» еще раз для остановки таймера обратного отсчета.
После настройки таймера обратного отсчета, он останется включенным, пока вы его не остановите.
Вы можете использовать таймер обратного отсчета для отсчета времени до важной встречи или для отслеживания времени выполнения упражнений в спортзале.
Шаг 5: Настройка секундомера
Настройка секундомера на часах G-Shock Casio WR20BAR достаточно проста и займет всего несколько минут. Так как секундомер на этих часах может учитывать до 24 часов, необходимо правильно настроить его перед использованием.
Шаг 1:
Нажмите кнопку «Mode» до тех пор, пока на дисплее не появится значок «STW». Это означает, что вы находитесь в режиме секундомера.
Шаг 2:
Нажмите кнопку «Start/Stop» для запуска/остановки секундомера. Нажатие кнопки «Lap/Split» в режиме секундомера позволяет делать отметки времени для замера интервалов времени.
Шаг 3:
Нажмите кнопку «Mode» после окончания замера времени для выхода из режима секундомера.
Это были шаги по настройке секундомера на часах G-Shock Casio WR20BAR. Не забудьте проверить правильность отображения времени и настроек перед использованием секундомера.
Шаг 6: Рекомендации по уходу за часами
Избегайте воздействия на часы механических ударов и вибраций
Чтобы сохранить работоспособность часов G-Shock Casio WR20BAR, следует избегать падений, ударов и других механических воздействий на часы. Они могут повредить корпус, дисплей или механизм, что приведёт к сбою в работе.
Предотвращайте попадание воды внутрь часов
G-Shock Casio WR20BAR стойкий к воде на глубине до 200 метров. Но если корпус, кнопки или любая другая часть часов повреждены, могут образоваться места, через которые вода проникнет внутрь. Тогда функционирование часов может нарушиться. Поэтому следует избегать попадания воды внутрь часов.
Оставляйте свою модель часов G-Shock Casio WR20BAR на солнце
Часы G-Shock Casio WR20BAR оснащены солнечной батареей, которая позволяет заряжать прибор без использования внешнего источника питания. Поэтому, для повышения эффективности процесса зарядки, рекомендуется оставлять часы на солнце.
Ухаживайте за ремешком и защитной пленкой дисплея
Ремешок часов G-Shock Casio WR20BAR подвержен износу, коррозии и изломам. Поэтому его стоит тщательно ухаживать и регулярно заменять. Чтобы избегать царапин на дисплее, рекомендуется установить на него защитную пленку.
Вопрос-ответ
Как установить точное время на часах G-Shock Casio WR20BAR?
Чтобы установить точное время на часах G-Shock Casio WR20BAR, необходимо синхронизировать их с сигналами регулятора времени. Для этого зажмите кнопку Adjust, чтобы войти в режим настройки часов, выполняйте действия, описанные в инструкции, и нажмите кнопку Mode, чтобы синхронизировать часы с сигналами регулятора времени.
Как настроить будильник на часах G-Shock Casio WR20BAR?
Чтобы настроить будильник на часах G-Shock Casio WR20BAR, необходимо зажать кнопку Adjust, пока часы не войдут в режим настройки, выбрать режим будильника кнопкой Mode, настроить время сработки будильника кнопкой Time Set, а затем нажать кнопку Adjust, чтобы сохранить настройки.
Можно ли заменить батарею на часах G-Shock Casio WR20BAR самостоятельно?
Да, заменить батарею на часах G-Shock Casio WR20BAR можно самостоятельно. Для этого следует открутить заднюю крышку и аккуратно заменить старую батарею на новую, которая должна соответствовать спецификациям, указанным в инструкции.
Как включить подсветку на часах G-Shock Casio WR20BAR?
Чтобы включить подсветку на часах G-Shock Casio WR20BAR, следует нажать кнопку Light. Подсветка будет включена на несколько секунд, а затем автоматически выключится.
Можно ли настроить часы G-Shock Casio WR20BAR на отображение времени в 24-часовом формате?
Да, можно настроить часы G-Shock Casio WR20BAR на отображение времени в 24-часовом формате. Для этого необходимо войти в режим настройки, выбрать формат времени кнопкой Mode и переключиться на 24-часовой формат кнопкой Adjust.
Как проверить водонепроницаемость часов G-Shock Casio WR20BAR?
Для проверки водонепроницаемости часов G-Shock Casio WR20BAR следует убедиться, что все прокладки и уплотнители на месте, затем надежно закрыть все крышки и защелки, ответственные за водонепроницаемость. Далее необходимо опустить часы в воду на небольшое время и проверить их на наличие течей или других признаков повреждения.
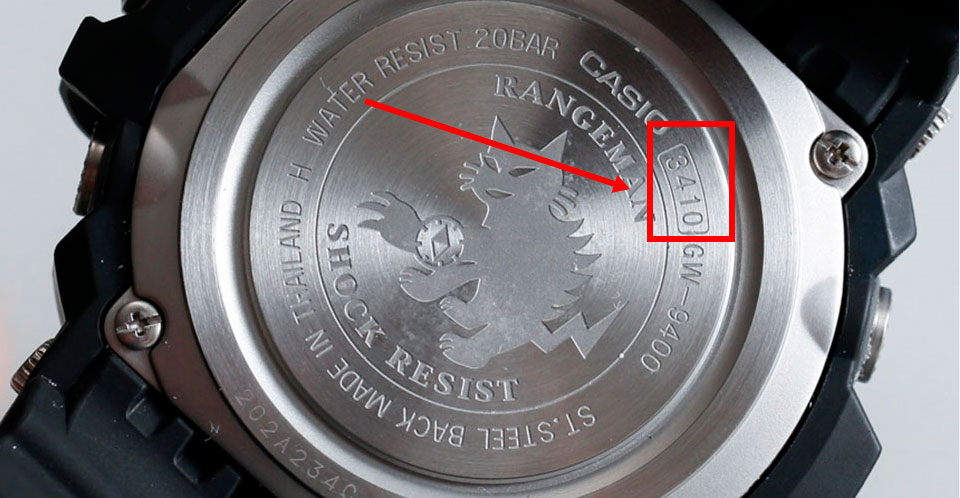
Выбор русской инструкции к часам Casio по названию модуля. Для того чтобы понять, какой именно модуль присвоен вашим часам – изучите четыре цифры на задней крышке часов (на рисунке ниже – это модуль 3410). Теперь, можете искать по нашим спискам (совет: нажмите сочетание клавиш ctrl + F и в окне браузера вставьте ваш номер модуля и нажмите enter – это позволит вам сразу понять, есть ли нужная инструкция в списке).
Поиск инструкции к часам Casio по названию модуля
| 304 305 306 307 308 309 310 314 315 317 319 323 328 329 331 332 337 339 340 341 344 350 351 358 359 361 364 369 371 372 380 381 382 383 388 391 394 397 401 437 438 481 482 487 501 506 526 540 549 555 560 587 590 592 593 596 605 617 643 657 668 671 675 676 681 683 689 690 691 692 694 695 701 703 705 706 707 708 709 725 739 742 745 746 747 753 755 756 761 815 828 838 844 856 871 874 880 893 894 895 901 914 918 928 950 971 974 976 977 978 983 1000 1005 1007 1009 1026 1030 1042 1046 1052 1070 1071 1074 1084 1101 1104 1156 1160 1170 1174 1175 1188 1189 1199 1209 1219 1230 1252 1253 1263 1264 1266 1268 1271 1275 1276 1282 1288 1289 1294 1299 1300 1301 1302 1309 1310 1311 1319 1320 1323 1325 1326 1327 1330 1331 1332 1333 1334 1335 1336 1337 1342 1343 1344 1345 1346 1347 1348 1349 |
1350 1352 1353 1356 1358 1359 1360 1362 1369 1370 1373 1374 1375 1376 1389 1391 1395 1398 1399 1405 1414 1416 1419 1425 1431 1433 1434 1441 1443 1444 1446 1449 1455 1461 1463 1464 1466 1470 1471 1472 1475 1476 1477 1479 1485 1486 1492 1498 1510 1514 1516 1517 1518 1522 1523 1524 1525 1531 1534 1536 1545 1548 1549 1553 1554 1556 1559 1564 1565 1569 1571 1572 1578 1583 1584 1588 1589 1590 1591 1595 1596 1597 1600 1602 1604 1605 1619 1622 1623 1626 1633 1634 1635 1636 1637 1641 1643 1644 1646 1656 1658 1659 1662 1664 1665 1667 1668 1673 1676 1678 1680 1681 1698 1699 1700 1701 1710 1711 1737 1745 1746 1747 1750 1756 1758 1760 1766 1770 1771 1782 1783 1787 1794 1795 1798 1799 1800 1803 1805 1807 1808 1809 1810 1811 1817 1818 1819 1822 1823 1826 1827 1829 1840B 1845 1846 1848 1849 1850 1869 1874 1879 1884 1909 1910 1913 1914 1918 1922 1934 1935 1949 1950 1965 1966 1968 1978 1993 1995 1998 |
2001 2002 2012 2016 2017 2030 2037 2038 2039 2049 2058 2059 2069 2072 2075 2080 2090 2109 2115 2117 2128 2135 2140 2142 2144 2145 2147 2153 2155 2161 2163 2164 2165 2168 2169 2172 2177 2178 2182 2184 2189 2190 2191 2198 2217 2220 2223 2226 2240 2246 2248 2251 2253 2258 2261 2265 2266 2269 2271 2273 2275 2276 2278 2285 2286 2288 2289 2291 2299 2300 2301 2307 2312 2313 2315 2318 2319 2320 2321 2322 2323 2325 2327 2328 2329 2330 2332 2335 2337 2338 2345 2347 2349 2351 2353 2355 2357 2358 2359 2362 2364 2365 2366 2367 2369 2374 2376 2384 2385 2387 2390 2397 2407 2409 2411 2412 2413 2415 2417 2419 2424 2428 2430 2441 2453 2454 2463 2465 2470 2471 2477 2481 2482 2487 2488 2490 2492 2495 2496 2499 2505 2509 2515 2516 2518 2519 2524 2531 2532 2534 2535 2539 2548 2551 2554 2555 2557 2568 2572 2575 2582 2586 2590 2591 2594 2599 2600 2606 2607 2610 2611 2615 2616 2617 2618 2621 2625 2630 2632 |
2634 2637 2642 2662 2672 2673 2674 2675 2676 2684 2685 2687 2690 2700 2701 2705 2707 2710 2711 2713 2714 2716 2717 2718 2719 2723 2725 2727 2731 2733 2734 2737 2738 2739 2742 2744 2747 2748 2749 2753 2758 2759 2760 2761 2767 2774 2782 2783 2784 2785 2787 2788 2789 2790 2791 2799 2802 2804 2805 2810 2812 2816 2821 2825 2836 2858 2859 2860 2861 2866 2867 2868 2869 2870 2872 2875 2877 2879 2888 2889 2894 2895 2898 2900 2901 2902 2910 2925 2926 2941 2943 2951 2952 2957 2958 2963 2965 2972 2973 2979 2981 2985 2993 2994 2996 2998 2999 3000 3005 3006 3007 3014 3015 3017 3019 3022 3028 3031 3034 3035 3036 3037 3039 3043 3047 3050 3053 3057 3058 3059 3061 3062 3063 3068 3070 3071 3073 3074 3075 3076 3077 3078 3079 3088 3089 3090 3091 3092 3095 3096 3097 3099 3100 3109 3117 3120 3125 3128 3132 3134 3135 3136 3137 3139 3143 3144 3147 3148 3149 3150 3151 3153 3154 3155 3157 3159 3160 3163 3164 |
3165 3166 3170 3171 3172 3173 3178 3179 3180 3184 3188 3189 3191 3192 3193 3194 3195 3196 3197 3198 3199 3200 3202 3208 3212 3214 3215 3216 3217 3221 3222 3223 3224 3225 3226 3228 3229 3230 3232 3234 3240 3241 3246 3247 3248 3250 3251 3252 3254 3255 3257 3258 3259 3260 3261 3263 3264 3265 3266 3267 3269 3270 3271 3274 3277 3278 3279 3280 3281 3283 3284 3285 3286 3289 3290 3294 3295 3296 3297 3298 3299 3304 3306 3309 3312 3316 3317 3318 3319 3320 3321 3333 3337 3344 3345 3352 3353 3354 3357 3358 3360 3361 3363 3364 3365 3368 3377 3378 3379 3400 3402 3403 3404 3407 3408 3409 3410 3414 3415 3416 3417 3418 3419 3420 3421 3422 3423 3425 3426 3427 3429 3433 3434 3435 3436 3437 3439 3440 3441 3443 3444 3445 3446 3447 3448 3450 3451 3454 3455 3456 3474 3711 3712 3716 3717 3723 3724 3725 3726 3731 3733 3734 3735 3736 3737 3740 3744 3745 3747 3748 3749 3750 3751 3752 3768 3769 3770 3771 3779 |
3780 3781 3784 3793 3794 3795 3796 3797 3798 3799 4304 4305 4306 4307 4308 4309 4314 4317 4318 4321 4322 4327 4328 4329 4331 4333 4334 4335 4338 4348 4351 4358 4361 4362 4367 4368 4369 4370 4375 4378 4379 4380 4384 4389 4391 4392 4393 4394 4396 4397 4398 4700 4709 4713 4719 4723 4725 4726 4731 4732 4733 4734 4735 4736 4737 4738 4746 4747 4749 4752 4753 4754 4755 4757 4762 4764 4765 4766 4773 4774 4775 4776 4777 4778 4779 4780 4781 4791 4798 4799 4910 5001 5009 5015 5021 5022 5025 5026 5027 5028 5029 5033 5034 5041 5044 5045 5048 5049 5051 5053 5055 5056 5057 5058 5059 5060 5061 5062 5064 5066 5067 5069 5070 5071 5072 5073 5078 5079 5081 5082 5086 5087 5089 5105 5106 5107 5108 5109 5110 5113 5114 5116 5117 5118 5119 5121 5122 5123 5125 5126 5127 5128 5134 5135 5139 5142 5143 5146 5147 5150 5156 5158 5161 5162 5165 5166 5167 5168 5169 5171 5172 5173 5174 5175 5176 5177 5180 5193 5194 |
5199 5200 5202 5205 5206 5207 5208 5213 5214 5218 5222 5223 5224 5225 5226 5228 5229 5230 5232 5236 5237 5238 5239 5240 5241 5242 5245 5249 5250 5255 5257 5259 5261 5269 5271 5273 5274 5276 5277 5278 5283 5284 5288 5289 5299 5302 5303 5305 5307 5308 5309 5311 5316 5317 5318 5325 5330 5332 5333 5336 5337 5338 5339 5340 5341 5342 5343 5344 5345 5346 5352 5353 5357 5358 5361 5364 5365 5366 5369 5371 5372 5373 5374 5375 5378 5380 5381 5382 5383 5386 5392 5393 5396 5398 5406 5410 5411 5413 5415 5418 5419 5420 5421 5422 5423 5424 5425 5427 5429 5434 5436 5441 5442 5443 5444 5446 5449 5450 5451 5455 5456 5457 5458 5459 5460 5463 5465 5466 5468 5470 5471 5472 5473 5474 5475 5476 5477 5478 5479 5480 5481 5482 5483 5484 5485 5486 5490 5495 5497 5498 5499 5502 5508 5510 5512 5513 5515 5518 5519 5520 5522 5524 5529 5530 5531 5535 5540 5545 5546 5547 5559 5563 5610 6000 7141 |
Мы содержим полную базу мануалов, которую обновляем с поступлением новых моделей. Тем не менее, бывает такое, что некоторых моделей у нас нет (как правило на русском языке). На сайте содержится список русских и английских инструкций к часам Casio, так как считаем, что английский вариант бывает на порядок лучше нашего отечественного формата. Если вы не нашли нужную инструкцию к своим часам Casio – пишите в комментариях. Мы, со временем, пытаемся найти все необходимые мануалы.
Не можете настроить свои часы Casio? На нашем форуме часов Casio вам помогут чем смогут. Свободное общение на любимые часовые темы и не только. Присоединяйтесь к нам.
24.08.2021
Новые G-Shock в индустриальном стиле – GA-2200
Casio GA-2200 — продолжение развития 2000-ой линейки GA.
G-Shock GA-2200 — это новая модель с легким корпусом, усиленным углеродным …
20.04.2021
GSW-H1000 – первые смарт-часы G-Shock от Casio
После долгих ожиданий Casio выпустила умные часы G-Shock с Wear OS от Google.
GSW-H1000 — это первые умные часы G-Shock, которые …
03.04.2021
G-Shock GST-B400 – самые тонкие G-Steel
Casio анонсировала выпуск модели GST-B400.
Часы имеют самый тонкий профиль (12,9 мм) из всех представленных моделей в линейке G-Steel. …
15.09.2020
Первые Gravitymaster c квадро-сенсором Quad Sensor – G-Shock GR-B200
CASIO представила новую авиационную модель линейки Master of G.
G-Shock GR-B200 обладают характерным внешний видом, вдохновленным ручкой …
CASIO G-SHOCK GA-2100 — Analog-Digatal Watch Manual

INTRODUCTION
Congratulations upon your selection of this CASIO watch.
To ensure that this watch provides you with the years of service for which it is designed, carefully read and follow the instructions in this manual, especially the information under «Operating Precautions» and «User Maintenance».
About This Manual
- Depending on the model of your watch, display text appears either as dark figures on a light background, or light figures on a dark background. All sample displays in this manual are shown using dark figures on a light background.
- Button operations are indicated using the letters shown in the illustration.

- Note that the product illustrations in this manual are intended for reference only, and so the actual product may appear somewhat different than depicted by an illustration.
Things to check before using the watch
- Check the Home City and the daylight saving time (DST) setting.
Use the procedure under «To configure Home City settings» to configure your Home City and daylight saving time settings.
- Proper World Time Mode data depends on correct Home City, time, and date settings in the Timekeeping Mode. Make sure you configure these settings correctly.
- Set the current time.
See «Adjusting the Digital Time and Date Settings».
The watch is now ready for use.
Mode Reference Guide
The mode you should select depends on what you want to do.
| To do this: | Enter this mode: |
|
Timekeeping Mode |
| View the current time in one of 48 cities (31 time zones) around the globe | World Time Mode |
| Use the stopwatch to measure elapsed time | Stopwatch Mode |
| Use the countdown timer | Countdown Timer Mode |
| Set an alarm time | Alarm Mode |
Selecting a Mode
- Press C to cycle between the modes as shown below.

-
To return to the Timekeeping Mode from any other mode, hold down C for at least two seconds.
General Functions (All Modes)
The functions and operations described in this section can be used in all modes.
Auto Return
If you do not perform any operation for about two or three minutes while configuring settings (setting flashing on the digital display) in any mode, the watch will exit the setting operation and return to normal display.
Scrolling
The B and D are used on the setting mode to scroll through data on the display. In most cases, holding down these buttons during a scroll operation scrolls through the data at high speed.
Moving the Hands Out of the Way for Better Viewing
You can use the procedure below to temporarily move the hour and minute hands out of the way to better view what is on the display.
- Press B and C at the same time. This will cause the hour and minute hands to move to a location where they do not block your view of the digital display.
Example: When the current time is 8:30
- Pressing B and C at the same time again will cause the hands to return to their normal positions (normal timekeeping).
Note
- Watch button functions are the same regardless of whether the hands are moved out of the way or at their normal positions.
-
Changing to another mode will cause the hands to move back to their normal positions.
-
The hands also will move back to their normal positions automatically if no operation is performed for about one hour.
Timekeeping
Use the Timekeeping Mode to set and view the current time and date.

- To view the Home City name (English), press A.
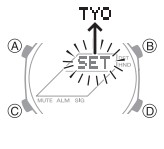
Configuring Home City settings
There are two Home City settings: actually selecting the Home City, and selecting either standard time or daylight saving time (DST).
To configure Home City settings
- In the Timekeeping Mode, hold down A until the flashing SET indicator disappears from the display and the currently selected city code appears on the display.
- This indicates the Home City setting mode.
- Use D (+) and B (–) to scroll through city codes until the one you want is displayed.
- For details about city codes, see the «City Code Table» at the back of this manual.
- After the setting is the way you want, press A to return to the Timekeeping Mode.

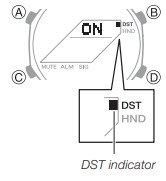
To change the Daylight Saving Time (summer time) setting
- In the Timekeeping Mode, hold down A until the flashing SET indicator disappears from the display and the currently selected city code appears on the display.

- Press C to display the DST setting mode.
- Press D or B to toggle between Daylight Saving Time (ON) and Standard Time (OFF).
- Note that you cannot switch between daylight saving time and standard time while UTC is selected as your Home City.
- After the setting is the way you want, press A to return to the Timekeeping Mode.
- The DST indicator appears to indicate that Daylight Saving Time is turned on.
Adjusting the Digital Time and Date Settings
Use the procedure below to adjust the digital time and date settings.
To configure the digital time and date settings
- In the Timekeeping Mode, hold down A until the flashing SET indicator disappears from the display and the currently selected city code appears on the display.
- Press C to move the flashing in the sequence shown below to select the other settings.

- When the timekeeping setting you want to change is flashing, perform the operation described below.
| Screen | To do this: | Do this: |
 |
Toggle between 12-hour (12H) and 24-hour (24H) timekeeping | Use D and B. |
 |
Reset the seconds to 00 | Press D. |
 |
Change the hour or minute | Use D (+) and B (–) to change these settings. |
 |
Change the year | |
 |
Change the month or day |
- Press A to exit the setting mode.
Note
- Resetting the seconds to 00 while the current count is in the range of 30 to 59 causes the minutes to be increased by 1.
- The watch’s built-in full automatic calendar makes allowances for different month lengths and leap years. Once you set the date, there should be no reason to change it except after you have the watch’s battery replaced.
- While 12-hour format is selected for timekeeping, a P indicator will appear for times from noon to 11:59 p.m. No indicator appears for times from midnight to 11:59 a.m. With 24-hour format, time is displayed from 0:00 to 23:59, without any P indicator.
- The day of the week changes automatically when the date changes.
Checking the Current Time in a Different Time Zone
You can use the World Time Mode to view the current time in one of 31 time zones (48 cities) around the globe.
The city that is currently selected in the World Time
Mode is called the «World Time City».
- The hour and minute hands indicate information for the currently selected Home City.
- When you enter the World Time Mode, the currently selected city code and city name (English) scroll once across the digital display. After that, the current time in the World Time City is displayed.
- You can view the city code by pressing A.
To enter the World Time Mode
Use C to select the World Time Mode.
To view the time in another time zone
In the World Time Mode, use D to change the city code.
To specify standard time or daylight saving time (DST) for a city
- In the World Time Mode, use D to display the city code (time zone) whose Standard Time/Daylight Saving Time setting you want to change.
- Hold down A for at least two seconds.
- This toggles the city code you selected in step 1 between Daylight Saving Time (DST indicator displayed) and standard time (DST indicator not displayed).
- Note that you cannot switch between standard time/ daylight saving time (DST) while UTC is selected as the World Time City.
- The standard time/daylight saving time (DST) setting affects only the currently displayed city. Other cities are not affected.
Using the Stopwatch
The stopwatch measures elapsed time, split times, and two finishes.
The stopwatch measures elapsed time in units of 1/100 seconds for the first hour, and in 1-second units after that for up to 24 hours total. After that, elapsed time reverts to zero and then stops.
To enter the Stopwatch Mode
Use C to select the Stopwatch Mode.
To perform an elapsed time operation
- Elapsed time is shown in 1/100-second units for the first hour of the measurement. After the first hour, elapsed time is shown in one-second units.

Note
- An ongoing elapsed time measurement operation will continue internally even if you change to another mode. However, if you exit the Stopwatch Mode while a split time is displayed, the split time will not be displayed when you return to the Stopwatch Mode.
Countdown Timer
The countdown timer start time can be set in 1-second
increments up to a maximum of 24 hours. An alarm sounds when the countdown reaches zero.
To enter the Countdown Timer Mode
Use C to select the Countdown Timer Mode.
To configure the countdown timer
- If a countdown timer operation is in progress, press D to pause it and then press A to reset the timer to its start time.
- If a countdown timer operation is paused, press A to reset the timer to its start time.
- Hold down A until the flashing SET indicator disappears from the display and the hour digits start to flash. Release A after the digits start to flash.
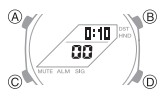
- Each press of C cause the flashing to move between settings in the following sequence: Hours Minutes
- The flashing value is the one that is currently selected for setting.
- Use D (+) and B (–) to change the currently flashing value.
- Press A to exit the setting mode.
To perform a countdown timer operation
To stop the alarm
Press any button.
Using the Alarm
You can set five independent daily alarms. When a daily alarm is turned on, an alarm tone will sound for about 10 seconds each day when the time in the Timekeeping Mode reaches the preset alarm time.
You can also turn on an Hourly Time Signal, which will cause the watch to beep twice every hour on the hour.
To enter the Alarm Mode
Use C to select the Alarm Mode.
- Alarm screens are numbered AL1 through AL5. The Hourly Time Signal screen is indicated by SIG.
- When you enter the Alarm Mode, the data you were viewing when you last exited the mode appears first.
- If you do not perform any operation for about two or three minutes in the Alarm Mode, the watch will automatically return to the Timekeeping Mode.
To set an alarm time
- In the Alarm Mode, use D to display the alarm whose settings you want to change.


- Hold down A until the flashing SET indicator disappears from the display and the alarm time hour digits start to flash. Release A after the digits start to flash.
- ALM appears on the display, indicating that alarm setting is enabled.
- Press C to move the flashing between the hour and the minute digits.
- The selected digits are those that are flashing.
- Use D (+) and B (–) to change the hour and minute settings.
- When setting the alarm time using the 12-hour format, take care to set the time correctly as a.m. (no indicator) or p.m. (P indicator).
- Press A to exit the setting mode.
To test the alarm
In the Alarm Mode, hold down D to sound the alarm.
To turn an alarm and the Hourly Time Signal on and off
In the Alarm Mode, use D to select an alarm or the hourly time signal.
- When the alarm you want or the Hourly Time Signal is displayed, press A to toggle it between on (ON displayed) and off (– – displayed).
- The alarm on indicator (when any alarm is on) and the Hourly Time Signal on indicator (when the Hourly Time Signal is on) are shown on the display in all modes.
To stop the alarm
Press any button.
Illumination
The display of the watch is illuminated for easy reading in the dark.
To turn on illumination
Press B in any mode to illuminate the display.
- You can use the procedure below to select either 1.5 seconds or three seconds as the illumination duration.
Note
-
The LED light will turn off automatically if the alarm starts to sound.
-
The LED light is disabled after holding down A to display a setting screen, or while the hands are moving at high speed.
To change the illumination duration
- In the Timekeeping Mode, hold down A until the flashing SET indicator disappears from the display and the currently selected city code appears on the display.
- Press C ten times to display the illumination duration setting screen.
- The current illumination duration setting (1 or 3) will be flashing in the display.
- Press D or B to toggle the illumination duration between three seconds (3 displayed) and 1.5 seconds (1 displayed).
- Press A to exit the setting mode.
Adjusting Hand Positions
The watch hands can go out of alignment with the time on the digital display if it is exposed to strong magnetism or impact. If this happens, you should adjust the hand positions.
- In the Timekeeping Mode, hold down A for at least five seconds until SUB starts to flash. Release A after SUB flashes.
- This enters the day of the week hand adjustment mode.
- If the day of the week hand is not pointed at the [SU] position, use D and B to move it there.
- Holding down either button moves the hands at high speed.
- Press C.
- This causes 0:00 to flash to indicate the hour and minute hand adjustment mode.
- If the hour and minute hands are not at 12 o’clock, use D (+) and B (–) to adjust them until they are.
- Press A to return to the Timekeeping Mode.
Check to make sure that the time indicated by the hands matches the time on the digital display. If the times don’t match, perform the correction procedure above again.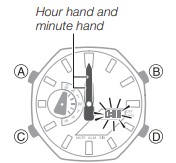
Button Operation Tone
You can turn the button operation tone on or off as desired.
-
Even if you turn off the button operation tone, alarms, the Hourly Time Signal, and other beepers all operate normally.

To turn the button operation tone on and off
- In the Timekeeping Mode, hold down A until the flashing SET indicator disappears from the display and the currently selected city code appears on the display.
- Press C nine times to display the button operation tone On/Off screen.
The screen will show either KEY or MUTE.
 - Press D or B to toggle the button operation tone setting between enabled (KEY ) and disabled (MUTE).
- Press A to exit the setting mode.
Note
- The mute indicator is displayed in all modes when the button operation tone is disabled.
Troubleshooting
Hand Movement and Indications
- The time indicated by the hands is different from the digital time.
This could indicate that the watch has been exposed to strong magnetism or impact, which has caused problems with proper hand alignment. Adjust the watch’s hand home position alignment.
Time Setting
- The current time setting is off by hours.
Your Home City setting may be wrong. Check your Home City setting and correct it, if necessary. - The current time setting is off by one hour.
You may need to change your Home City’s standard time/daylight saving time (DST) setting. Use the procedure under «Adjusting the Digital Time and Date Settings» to change the standard time/daylight saving time (DST) setting.
World Time Mode
- The time for my World Time City is off in the World Time Mode.
This could be due to incorrect switching between standard time and daylight saving time. See «To specify standard time or daylight saving time (DST) for a city» for more information.
Main Indicators

| Number | Name |
| 1 | Split indicator |
| 2 | PM indicator |
| 3 | Hands shifted indicator |
| 4 | DST indicator |
| 5 | Mute indicator |
| 6 | Alarm on indicator |
| 7 | Hourly time signal on indicator |
Specifications
Accuracy at normal temperature:
- ± 15 seconds a month
Digital Timekeeping:
- Hour, minutes, seconds, p.m. (P), month, day
- Time format: 12-hour and 24-hour
- Calendar system: Full Auto-calendar pre-programmed from the year 2000 to 2099
- Other: Home City code (can be assigned one of 48 city codes); Standard Time/Daylight Saving Time (summer time)
Analog Timekeeping:
- Hour, minutes (hand moves every 20 seconds), day of the week
World Time:
- 48 cities (31 time zones) and Coordinated Universal Time (UTC)
- Other: Daylight Saving Time/Standard Time
Stopwatch:
- Measuring unit: 1/100 seconds (first hour); 1 second (after first hour)
- Measuring capacity: 23:59’59»
- Measuring modes: Elapsed time, split time, two finishes
Countdown Timer:
- Measuring unit: 1 second
- Countdown range: 24 hours
- Countdown start time setting range: 1 second to 24 hours (1-second increments)
Alarms:
- 5 Daily alarms; Hourly time signal
Illumination:
- Double LED (light-emitting diode); Selectable illumination duration (approximately 1.5 seconds or 3 seconds)
Other:
- Button operation tone on/off; Moving the Hands to View the Digital Display
Battery:
- Two silver oxide batteries (Type: SR726W)
- Approximate battery operating time: 3 years under the following conditions:
- Alarm: 10 seconds/day
- 1 illumination operation (1.5 seconds) per day
Frequent use of illumination runs down the battery.
Specifications are subject to change without notice.
Operating Precautions
Water Resistance
- The information below applies to watches with WATER RESIST or WATER RESISTANT marked on the back cover.
| Water Resistance Under Daily Use | Enhanced Water Resistance Under Daily Use | ||||
| 5 Atmospheres | 10 Atmospheres | 20 Atmospheres | |||
| Marking | On watch front or on back cover | No BAR mark | 5BAR | 10BAR | 20BAR |
| Example of Daily Use | Hand washing, rain | Yes | Yes | Yes | Yes |
| Water-related work, swimming | No | Yes | Yes | Yes | |
| Windsurfing | No | No | Yes | Yes | |
| Skin diving | No | No | Yes | Yes |
- Do not use your watch for scuba diving or other types of diving that requires air tanks.
- Watches that do not have WATER RESIST or WATER RESISTANT marked on the back cover are not protected against the effects of sweat. Avoid using such a watch under conditions where it will be exposed to large amounts of sweat or moisture, or to direct splashing with water.
- Even if a watch is water resistant, note the usage precautions described below. Such types of use reduce water resistance performance and can cause fogging of the glass.
- Do not operate the crown or buttons while your watch is submersed in water or wet.
- Avoid wearing your watch while in the bath.
- Do not wear your watch while in a heated swimming pool, sauna, or any other high temperature/high humidity environment.
- Do not wear your watch while washing your hands or face, while doing housework, or while performing any other task that involves soaps or detergents. x After submersion in seawater, use plain water to rinse all salt and dirt from your watch.
- To maintain water resistance, have the gaskets of your watch replaced periodically (about once every two or three years).
-
A trained technician will inspect your watch for proper water resistance whenever you have its battery replaced. Battery replacement requires the use of special tools. Always request battery replacement from your original retailer or from an authorized CASIO service center.
-
Some water-resistant watches come with fashionable leather bands. Avoid swimming, washing, or any other activity that causes direct exposure of a leather band to water.
-
The inside surface of the watch glass may fog when the watch is exposed to a sudden drop in temperature. No problem is indicated if the fogging clears up relatively quickly. Sudden and extreme temperature changes (such as coming into an air conditioned room in the summer and standing close to an air conditioner outlet, or leaving a heated room in the winter and allowing your watch to come into contact with snow) can cause it to take longer for glass fogging to clear up. If glass fogging does not clear up or if you notice moisture inside of the glass, immediately stop using your watch and take it to your original retailer or to an authorized CASIO service center.
-
Your water-resistant watch has been tested in accordance with International Organization for Standardization regulations.
Band
- Tightening the band too tightly can cause you to sweat and make it difficult for air to pass under the band, which can lead to skin irritation. Do not fasten the band too tightly. There should be enough room between the band and your wrist so you can insert your finger.
- Deterioration, rust, and other conditions can cause the band to break or come off of your watch, which in turn can cause band pins to fly out of position or to fall out. This creates the risk of your watch falling from your wrist and becoming lost, and also creates the risk of personal injury. Always take good care of your band and keep it clean.
- Immediately stop using a band if you even notice any of the following: loss of band flexibility, band cracks, band discoloration, band looseness, band connecting pin flying or falling out, or any other abnormality. Take your watch to your original retailer or to a CASIO service center for inspection and repair (for which you will be charged) or to have the band replaced (for which you will be charged).
Temperature
- Never leave your watch on the dashboard of a car, near a heater, or in any other location that is subject to very high temperatures. Do not leave your watch where it will be exposed to very low temperatures. Temperature extremes can cause your watch to lose or gain time, to stop, or otherwise malfunction.
- Leaving your watch in an area hotter than +60°C (140°F) for long periods can lead to problems with its LCD. The LCD may become difficult to read at temperatures lower than 0°C (32°F) and greater than +40°C (104°F).
Impact
- Your watch is designed to withstand impact incurred during normal daily use and during light activity such as playing catch, tennis, etc. Dropping your watch or otherwise subjecting it to strong impact, however, can lead to malfunction. Note that watches with shock-resistant designs (G-SHOCK, BABY-G, G-MS) can be worn while operating a chain saw or engaging in other activities that generate strong vibration, or while engaging in strenuous sports activities (motocross, etc.)
Magnetism
- The hands of analog and combination (analog-digital) watches are moved by a motor that uses magnetic force. When such a watch is close to a device (audio speakers, magnetic necklace, cell phone, etc.) that emits strong magnetism, the magnetism can cause timekeeping to slow down, speed up, or stop, resulting in the incorrect time being displayed.
- Very strong magnetism (from medical equipment, etc.) should be avoided because it can cause malfunction of your watch and damage to electronic components.
Electrostatic Charge
- Exposure to very strong electrostatic charge can cause your watch to display the wrong time. Very strong electrostatic charge even can damage electronic components.
- Electrostatic charge can cause the display to go blank momentarily or cause a rainbow effect on the display.
Chemicals
- Do not allow your watch to come into contact with thinner, gasoline, solvents, oils, or fats, or with any cleaners, adhesives, paints, medicines, or cosmetics that contain such ingredients. Doing so can cause discoloration of or damage to the resin case, resin band, leather, and other parts.
Storage
- If you do not plan to use your watch for a long time, thoroughly wipe it free of all dirt, sweat, and moisture, and store it in a cool, dry place.
Resin Components
- Allowing your watch to remain in contact with other items or storing it together with other items for long periods while it is wet can cause color on resin components to transfer to the other items, or the color of the other items to transfer to the resin components of your watch. Be sure to dry off your watch thoroughly before storing it and make sure it is not in contact with other items.
- Leaving your watch where it is exposed to direct sunlight (ultraviolet rays) for long periods or failure to clean dirt from your watch for long periods can cause it to become discolored.
- Friction caused by certain conditions (strong external force, sustained rubbing, impact, etc.) can cause discoloration of painted components.
- If there are printed figures on the band, strong rubbing of the printed area can cause discoloration.
- Leaving your watch wet for long periods can cause fluorescent color to fade. Wipe the watch dry as soon as possible after it becomes wet.
- Semi-transparent resin parts can become discolored due to sweat and dirt, and if exposed to high temperatures and humidity for long periods.
- Daily use and long-term storage of your watch can lead to deterioration, breaking, or bending of resin components. The extent of such damage depends on usage conditions and storage conditions.
Leather Band
- Allowing your watch to remain in contact with other items or storing it together with other items for long periods while it is wet can cause the color of the leather band to transfer to the other items or the color of the other items to transfer to the leather band. Be sure to dry off your watch thoroughly with a soft cloth before storing it and make sure it is not in contact with other items.
- Leaving a leather band where it is exposed to direct sunlight (ultraviolet rays) for long periods or failure to clean dirt from a leather band for long periods can cause it to become discolored.
Exposing a leather band to rubbing or dirt can cause color transfer and discoloration.
Metal Components
- Failure to clean dirt from metal components can lead to formation of rust, even if components are stainless steel or plated. If metal components exposed to sweat or water, wipe thoroughly with a soft, absorbent cloth and then place the watch in a well-ventilated location to dry.
- Use a soft toothbrush or similar tool to scrub the metal with a weak solution of water and a mild neutral detergent, or with soapy water. Next, rinse with water to remove all remaining detergent and then wipe dry with a soft absorbent cloth. When washing metal components, wrap the watch case with kitchen plastic wrap so it does not come into contact with the detergent or soap.
Bacteria and Odor Resistant Band
- The bacteria and odor resistant band protects against odor generated by the formation of bacteria from sweat, which ensures comfort and hygiene. In order to ensure maximum bacteria and odor resistance, keep the band clean. Use an absorbent soft cloth to thoroughly wipe the band clean of dirt, sweat, and moisture. A bacteria and odor resistant band suppresses the formation of organisms and bacteria. It does not protect against rash due to allergic reaction, etc.
Liquid Crystal Display
- Display figures may be difficult to read when viewed from an angle.
Note that CASIO COMPUTER CO., LTD. assumes no responsibility for any damage or loss suffered by you or any third party arising through the use of your watch or its malfunction.
User Maintenance
Caring for Your Watch
Remember that you wear your watch next to your skin, just like a piece of clothing.
To ensure your watch performs at the level for which it is designed, keep it clean by frequently wiping with a soft cloth to keep your watch and band free of dirt, sweat, water and other foreign matter.
- Whenever your watch is exposed to sea water or mud, rinse it off with clean fresh water.
- For a metal band or a resin band with metal parts, use a soft toothbrush or similar tool to scrub the band with a weak solution of water and a mild neutral detergent, or with soapy water. Next, rinse with water to remove all remaining detergent and then wipe dry with a soft absorbent cloth. When washing the band, wrap the watch case with kitchen plastic wrap so it does not come into contact with the detergent or soap.
-
For a resin band, wash with water and then wipe dry with a soft cloth. Note that sometimes a smudge like pattern may appear on the surface of a resin band. This will not have any effect on your skin or clothing. Wipe with a cloth to remove the smudge pattern.
-
Clean water and sweat from a leather band by wiping with a soft cloth.
-
Not operating a watch crown, buttons, or rotary bezel could lead to later problems with their operation. Periodically rotate the crown and rotary bezel, and press buttons to maintain proper operation.
Dangers of Poor Watch Care
Rust
- Though the metal steel used for your watch is highly rust-resistant, rust can form if your watch is not cleaned after it becomes dirty.
- Dirt on your watch can make it impossible for oxygen to come into contact with the metal, which can lead to breakdown of the oxidization layer on the metal surface and the formation of rust.
- Rust can cause sharp areas on metal components and can cause band pins to fly out of position or to fall out. If you ever notice any abnormality immediately stop using your watch and take it to your original retailer or to an authorized CASIO service center
- Even if the surface of the metal appears clean, sweat and rust in crevasses can soil the sleeves of clothing, cause skin irritation, and even interfere with watch performance.
Premature Wear
- Leaving sweat or water on a resin band or bezel, or storing your watch an area subject to high moisture can lead to premature wear, cuts, and breaks.
Skin Irritation
- Individuals with sensitive skin or in poor physical condition may experience skin irritation when wearing a watch. Such individuals should keep their leather band or resin band particularly clean. Should you ever experience a rash or other skin irritation, immediately remove your watch and contact a skin care professional.
Battery Replacement
- Leave battery replacement up to your original retailer or authorized CASIO service center.
- Have the batteries replaced only with the type specified in the User’s Guide. Use of a different battery type can cause malfunction. x When replacing the batteries, also request a check for proper water resistance.
- Ornamental resin components may become worn, cracked, or bent over time when subjected to normal daily use. Note that if cracking or any other abnormality indicating possible damage is noticed in a watch submitted for battery replacement, your watch will be returned with an explanation of the abnormality, without the requested servicing being performed.
Initial Batteries
- The batteries that come loaded in your watch when you purchase it are used for function and performance testing at the factory.
- Test batteries may go dead quicker than the normally rated battery life as noted in the User’s Guide. Note that you will be charged for replacement of these batteries, even if replacement is required within your watch’s warranty period.
Low Battery Power
- Low battery power is indicated by large timekeeping error, by dim display contents, or by a blank display.
- Operation while battery power is low can result in malfunction. Replace the batteries as soon as possible.
City Code Table


- This table shows the city codes of this watch (As of January 2019).
- The rules governing global times (GMT differential and UTC offset) and summer time are determined by each individual country.
CASIO COMPUTER CO., LTD.
6-2, Hon-machi 1-chome
Shibuya-ku, Tokyo 151-8543, Japan

Documents / Resources
Download manual
Here you can download full pdf version of manual, it may contain additional safety instructions, warranty information, FCC rules, etc.
Download CASIO G-SHOCK GA-2100 — Analog-Digatal Watch Manual
Джишоки Касио WR20BAR – популярные и надежные часы, которые выделяются своей прочностью и функциональностью. Но чтобы гарантированно использовать все их возможности, необходимо правильно настроить часы и установить все нужные параметры. В этой подробной инструкции мы расскажем, как настроить джишоки Касио WR20BAR.
В первую очередь, перед началом настройки рекомендуется ознакомиться с руководством пользователя, которое обычно поставляется вместе с часами. В нём вы найдете информацию о особенностях и функциях данной модели, а также инструкцию по настройке.
Для начала настройки вам понадобится нажать на кнопку «Mode» – это основная управляющая кнопка на джишоках. При каждом нажатии на нее вы будете переключаться между разными режимами настройки. Нажимая на кнопку «Mode» несколько раз, вы сможете попасть в нужный режим настройки, такой как настройка времени, будильника, таймера и других функций.
Совет: Не забудьте отрегулировать стрелки после настройки времени. Для этого потяните их в нижнем положении режима «Analog».
Содержание
- Начало настройки джишоки касио wr20bar
- Первоначальные настройки джишоки касио wr20bar
- Настройка даты и времени на джишоки касио wr20bar
- Настройка будильника на джишоки касио wr20bar
- Изменение часового пояса на джишоки касио wr20bar
- Настройка таймера на джишоки касио wr20bar
- Дополнительные функции джишоки касио wr20bar
- Настройка подсветки на джишоки касио wr20bar
Для начала настройки часов Casio G-Shock WR20BAR следуйте инструкциям ниже:
- Убедитесь, что батарея в часах полностью заряжена. Это гарантирует точность настройки и длительность работы часов.
- Распакуйте часы из упаковки и аккуратно удалите защитную пленку с экрана и корпуса.
- Проверьте, что все функциональные кнопки находятся в нажатом положении.
- Следите за инструкциями на экране. Настройка часов выполняется при помощи функциональных кнопок.
Важно запомнить, что процесс настройки может отличаться в зависимости от конкретной модели Casio G-Shock WR20BAR. Всегда следуйте инструкциям, приложенным к вашим часам, для достижения наибольшей точности настройки. Если вы не уверены в своих действиях, лучше обратиться к профессионалу или специалисту по обслуживанию часов.
Первоначальные настройки джишоки касио wr20bar
Первоначальные настройки джишоки касио wr20bar помогут вам правильно использовать функции и возможности этого спортивного шокоустойчивого часового компьютера. Под следующими инструкциями вы найдете необходимые шаги, чтобы установить время, дату и другие параметры на вашей джишоки касио wr20bar.
- Раскройте ремешок и наденьте часы на запястье.
- Нажмите кнопку «Mode» (режим) на правой стороне корпуса часов, чтобы перейти в режим настроек.
- Используйте кнопки «Adjust» (регулировка) и «Search» (поиск) для настройки нужных параметров (например, время и дату). Обычно кнопка «Adjust» служит для изменения значения, а кнопка «Search» — для выбора следующего параметра.
- Следуйте инструкциям на экране и используйте кнопки для выбора опций и настройки значений.
- После завершения настройки всех параметров нажмите кнопку «Mode» (режим) еще раз, чтобы сохранить настройки и вернуться в режим работы часов.
Вот и все! Теперь вы можете наслаждаться использованием своих джишоки касио wr20bar с правильно настроенными параметрами. Если вам требуется изменить настройки в будущем, вы всегда можете повторить эти шаги и обновить значения в соответствующих меню.
Настройка даты и времени на джишоки касио wr20bar
Настройка даты и времени на часах Casio G-Shock WR20BAR может быть выполнена с помощью нескольких простых шагов. Следуйте инструкциям ниже, чтобы настроить дату и время на вашем G-Shock WR20BAR:
- Нажмите на кнопку «Mode» на часах, чтобы перейти в режим настройки.
- Используйте кнопку «Adjust» для выбора значения, которое вы хотите настроить (например, дату или время).
- Используйте кнопки «Forward» и «Back» для изменения значения выбранного параметра.
- После выбора нужного значения нажмите кнопку «Mode», чтобы перейти к следующему параметру.
- Повторяйте шаги 2-4, пока не настроите все нужные значения.
- Для сохранения настроек нажмите на кнопку «Adjust».
- Для возврата в основной режим нажмите кнопку «Mode».
Повторите эти шаги, чтобы настроить и другие параметры на часах Casio G-Shock WR20BAR. Убедитесь, что вы следуете инструкциям и правильно настраиваете дату и время, чтобы ваш G-Shock WR20BAR работал корректно.
Будьте внимательны при настройке часов и следуйте указанным шагам, чтобы избежать ошибок и не повредить ваш G-Shock WR20BAR. Следуя этой простой инструкции, вы сможете настроить дату и время на своих часах Casio G-Shock WR20BAR без проблем.
Настройка будильника на джишоки касио wr20bar
Джишоки касио wr20bar – это стильные и функциональные часы, позволяющие не только отслеживать время, но и использовать различные дополнительные функции, включая будильник. Настройка будильника на этих часах очень проста и займет всего несколько шагов.
- Нажмите кнопку «Mode» (Режим) на часах, чтобы переключиться в режим настройки.
- Прокрутите кнопкой «Adjust» (Настройка) до тех пор, пока не увидите пункт меню «Alarm» (Будильник).
- Нажмите кнопку «Mode» (Режим) для выбора пункта меню «Alarm» (Будильник).
- Нажмите кнопку «Adjust» (Настройка) для перехода к настройке будильника.
- Определите время срабатывания будильника с помощью кнопок «Start/Stop» (Старт/Стоп) и «Mode» (Режим).
- Нажмите кнопку «Adjust» (Настройка) для перехода к настройке минут будильника.
- Определите минуты срабатывания будильника с помощью кнопок «Start/Stop» (Старт/Стоп) и «Mode» (Режим).
- Нажмите кнопку «Adjust» (Настройка), чтобы сохранить настройки будильника.
- Нажмите кнопку «Mode» (Режим) для выхода из режима настройки.
После выполнения этих простых шагов ваш будильник на джишоки касио wr20bar будет настроен и готов к использованию. Теперь вы сможете просыпаться вовремя и не пропускать важные события!
Изменение часового пояса на джишоки касио wr20bar
Джишоки Касио WR20BAR — надежные и прочные часы, которые отлично подойдут для активного образа жизни. Правильная настройка часового пояса позволит вам всегда быть в курсе текущего времени, особенно когда вы находитесь в другом регионе или стране. В этой инструкции мы расскажем, как изменить часовой пояс на джишоки касио WR20BAR.
- Шаг 1: На основном экране часового модуля нажмите кнопку «Mode» (режим), чтобы перейти в режим настроек.
- Шаг 2: Пролистайте список режимов настройки, используя кнопки переключения вниз или вверх, пока не найдете «Time» (время).
- Шаг 3: Нажмите кнопку «Adjust» (настройка), чтобы войти в режим регулировки времени.
- Шаг 4: Прокрутите параметры времени, пока не дойдете до параметра «World Time» (часовой пояс).
- Шаг 5: Нажмите кнопку «Adjust» (настройка) для изменения часового пояса.
Теперь вы можете использовать кнопки переключения вниз или вверх, чтобы выбрать нужный часовой пояс. Переместите указатель на нужный город или номер часового пояса и нажмите кнопку «Mode» (режим), чтобы подтвердить выбор. После этого, длинное нажатие кнопки «Adjust» (настройка) вернет вас в главное меню выхода.
Обратите внимание, что после изменения часового пояса, время на часах автоматически обновится в соответствии с выбранным регионом. Для наилучшей точности синхронизации часов, рекомендуется установить часовой пояс с помощью синхронизации с атомными часами или сетью сотовых операторов.
| Кнопка | Описание |
|---|---|
| Mode | Переключение между режимами |
| Adjust | Вход в меню настроек и выбор параметров |
| Up/Down | Переключение между опциями в меню |
Теперь, с помощью этой подробной инструкции, вы легко сможете изменить часовой пояс на джишоки касио WR20BAR и настроить их в соответствии с вашим текущим местоположением.
Настройка таймера на джишоки касио wr20bar
Джишоки касио wr20bar оснащены удобным таймером, который может быть использован для отсчета времени во время различных деятельностей, таких как спорт, приготовление пищи или просто управление временем.
Для настройки таймера на вашем джишоки касио wr20bar следуйте этим простым шагам:
- Войдите в режим настройки, нажав на кнопку Mode несколько раз, пока на дисплее не появится иконка таймера.
- В режиме настройки нажмите на кнопку Adjust, чтобы выбрать значок таймера для настройки.
- Используйте кнопку Start/Stop для установки нужного значения для таймера, и нажмите на кнопку Adjust, чтобы перейти к следующему значку (минуты, секунды и т. д.).
- Повторите шаг 3 для настройки всех значений таймера.
- Нажмите на кнопку Mode, чтобы выйти из режима настройки таймера и сохранить установки.
Теперь таймер на вашем джишоки касио wr20bar готов к использованию. Для запуска таймера нажмите на кнопку Start/Stop, чтобы начать отсчет времени, и нажмите на нее снова, чтобы остановить или снова запустить таймер.
Если вы хотите сбросить таймер, находясь в режиме отсчета времени, нажмите на кнопку Adjust. Чтобы выйти из режима таймера, нажмите на кнопку Mode несколько раз, пока не попадете в основной режим джишоки.
Теперь вы знаете, как правильно настроить и использовать таймер на вашем джишоки касио wr20bar. Наслаждайтесь удобством и точностью отсчета времени!
Дополнительные функции джишоки касио wr20bar
В часах Casio G-Shock WR20BAR есть несколько дополнительных функций, которые делают их еще более полезными и удобными в использовании. Ниже приведены некоторые из этих функций:
- Автоматическое обновление времени: Эта функция позволяет часам автоматически обновлять время, когда они находятся в зоне покрытия радиосигнала. Это удобно, так как позволяет избежать необходимости регулярной настройки времени.
- Автоматическое переключение DST: DST (Daylight Saving Time) — это функция, которая автоматически переключает время на 1 час вперед, чтобы соответствовать переходу на летнее время. В джишоки касио wr20bar есть функция автоматического переключения DST, которая позволяет часам самостоятельно переключать время в зависимости от текущего сезона.
- Мировое время: Часы G-Shock WR20BAR имеют функцию мирового времени, которая позволяет отобразить текущее время в разных часовых поясах. Это особенно удобно для путешественников или для тех, кто часто взаимодействует с людьми из различных часовых поясов.
- Будильник: Джишоки касио wr20bar оборудованы функцией будильника, которая позволяет установить будильник на определенное время. Это может быть полезно для тех, кто хочет использовать часы не только для отслеживания времени, но и в качестве будильника.
- Хронограф: Часы G-Shock WR20BAR имеют встроенный хронограф, который позволяет измерять прошедшее время с точностью до 1/100 секунды. Это может быть полезно для замера времени при спортивных тренировках или соревнованиях.
Это лишь некоторые из дополнительных функций, которые имеют джишоки касио wr20bar. Они делают эти часы еще более полезными и функциональными для повседневного использования.
Настройка подсветки на джишоки касио wr20bar
Подсветка на часах Casio G-Shock WR20BAR может быть очень полезной функцией, особенно при использовании часов в темное время суток или в условиях недостаточного освещения. Настройка подсветки позволяет вам с легкостью читать время и использовать другие функции часов, даже при плохих условиях освещения.
Вот пошаговая инструкция о том, как настроить подсветку на часах Casio G-Shock WR20BAR:
- Шаг 1: Нажмите и удерживайте кнопку «Adjust» (настройка) в верхнем левом углу часов.
- Шаг 2: Переключайтесь между режимами настройки, нажимая кнопку «Mode» (режим), пока не появится значок лампы подсветки на дисплее.
- Шаг 3: Нажмите кнопку «Adjust» (настройка) еще раз, чтобы войти в режим настройки подсветки.
- Шаг 4: Используйте кнопки «D» (вниз) и «B» (вверх), чтобы настроить яркость подсветки. Некоторые часы могут позволять выбрать из нескольких уровней яркости.
- Шаг 5: Нажмите кнопку «Adjust» (настройка), чтобы сохранить настройки подсветки.
Обратите внимание, что точные шаги настройки подсветки могут незначительно различаться в зависимости от модели Casio G-Shock WR20BAR. В случае возникновения проблем или если у вас есть дополнительные вопросы, рекомендуется обратиться к инструкции по эксплуатации, поставляемой с ваших часами, или связаться с официальным сервисным центром Casio для получения дополнительной поддержки.
После настройки подсветки, вы будете готовы использовать эту полезную функцию ваших Casio G-Shock WR20BAR в любых условиях освещения.