Гарнитура Cardo Packtalk Bold JBL Bluetooth

Обзор


Язык по умолчанию — английский. Язык можно изменить в настройках приложения Cardo Connect.
Первые шаги


Сопряжение мобильных устройств

![]()
Телефон


Преобразование активных телефонных звонков в группу DMC


Аудио
FM-радио


Музыка


Интерком группировка DMC

Создать / присоединиться к новой группе DMC


Отменить группировку

Использование DMC Intercom
Говорю — всегда на связи


Приватный чат
Общайтесь в чате с одним из участников группы
- Выберите участника для приватного чата через мобильное приложение

- Начать / остановить чат

Мост (добавить) пассажира, не являющегося гражданином DMC
- Первое убедитесь, что пассажир подключен через Bluetooth. (см. 2-стороннее сопряжение Bluetooth-интеркома)

Приватный чат
Голосовые команды — всегда включено! “
 |
|
 |
|
 |
|
 |
|
 |
|
 |
|
Мобильное приложение Cardo
Мобильное приложение Cardo
- Для легкой настройки
- Пульт дистанционного управления
- Настройка параметров на ходу
- Управление группами DMC
Полная версия руководства cardosystems.com/support
Сброс всех настроек

Установите Cardo non DMC Intercom

Присоединиться / создать группу внутренней связи, отличную от Cardo

Внутренняя связь


Cardosystems.com
cardosystems.com/support
Зарегистрируйте свое устройство и обновите прошивку с помощью Cardo Update cardosystems.com/update
Кардосистемы ©
Авторские права
Содержание данного Руководства, включая весь текст, иллюстрации и рисунки, является исключительной интеллектуальной собственностью Cardo Systems, Ltd. и защищено законами об авторских правах. Их нет в открытом доступе. Любое частичное или полное воспроизведение, перевод и/или распространение без предварительного письменного разрешения Cardo Systems, Ltd. строго запрещены. Любые права, прямо не предоставленные здесь, защищены.
Документы / Ресурсы
Cardo Packtalk Bold Manual

For easy reference while on the road, download the Pocket Guide from
https://www.cardosystems.com/wp-content/uploads/guides/pocket/en/packtalkBold-desktop.pdf.
Register your PACKTALK BOLD
Registering your PACKTALK BOLD allows you to download software patches, enjoy new features that are offered from time to time, and most importantly, assures smooth handling of any warranty issues you may have. Your registered PACKTALK BOLD is also eligible for free product upgrades.
It’s easy, just visit www.cardosystems.com/update and you’ll be done in no time. Also, rest assured: Cardo does not share your details with others.
Be SMART, register your PACKTALK BOLD.
INTRODUCTION
We wish you a great PACKTALK BOLD experience and encourage you to visit www.cardosystems.com/support/packtalk-bold-support/ regarding any questions, suggestions or comments you may have.
If you have not yet installed the PACKTALK BOLD unit on your helmet, please install it as described in the Installation Guide provided in the package.
And don’t forget to register your PACKTALK BOLD at www.cardosystems.com/update.
GETTING STARTED
GETTING TO KNOW YOUR PACKTALK BOLD

CHARGING THE PACKTALK BOLD
Make sure that your PACKTALK BOLD battery is charged for at least 4 hours before initial use.
To charge the unit:
- Using the supplied USB cable, connect your computer or wall charger to the USB port on your PACKTALK BOLD.

- Charging with the wall charger is faster than via a computer USB port.
- Charging your unit switches it off automatically. To use your unit while it is being charged, switch it on. (see Switching Your Unit On/Off)
While charging, the LED indicates the charging status as follows:- Red LED on — charging
- Red LED off — charging complete
TIP: You can check the battery charge at any time by saying «Hey Cardo, battery status.«
SWITCHING YOUR UNIT ON/OFF
To switch your PACKTALK BOLD on:
To switch your PACKTALK BOLD off:
USING YOUR PACKTALK BOLD
You can operate the various features of your PACKTALK BOLD in the following ways:
- Press a button or combination of buttons on the unit.
- Use the Cardo Mobile App on your mobile device (once it is paired with the unit).
- Use automatic voice recognition (by saying a command, for example «Hey Cardo, Radio On»).
You can also configure your unit by connecting it to a computer with the supplied USB cable and running the Cardo Updater while your computer is connected to the Cardo Update website.
PAIRING YOUR UNIT TO BLUETOOTH DEVICES
Your PACKTALK BOLD has two Bluetooth channels for connection to Bluetooth devices such as mobile phones, GPS devices, and Bluetooth music players with A2DP.
To connect your unit to a Bluetooth device, you must first pair them. Once paired, they automatically recognize each other whenever they are within range.
If you are pairing more than one device, Cardo recommends that you pair the mobile phone to channel 1, and the additional device (such as GPS, music player or additional mobile phone) to channel 2.
If you are pairing the unit to more than one mobile phone, the phone paired with channel 1 is the default phone for outgoing calls.
To pair Bluetooth channel 1 to a mobile phone:
- Enable Bluetooth on the mobile phone.
- On the unit in standby mode, press
 for 5 seconds.
The LED flashes red and blue. - On your mobile phone, search for Bluetooth devices.
- When your PACKTALK BOLD appears in the list of available devices, select it. If prompted for a PIN or Passkey, enter 0000 (four zeros).
The phone confirms that pairing has succeeded and the LED flashes purple for 2 seconds.
To pair Bluetooth channel 2 to another Bluetooth device:
- Enable Bluetooth on the device (for example, your mobile phone, GPS device, or music player).
- On the unit in standby mode, press for 5 seconds. The LED flashes red and blue.
- Tap twice. The LED flashes red and green.
- If you are pairing a GPS device, roll the control wheel inward.

The LED flashes slower. - On the device you are pairing, search for Bluetooth devices.
- When your PACKTALK BOLD appears in the list of available devices, select it. If prompted for a PIN or Passkey, enter 0000 (four zeros). The device confirms that pairing has succeeded and the LED flashes purple for 2 seconds.
- If pairing is not completed within 2 minutes, the unit automatically returns to Standby.
- If you have paired two different mobile phones directly to your PACKTALK BOLD, set one as default for making calls (see Setting the Default Mobile Phone).
- Not all Bluetooth mobile phones broadcast Bluetooth Stereo music (A2DP) even if the phone has an MP3 player function. Consult your mobile phone’s user manual for more information.
- Not all Bluetooth GPS devices allow connection to Bluetooth audio devices. Consult your GPS User Manual for more information.
To cancel the pairing process:
To reset all Bluetooth device pairing:
- Press for 5 seconds.

- Press
 and
and  for 2 seconds.
The LED flashes purple 5 times, confirming that pairing has been reset.
ON THE ROAD
PACKTALK BOLD makes it easy for you to receive phone calls and listen to music in a convenient and safe manner.
BASIC AUDIO FUNCTIONS
The basic audio functions are the same whether you are listening to music, speaking on the intercom, or having a phone conversation.
To turn the volume up:
- Roll the Control Wheel inward.

An increasingly louder tone is played on the speaker until you reach the maximum volume, as indicated by the maximum volume tone.
To turn the volume down:
- Roll the Control Wheel outward.

An increasingly quieter tone is played on the speaker until you reach the minimum volume, as indicated by the minimum volume tone.
To mute the microphone completely and lower the speaker volume to the minimal level:
- Roll the Control Wheel outward, then inward.

To unmute the microphone and raise the speaker volume to the previous level:
- Roll the Control Wheel in any direction.
An ascending tone is played on the speaker.
MAKING AND RECEIVING PHONE CALLS
You can use your mobile phone to make and receive phone calls while paired to your PACKTALK BOLD.
You can make a hands-free call using your mobile phone’s voice dial option or using the Cardo speed dial or redial last call options.
To make a phone call:
- If you connected two mobile phones to your unit, you cannot make an additional phone call from the other phone while a phone call is already active.
- During Bluetooth intercom 3 or 4-way calls, riders that are connected on both channels A and B cannot receive phone calls.
To answer a call:
To reject a call:
To ignore a call:
- Roll the Control Wheel outward, then inward, or say Ignore.
To end a call:
SWITCHING BETWEEN TWO CALLS ON TWO MOBILE PHONES
Your PACKTALK BOLD can toggle between two calls on two mobile phones when both mobile phones are paired to your unit.
To toggle between two calls on two mobile phones (without disconnecting either call):
To disconnect the current call and switch to the other call:
- Tap .
STREAMING MUSIC
You can stream music from your paired device to your PACKTALK BOLD.
To start music streaming from your paired device:
To stop music streaming:
- Tap the Control Wheel or say «Hey Cardo, music off.»
To skip to the next track (while streaming):
- Tap or say «Hey Cardo, next track.»
To skip back to the previous track (while streaming):
- Tap twice or say «Hey Cardo, previous track.»
To toggle between FM and ATDP music:
- Press for 2 seconds.
LISTENING TO FM RADIO
The PACKTALK BOLD is equipped with a built-in FM radio.
To turn on the FM radio:
When you switch on your FM radio, the station that was playing when you last switched off resumes playing.
To turn the FM radio off:
- Tap the Control Wheel or say «Hey Cardo, radio off.»
To skip to the next station:
- Tap or say «Hey Cardo, next station.»
To skip back to the previous station:
- Tap twice or say «Hey Cardo, previous station.»
To scan for and select a station:
- Press down the Control Wheel and simultaneously roll it inward. The FM radio plays each station that it finds for several seconds.

- When you hear a station you want to select, tap .
To store a scanned station in the active preset:
- Tap within 20 seconds of stopping the scan.
To toggle between FM and ATDP music:
- Press for 2 seconds.
SWITCHING MUSIC SOURCES
If two music (A2DP) audio sources are paired, PACKTALK BOLD uses the audio source from which you last played music.
To switch to the other audio source:
- Stop music (A2DP) playback from the current device (see Streaming Music).
- Play music (A2DP) from the other device.
PACKTALK BOLD automatically remembers your last played device.
VOICE COMMANDS
You can use voice commands for hands-free operation of certain PACKTALK BOLD features. Voice commands use voice recognition. You loudly say a command and PACKTALK BOLD performs the action. Voice commands are available in various languages. English is the default language. You can change the language to another available language.
PACKTALK BOLD uses the following predefined voice commands.
| To… | Say… |
| Turn on the radio | «Hey Cardo, radio on» |
| Turn off the radio | «Hey Cardo, radio off» |
| Skip to the next preset radio station | «Hey Cardo, next station» |
| Skip to the previous preset radio station | «Hey Cardo, previous station» |
| Turn on music | «Hey Cardo, music on» |
| Turn off music | «HeyCardo, music off» |
| Play the next music track | «Hey Cardo, next track» |
| Play the previous music track | «HeyCardo, previous track» |
| Raise volume | «Hey Cardo, volume up» |
| Lower volume | «Hey Cardo, volume down» |
| Mute audio | «Hey Cardo, mute audio» |
| Unmute audio | «Hey Cardo, unmute audio» |
| Call the default number (configurable) | «Hey Cardo, speed dial» |
| Redial the last number | «Hey Cardo, redial number» |
| Answer an incoming call | «Answer» |
| Ignore an incoming call | «Ignore» |
| Access Siri (when connected to an iOS device) | «Hey Siri» |
| Access Google (when connected to an Android device) | «OK Google» |
| Check the battery status | «Hey Cardo, battery status» |
| Open the call intercom | «Hey Cardo, call intercom» |
RIDING WITH OTHERS
Your PACKTALK BOLD features two distinct intercom communication modes: the traditional Bluetooth protocol and the Cardo’s Dynamic Mesh Communications (DMC) technology.
DMC is the best way to communicate in a group. In DMC mode, you can instantly create or join a dynamicallyfluid network of up to 15 riders to communicate in full conference mode. Unlike Bluetooth, DMC allows anyone in the group to roam freely, overtake each other or even leave the group altogether, without affecting the ongoing conversations of the remaining fellow riders. You can also use the DMC intercom to communicate privately with another rider.
Of course, you can still use Bluetooth to connect to devices, such as your smartphone or GPS, or to communicate with riders with headsets that don’t include DMC technology. For details, see Bluetooth Intercom.
How Does DMC Work?
Anyone can start a new DMC group.
In DMC intercom mode, riders can join, leave, and rejoin existing DMC groups without affecting the ongoing conversation among the other group members. If a group member goes out of range, the remaining riders are automatically re-connected within split seconds to a closer group member, bypassing the absent or remote rider. This way, all active riders remain connected to each other.
DMC INTERCOM
You can use the DMC intercom to speak with other riders in your DMC group. For more information on creating DMC intercom groups, see Setting Up and Using DMC intercom Groups.
Using the DMC intercom, all riders in a group speak hands-free. A rider in a group performs no additional operation to speak to or hear other riders in the group.
Using the DMC intercom, you can also:
- Chat privately with another rider in your DMC group, see Chatting Privately
- Bridge a non-DMC passenger or rider, see Using DMC intercom
- Mute/unmute DMC intercom groups, see Muting/Unmuting DMC Intercom Groups
- Delete DMC intercom groups, see Deleting DMC intercom Groups
- Listen to music while in DMC intercom groups, see Background Audio Level and Audio Source Priorities
- Switch between DMC intercom and Bluetooth intercom, see Switching between Intercom modes
SETTING UP AND USING DMC INTERCOM GROUPS
You can manage DMC intercom groups to suit your riding requirements, this includes creating groups, joining groups, leaving and rejoining groups or changing your active group.
DMC intercom groups are created and deleted by a group creator. Each group can have up to 15 riders: one group creator/admin and a maximum of 14 group members.
When creating a group, all members should be within 3 meters (10 feet) of the creator. The group continues functioning even if the creator is no longer available.
If a rider’s connection is lost, the rider remains part of the group and reconnects automatically once in range.
If you purchased the PACKTALK BOLD DUO, the package contains two units belonging to the same DMC intercom group.
CREATING DMC INTERCOM GROUPS
When creating a DMC group, you must coordinate with the other riders who will be the group creator.
To create a DMC group:
- Confirm your PACKTALK BOLD is in DMC intercom mode (LED flashes green slowly). If your PACKTALK BOLD is not in DMC intercom mode, press and .
- The group creator and all group members: Press for 5 seconds. The LED flashes green quickly.

- Only the group creator: Tap . The LED flashes red and green quickly.
- Other members can join the group within 2 minutes.
- After each member joins successfully, the LEDs of the joined unit and the creator’s unit flash purple.
After grouping is completed, the DMC intercom conference starts automatically.
JOINING DMC INTERCOM GROUPS
You can join or rejoin a DMC intercom group created by another rider.
If your DMC group connection is lost, you remain part of the group. Once in range of any other group member, you automatically reconnect.
If your DMC group splits with some group members remaining in range of each other but not in range of all group members, you can continue speaking with the members still in range. Once in range of any other group member, you automatically reconnect.
If you join a new DMC group, you automatically leave your existing DMC group.
To join an existing DMC group:
- Confirm your PACKTALK BOLD is in DMC intercom mode (LED flashes green slowly). If your PACKTALK BOLD is not in DMC intercom mode, press and .
- Both you and the group creator: Press for 5 seconds. The LED flashes green quickly.

- Only the group creator: Tap . The LED flashes red and green quickly.
The color of the flashing LED indicates whether you have been added to the group:- Purple: You have successfully joined the group.
- Yellow: You cannot join the group because it has already reached the maximum number of riders.
- Red: Failed to join.
DELETING DMC INTERCOM GROUPS
If you delete a DMC intercom group, you must rejoin it if you want to connect to it again in the future.
To delete a DMC group:
- Confirm your PACKTALK BOLD is in DMC intercom mode (LED flashes green slowly). If your PACKTALK BOLD is not in DMC intercom mode, press and .
- Press for 5 seconds. The LED flashes green quickly.

- Press and for 2 seconds.

USING DMC INTERCOM
ADDING A NON-DMC PASSENGER
You can use the DMC bridging feature to add a non-DMC rider or passenger to the intercom group.
To bridge a non-DMC passenger/rider:
- Verify that the passenger/rider is paired via Bluetooth to Channel A (see Setting Up non-DMC Intercom Groups).
- On your unit, press .

To disconnect the bridge:
- Press .
CHATTING PRIVATELY
You can chat privately with a specific member of your DMC group.
This option is also available using the Cardo mobile app.
To chat privately:
- In the Mobile app, select the rider you want to speak with in private or pair with the rider’s device on Bluetooth channel B. (For details, see Bluetooth Intercom).
- To start or stop a private chat, tap 2 times.

MUTING/UNMUTING DMC INTERCOM GROUPS
Muting the DMC intercom mutes your microphone and speaker. Unmuting the DMC intercom restores sound to your microphone and speaker.
To mute/unmute the DMC group:
- Confirm your PACKTALK BOLD is in DMC intercom mode (LED flashes green slowly). If your PACKTALK BOLD is not in DMC intercom mode, press and .
- On your unit, press the control wheel for 2 seconds.

MUTING/UNMUTING THE MICROPHONE
This feature is available with software update 5.10. To make sure you have the latest software, download the Cardo Update tool to your computer, and update your unit.
To mute the microphone on your PACKTALK BOLD:
- Tap the Intercom and Audio buttons.

A beep indicates that your microphone is muted. - To unmute your microphone, tap the Intercom and Audio buttons once more.
A beep indicates that your microphone is in active mode.
BACKGROUND AUDIO LEVEL AND AUDIO SOURCE PRIORITIES
The PACKTALK BOLD can use parallel audio streaming to stream audio from two connected sources simultaneously, so that you can listen to your music or the FM radio while holding a DMC intercom conversation. PACKTALK BOLD automatically manages your music and FM radio volume while using DMC intercom. PACKTALK BOLD also automatically manages DMC intercom volume with mobile phone calls and GPS. For more information on background audio level and audio source priorities, see Using Parallel Audio Streaming.
BLUETOOTH INTERCOM
To connect your unit to another unit with a Bluetooth intercom, such as a Cardo Bluetooth unit or other Bluetooth-enabled devices, you must first pair their channels. Once paired, the units automatically recognize each other whenever they are in range (line of sight up to 1.6 km / 5,200 ft subject to terrain).
- Pairing a channel replaces any existing paired unit on that channel with the new unit.
- If you purchased the PACKTALK BOLD DUO, the retail package contains two pre-paired units in DMC mode.
- The Intercom range with other models is limited to the distance of the unit with the shorter range.
SETTING UP NON-DMC INTERCOM GROUPS
DMC is always the best way to connect a group of riders. If you happen to ride with a group of riders that do not have DMC devices (such as Bluetooth communicators by Cardo or by other brands), you can switch your unit to Bluetooth mode and create or join a non-DMC group. The participating riders are connected in a chain with a maximum total of four riders.
To set up a Cardo non-DMC group:
- Confirm your unit is in Standby Bluetooth intercom mode (LED flashes blue slowly).
If your unit is not in Bluetooth intercom mode, tap and . For more information see, Switching between Intercom modes. - To initiate 2-way pairing:
- To add a 3rd rider:
- To add a 4th rider, Rider 1 or Rider 2 connects to the additional rider.

Bluetooth intercom pairing needs to be initiated on the other device.
To pair a non-Cardo Bluetooth intercom group unit:
- Confirm your unit is in Standby Bluetooth intercom mode (LED flashes blue slowly).
If your unit is not in Bluetooth intercom mode, tap and . For more information see, Switching between Intercom modes. - To initiate 2-way pairing:
- To add a 3rd rider:
- To add a 4th rider, Rider 1 or Rider 2 connects to the additional rider.

Bluetooth intercom pairing needs to be initiated on the other device.
- To cancel the pairing process, press for 2 seconds. The LED stops flashing.
- If pairing is not completed within 2 minutes, the unit automatically returns to Standby.
USING THE BLUETOOTH INTERCOM
STARTING/ENDING BLUETOOTH INTERCOM CALLS
To start or end communication with Rider 1:
To start or end communication with Rider 2:
To initiate a 4-way Bluetooth Conference:
You can also start the Bluetooth intercom by making a loud noise, for example, by saying «Hey.»
If channels A and B are already paired, the conversation starts for both of them.
RECEIVING BLUETOOTH INTERCOM CALLS
If another paired unit calls you via Bluetooth intercom, the call begins instantly.
RESETTING BLUETOOTH INTERCOM PAIRING
Resetting Bluetooth intercom pairing also resets all Bluetooth device pairing.
To reset Bluetooth intercom pairing:
- Press for 5 seconds.
- When the LED flashes red, press and for 2 seconds.

The LED flashes purple 5 times slowly, confirming that pairing has been reset.
SHARING MUSIC AND RADIO
You can share music and FM radio with a passenger or other rider. Music sharing is more suitable for rider/passenger combinations, whereas FM radio is also intended for rider/rider combinations.
- You can share music only in Bluetooth intercom mode.
- Music and radio can be shared with only one passenger/rider.
- Bluetooth intercom calls are disabled when sharing music.
- FM radio sharing opens a Bluetooth intercom call automatically.
- If you paired your unit to two mobile phones, music will be shared from the mobile phone through which you last played music.
- When sharing FM radio, either passenger/rider can change station while the Bluetooth intercom call remains open.
- When you stop sharing FM radio, the Bluetooth intercom call remains open and the FM radio continues to play independently on each passenger/rider’s unit.
- When you stop sharing music, the music continues to play on your unit only.
To start/stop sharing:
- Confirm your PACKTALK BOLD is in Bluetooth intercom mode (blue LED flashes slowly).
If your PACKTALK BOLD is not in Bluetooth intercom mode, press and . - Start playing music or the FM radio.
- Press for 2 seconds to start sharing on Channel A (by default).

To manually select the channel on which to share music or radio:
- Start playing music or the FM radio.
- Start a Bluetooth intercom call on either channel (A or B).
- Press for 2 seconds.
To stop sharing:
- Press for 2 seconds.
SWITCHING BETWEEN INTERCOM MODES
Your PACKTALK BOLD unit can work in only one intercom mode at a time.
The current intercom mode is indicated by the color of the LED:
- When in DMC intercom mode, the LED flashes green at approximately 4-second intervals.
- When in Bluetooth intercom mode, the LED flashes blue at approximately 4-second intervals.
To switch between intercom modes:
TROUBLESHOOTING
SOFT RESET
If your PACKTALK BOLD stops responding, reset it in one of these ways:
- Turning it off and then on again (see Getting Started).
- Using the supplied USB cable, connect your unit to the computer or wall charger for 30 seconds.
RESET PAIRING
This option deletes all paired units and devices.
To reset mobile device pairing:
- Confirm your unit is in Standby Bluetooth intercom mode (LED flashes blue slowly).
If your unit is not in Bluetooth intercom mode, tap and . For more information see, Switching between Intercom modes. - While in standby mode, press for 5 seconds.

- Press and for 2 seconds.
The LED flashes purple 5 times slowly, confirming that pairing has been reset.
To reset intercom pairing:
- Confirm your unit is in Standby Bluetooth intercom mode (LED flashes blue slowly).
If your unit is not in Bluetooth intercom mode, tap and . For more information see, Switching between Intercom modes. - While in standby mode, press for 5 seconds.

- Press and for 2 seconds.
The LED flashes purple 5 times slowly, confirming that pairing has been reset.
To reset DMC group pairing:
- Confirm your PACKTALK BOLD is in DMC intercom mode (LED flashes green slowly).
If your PACKTALK BOLD is not in DMC intercom mode, press and . - While in standby mode, press for 5 seconds.
- Press and for 2 seconds.
The LED flashes purple 5 times slowly, confirming that pairing has been reset.
RESET TO FACTORY SETTINGS
This option deletes all paired units, devices and all configuration settings.
To perform a factory reset through the unit:
- Check that your PACKTALK BOLD is in Standby mode (see PACKTALK BOLD LED Indications).
- Simultaneously press ++ for 5 seconds.

The LED flashes purple 5 times slowly, confirming that pairing has been reset.
FAQ
Additional answers to common problems can be found at https://www.cardosystems.com/support/packtalk-bold/.
PERSONALIZING YOUR DEVICE
Get the most out of your PACKTALK BOLD by changing the settings and customizing your unit according to your own personal preferences, using either of the following methods:
- Cardo Mobile App on iOS or Android devices.
- Unit buttons.
Cardo recommends you customize your settings before going out on the road. You can adjust any of these settings as required after experiencing them under road conditions.
| Object | Default Value | Description | Cardo Mobile App (iOS/Android) |
| AGC sensitivity (Off/Low/Medium/High) | Medium | AGC automatically adjusts speaker volume according to ambient noise and riding speed. For example, when set to Low, higher ambient noise will cause the volume increase to kick in at a higher level. | ✓ |
| Audio priority (A2DP/Bluetooth intercom) | Bluetooth intercom | Priority of audio source playing through speakers. Either music is not interrupted by an intercom call, or vice-versa. | ✓ |
| Background Audio Level | N/A | Sets the background audio volume when parallel audio streaming is on (see Parallel audio streaming in Bluetooth mode (Enable/Disable) below). | ✓ |
| Bluetooth friendly name PACKTALK | BOLD | Sets the name that appears on your phone while pairing and in the Cardo app. | ✓ |
| Create, join or leave a group of passengers/riders | Empty | DMC intercom groups. For more information, see Setting Up and Using DMC intercom Groups. | ✓ |
| FM Band | According to Your Region | If you are in Japan, select Japan. Otherwise, select Worldwide. | ✓ |
| Intercom Mode (DMC/Bluetooth) | DMC Intercom | DMC intercom and Bluetooth intercom. | ✓ |
| Language | According to Your Region | Voice announcements and voice-assisted menus language (see «Spoken Status Announcements» below). | ✓ |
| Mobile priority | Mobile 1 | If you paired your unit to two mobile phones, you must set one of them as the default phone for outgoing calls. | ✓ |
| Parallel audio streaming in Bluetooth mode (Enable/Disable) | Disable | You can hear two audio sources simultaneously. For example, hear GPS while listening to music. Note: Parallel audio streaming may not work properly with some iOS devices (i.e., music player or GPS navigator) due to connected device limitations. | ✓ |
| RDS (Enable/Disable) | Disable | Radio Data System allows the radio to automatically retune to the strongest frequency available for the FM station you are listening to when the signal becomes too weak. | ✓ |
| Set speed dial numbers Empty | Pre-set phone numbers for automatic dialing. | ✓ | |
| Set the 6 FM radio presets | 107.5 | Pre-set FM radio stations. | ✓ |
| Spoken Status Announcements (Enable/Disable) | Enable | Voice announcements inform you to whom or to what device you are connected. | ✓ |
AGC and voice control performance vary based on environmental conditions, including riding speed, helmet type and ambient noise. For improved voice control performance, minimize the wind impact on the microphone by closing the visor and using the large microphone sponge.
SETTING THE DEFAULT MOBILE PHONE
If you paired your unit to two mobile phones, you must set one of them as the default phone for outgoing calls.
If you do not set a default phone, the phone that you first paired with your unit is automatically set as the default phone.
To set the default phone:
USING PARALLEL AUDIO STREAMING
With parallel audio streaming, you can hear GPS instructions during a mobile or Bluetooth intercom call, or while listening to other audio sources, such as music or FM radio.
Parallel audio streaming may not work properly with some iOS devices (i.e., music player or GPS navigator) due to connected device limitations.
Your PACKTALK BOLD sets the various audio sources to either foreground (volume remains the same) or background (volume reduced) as described in the following table:
| Mobile Phone 1/2 | GPS | Intercom 1 | Intercom 2 | Music | FM Radio |
| Foreground | Foreground | ||||
| Foreground1 | Foreground1 | ||||
| Foreground | Foreground | ||||
| Foreground | Background | ||||
| Foreground | Background | ||||
| Foreground | Background | ||||
| Foreground | Background | ||||
| Foreground2,3 | Foreground2,3 | Background | |||
| Foreground4 | |||||
| Foreground5 |
1 If you add an intercom call to a mobile phone call creating a conference call, the volume for both audio sources is the same.
2 If you make two intercom calls simultaneously creating an intercom conference call, the volume for both audio sources is the same.
3 If you make two intercom calls simultaneously creating an intercom conference call, you cannot hear the mobile phone or GPS.
4 If you play music only, the music volume is not reduced.
5 If you play the FM radio only, the FM radio volume is not reduced.
In some cases, parallel audio streaming may not work properly due to connected device limitations (music player or GPS navigator). For more information, see FAQ.
Cardo recommends that during a 3-way or 4-way Bluetooth intercom conference call, the rider who is connected to only one intercom call listens for mobile phone and GPS announcements.
You cannot use music sharing for voice audio with riders during parallel audio streaming.
Music can be streamed in the background during an active DMC intercom call.
You can configure parallel audio streaming via the Cardo app.
AUDIO SOURCE PRIORITIES
If Parallel Audio Streaming is disabled, PACKTALK BOLD manages the audio sources you hear through the speakers according to the following audio source priorities.
| Priority | Audio Source |
| Higher Priority ↑ Lower Priority |
Mobile phone, GPS device instructions1 Intercom (DMC and Bluetooth modes) or Music2 Music or Intercom (DMC and Bluetooth modes)3 FM Radio |
1 Phone calls and GPS temporarily mute DMC intercom, but group members remain part of the DMC intercom group.
2 When audio priority is set to Intercom, you cannot hear navigation app or SMS messages from your phone during an ongoing intercom call.
3 When audio priority is set to A2DP (music), the intercom is disabled while listening to music (via A2DP). A rider calling you by intercom hears a sound indicating you are not available.
Intercom modes all have the same priority, so ongoing intercom calls will not be interrupted by any other intercom call.
If you paired your unit to two mobile phones (see Setting the Default Mobile Phone), music will be shared from the mobile phone through which you last played music.
UPDATING YOUR DEVICE
Always keep your unit updated. Stay up-to-date by downloading software updates whenever a new version is available.
- Cardo Update on Windows / Mac — minimum requirements — Windows® 7 / macOS X 10.8
To upgrade your PACKTALK BOLD unit:
- Download and install the Cardo Update tool https://www.cardosystems.com/update
- Open the app.
- Register (first time only).
- Connect the unit to the computer using an USB cable and update the firmware.
APPENDIX A. PACKTALK BOLD LED INDICATIONS
Your PACKTALK BOLD operates in various modes. Each mode consists of a group of features currently available for your use. For example, when PACKTALK BOLD plays music, it will be in music playing mode, enabling features related to playing music such as skipping to the next and previous tracks.
Events are considered to occur whenever you operate a feature and when PACKTALK BOLD responds. For example, turning on music is an event.
PACKTALK BOLD’s current mode is indicated by the unit LEDs. You also hear voice announcements on your unit for mode changes and events.
The following table shows LED indications for modes and events according to the current battery state.
| LED | Flashing | Battery State | Mode or Event |
| Blue | For 2 seconds | Normal |
|
| Blue | Fast (three times) | Normal Low Battery Charging |
|
| Blue | Fast (repeating fast) | Normal Low Battery Charging |
|
| Blue | Slow (repeated at 3-second intervals) | Normal |
|
| Blue | Slow twice (repeated at 3-second intervals) | Normal |
|
| Green | Fast twice (repeated at 1-second intervals) | Normal or Low Battery |
|
| Green | Fast (repeating) | Normal or Low Battery |
|
| Purple | For 2 seconds | Normal Low Battery Charging |
|
| Purple | Slow (5 times) | Normal Low Battery |
|
| Purple/Red | Purple twice slowly, then red | Charging |
|
| Purple/Red | Slow purple and red (repeating) | Charging |
|
| Red | Slow twice (repeated at 3-second intervals) | Low Battery |
|
| Red | For 2 seconds | Normal or Low Battery |
|
| Red | Fast (repeated at 3-second intervals) | Low Battery |
|
| Red | Fast (repeated at 3-second intervals) | Low Battery |
|
| Red | Fast (repeating fast) | Normal Low Battery Charging |
|
| Red | Fast (3 times) | Normal Low Battery Charging |
|
| Red | For 2 seconds | Normal Low Battery Charging |
|
| Red | Remains on | Charging |
|
| Red/Blue | Alternating fast | Normal Low Battery Charging |
|
| Red/Blue | Alternating slow | Normal Low Battery |
|
| Red/Green | Alternating fast | Normal Low Battery Charging |
|
| Red/Green | Alternating slow | Normal Low Battery |
|
| Yellow | For 2 seconds | Normal Low Battery Charging |
|
GLOSSARY
| Term/Abbreviation | Description |
| A2DP | Advanced Audio Distribution Profile (for music). A protocol for playing music over Bluetooth. |
| AGC sensitivity | AGC (Automatic Gain Control) automatically adjusts speaker volume and microphone sensitivity according to ambient noise and riding speed. |
| Device | Mobile phone, GPS or music player. |
| DMC | Dynamic Mesh Communications. |
| Intercom Mode (DMC/Bluetooth) | DMC intercom or Bluetooth intercom. |
| Language | Voice announcements and voice commands language. |
| Unit | Cardo or non- Cardo Bluetooth Communication system. |
| Voice control | Voice activation (by saying a word or phrase) of certain features for handsfree operation. |
| Voice control sensitivity | Adjusts your microphone sensitivity for voice activation while you are riding. |
SUPPORT
For additional information:  https://www.cardosystems.com/support/packtalk-bold/
To avoid potential problems and to receive our support and warranty coverage, we strongly recommend buying our products only from authorized Cardo dealers.
Your favorite brick-and-mortar store is always your best bet. Unauthorized online resellers and online auction sites such as eBay are not among Cardo’s authorized dealers, and purchasing our products from such sites will be at your own risk. Cardo strives to provide quality products and exceptional customer service. We select dealers who share that vision. Buying grey market items from unauthorized online dealers is counterproductive and also adversely affects unsuspecting online consumers who may be purchasing used, counterfeit or defective products or devices whose warranties are void. Protect your investment by purchasing genuine Cardo and scala rider® products only from authorized dealers.

© 2021 Cardo Systems
All rights reserved. Cardo, the Cardo logo and other Cardo marks are owned by Cardo and may be registered. All other trademarks are the property of their respective owners. Cardo Systems assumes no responsibility for any errors that may appear in this document. Information contained herein is subject to change without notice.
Videos
Cardo PACKTALK Bold: Complete Tutorial Video
Documents / Resources
References
Download manual
Here you can download full pdf version of manual, it may contain additional safety instructions, warranty information, FCC rules, etc.
Download Cardo Packtalk Bold Manual
Инструкции и Руководства для Cardo Systems PACKTALK BOLD.
Мы нашли 20
инструкции доступные для бесплатного скачивания:
Инструкция по установке, Руководство пользователя
Cardo Systems PACKTALK BOLD Руководство пользователя
Бренд:
Cardo Systems
Размер:
3 MB
Страниц:
2
Язык(и):
Русский
Открыть в новой вкладке

Cardo Systems PACKTALK BOLD Guide d’installation
Бренд:
Cardo Systems
Размер:
2 MB
Страниц:
2
Язык(и):
Немецкий, Английский, Испанский, Французский, Итальянский, Японский, Голландский, Португальский, Русский, Шведский
Открыть в новой вкладке

Cardo Systems PACKTALK BOLD Manual de usuario
Бренд:
Cardo Systems
Размер:
3 MB
Страниц:
2
Язык(и):
Английский, Испанский, Японский
Открыть в новой вкладке
Cardo Systems PACKTALK BOLD Benutzerhandbuch
Бренд:
Cardo Systems
Размер:
3 MB
Страниц:
2
Язык(и):
Немецкий, Английский, Французский, Итальянский
Открыть в новой вкладке

Cardo Systems PACKTALK BOLD Manuale utente
Бренд:
Cardo Systems
Размер:
1 MB
Страниц:
31
Язык(и):
Итальянский
Открыть в новой вкладке

Cardo Systems PACKTALK BOLD Manual de usuario
Бренд:
Cardo Systems
Категория:
Motorcycle Accessories
Размер:
1 MB
Страниц:
31
Язык(и):
Испанский
Открыть в новой вкладке
Cardo Systems PACKTALK BOLD ユーザーマニュアル
Бренд:
Cardo Systems
Размер:
1 MB
Страниц:
30
Язык(и):
Японский
Открыть в новой вкладке
Cardo Systems PACKTALK BOLD ユーザーマニュアル
Бренд:
Cardo Systems
Размер:
2 MB
Страниц:
2
Язык(и):
zh
Открыть в новой вкладке

Cardo Systems PACKTALK BOLD Pocket Guide
Бренд:
Cardo Systems
Размер:
3 MB
Страниц:
17
Язык(и):
Английский
Открыть в новой вкладке
Cardo Systems PACKTALK BOLD User Manual
Бренд:
Cardo Systems
Категория:
Motorcycle Accessories
Размер:
1 MB
Страниц:
31
Язык(и):
Английский
Открыть в новой вкладке
Cardo Systems PACKTALK BOLD Benutzerhandbuch
Бренд:
Cardo Systems
Размер:
3 MB
Страниц:
17
Язык(и):
Немецкий
Открыть в новой вкладке

Cardo Systems PACKTALK BOLD Manuel utilisateur
Бренд:
Cardo Systems
Размер:
3 MB
Страниц:
17
Язык(и):
Французский
Открыть в новой вкладке

Cardo Systems PACKTALK BOLD Manuale utente
Бренд:
Cardo Systems
Размер:
3 MB
Страниц:
17
Язык(и):
Итальянский
Открыть в новой вкладке

Cardo Systems PACKTALK BOLD Manual de usuario
Бренд:
Cardo Systems
Размер:
3 MB
Страниц:
17
Язык(и):
Испанский
Открыть в новой вкладке

Cardo Systems PACKTALK BOLD ユーザーマニュアル
Бренд:
Cardo Systems
Размер:
3 MB
Страниц:
17
Язык(и):
Японский
Открыть в новой вкладке
Cardo Systems PACKTALK BOLD ユーザーマニュアル
Бренд:
Cardo Systems
Размер:
3 MB
Страниц:
17
Язык(и):
zh
Открыть в новой вкладке
Cardo Systems PACKTALK BOLD Handleiding
Бренд:
Cardo Systems
Размер:
152 KB
Страниц:
2
Язык(и):
Голландский
Открыть в новой вкладке
Cardo Systems PACKTALK BOLD ユーザーマニュアル
Бренд:
Cardo Systems
Размер:
1 MB
Страниц:
31
Язык(и):
Японский, zh
Открыть в новой вкладке
Cardo Systems PACKTALK BLACK Benutzerhandbuch
Бренд:
Cardo Systems
Размер:
1 MB
Страниц:
31
Язык(и):
Немецкий
Открыть в новой вкладке

Cardo Systems PACKTALK BLACK Manuel utilisateur
Бренд:
Cardo Systems
Категория:
Portable speakers
Размер:
1 MB
Страниц:
32
Язык(и):
Французский
Открыть в новой вкладке

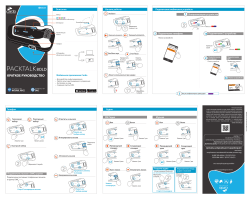
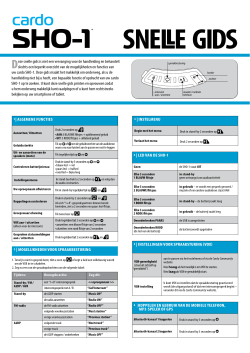
КРАТКОЕ РУКОВОДСТВО
Вкл/Выкл звук
Подключение
телефона
Поиск устройств Прокрутить колесо
2
Подключение 2 устройства
Поиск устройств
Поиск устройств
USB зарядка,
обновление прошивки
Интерком
Медиа
Телефон
Управляющее
колесо
Светодиодный индикатор
• Работа пульта дистанционного управления
Для удобства конфигурирования
• Настройка на ходу
• Создание группы DMC
1
Быстрый набор
www.cardosystems.com
support@cardosystems.com
USA & Canada: 1-800-488-0363
International: +49 89 450 36819
Для полной версии руководства, пожалуйста,
посетите
cardosystems.com/product-manuals
Авторские права
MAN00435 PACKTALKboldRU A02
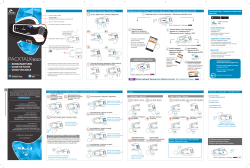
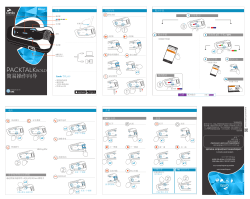
ОписаниеНачало работы Подключение мобильных устройств
Телефон
sec.
Bluetooth
ON
Searching for available devices
PACKTALK
Завершение вызова
Подключить вызов к DMC группе
Подключение активных телефонных звонков
в группу DMC
Старт/Стоп передачи вызова
GPS
Авто поиск Отключить поиск
Нажать
и повернуть
Мобильное приложение Cardo
Аудио
FM Радио
Вкл Выкл
x2
Музыка
Вкл Выкл
Ответить на вызов
x2
x2
Голосовой
набор
Повторный
набор
x2
Предыдущая
станция
Следующая
станция
Предыдущий
трек
Следующий
трек
Подключение
GPS
2a
Откидная антенна
Старт/стоп раздачи
См. Противоположную страницу
Раздача аудио
(Когда в режиме Bluetooth)
Переключение между
радио и музыкой
sec.
sec.
Игнорировать вызов
sec.
Отклонить вызов
Увеличить громкость Уменьшить громкость
Bluet
ooth
ON
S
ea
rchi
n
g
f
o
r
avai
lable de
vice
s
PACKTALK
x2
3
После подключения замигает
Подключение телефона
sec.
Нажать на
любую кнопку
sec.
Стоп/Пауза
Прокрутить
до конца
колесо
Нажать
на колесо
Нажмите
2 раза
Удерживать
Нажать 1 раз
Нажать 1 раз Нажать 1 раз Нажать 1 раз
Нажать 2 раза
Нажать 2 раза
Нажать 1 раз
Нажать 1 раз
Удерживать
2 секунды
Удерживать
2 секунды
Нажать 2 раза Нажать 1 разНажать 2 раза
Удерживать 2 секунды.
Покрутить
колесо
1 секунду
Удерживать
2 кнопки 1 сек
1a
2
Инициализация устройства
Нажать на
любую кнопку
Мигает:
Мигает:
Зарегистрируйте свое устройство на Cardo Community
cardosystems.com/cardo-community/
• Получить обновление программного обеспечения
• Настроить устройство
….. и более
Может использоваться при зарядке
sec.
Вкл/Выкл
Удерживать кнопку
2 секунды
Содержание этого руководства, включая весь текст,
иллюстрации и чертежи, является исключительной
интеллектуальной собственностью Cardo Systems и за
—
щищено законами об авторском праве. Они не находятся
в общественном достоянии. Любое частичное или полное
воспроизведение, перевод и распространение без предва
—
рительного письменного разрешения Cardo Systems строго
запрещено. Любые права, явно не предоставленные здесь,
зарезервированы.
Обзор самой свежей и продвинутой bluetooth гарнитуры для установки в шлем мотоциклистов Packtalk Bold JBL. В статье я расскажу о комплекте поставки мотогарнитуры. Затронем основные функциях мотогарнитуры и ее отличия от других моделей. Ну и конечно, дам несколько советов по выбору мотогарнитуры. Надеюсь, что эта статья поможет выбрать наиболее подходящую гарнитуру именно для вас.
Итак, поехали!
Распаковка мотогарнитуры. Комплект поставки.
В моих руках абсолютно новый комплект мотогарнитуры от Cardo Packtalk bold JBL duo. Отличный дизайн и полиграфия. Сама коробка сделана из плотного картона и «одета» в рубашку с основной информацией о том, что внутри. На фото коробка в рубашке.

Сразу бросается в глаза значок JBL. Это означает, что в комплекте идут динамики в шлем доработанные инженерами HARMAN и активирован алгоритм обработки звука. Также нам доступны основные профили звука — вокал, бас и стандарт. Это вклад JBL в качество звука этой мотогарнитуры. Но о звуке чуть ниже. А тем, кому не терпится узнать больше о качестве звука — добро пожаловать по линку на мою статью.
Так же мы сразу видим слово duo и фото двух модулей. Это означает, что в одной коробке прячется два полных комплекта гарнитур для двух мотоциклистов. Обратите внимание, такой комплект чуть дешевле, чем покупать гарнитуры по одной. Поэтому, чтоб держать цену максимально низкой, я часто выкупаю комплекты duo и продаю гарнитуры по одной.
Продолжаем рассматривать коробку. На боковой стороне наклейка с серийными номерами.

На этикетке указаны серийные номера модулей. Ну и да, все мотогарнитуры Cardo собирает в Украине.
На обратной стороне упаковки перечень основных функций и характеристик мотогарнитуры. Давайте посмотрим и поговорим о каждой из них отдельно.

DMC — Dynamic Mesh Communication.
Это новейший протокол связи между мотоциклистами. Позволяет одновременно учавствовать в разговоре 15 человекам. Ок, говорить одновременно могут не более 6 человек, а слышат их все. Это имеет смысл, иначе разобрать кто и что говорит станет невозможно.
Так же протокол позволяет постоянно находиться на связи и одновременно слушать музыку. Это очень удобно. В предыдущих протоколах несколько секунд уходило на установление связи и оставаться на связи постоянно было не комфортно. Данная проблема полностью решена DMC. Если вы хотите предупредить кого-то об опасности на дороге вам не потребуется секунда другая на установку связи.
Обратите внимание, если вы намереваетесь использовать гарнитуру в профессиональных целях или для участия в соревнованиях. Задержка между моментом когда вы что-то сказали и вас услышали составляет доли секунды. Такая задержка абсолютна не критична и не заметна в обычных условиях поездки на мотоциклах. Однако она может быть критичной для связи Пилот — Штурман на соревнованиях. В этом случае забудьте о музыке и переключитесь на предыдущий протокол связи bluetooth.
Еще одним преимуществом DMC для мотоциклистов будет устойчивость связи. На картинке ниже видно, что чем больше участников тем более устойчивая связь и тем больше площадь покрытия.

Представим, что несколько мотоциклистов отстали.В этом случае они остаются на связи друг с другом. А уехавшие вперед продолжают общаться между с собой. Как только отставшие догонят основную группу — они будут автоматически объединяются с основной группой и смогут учавствовать в разговоре.
Natural voice Operation
Здесь и писать сильно не о чем — качество голоса действительно очень высокое, голоса звучат очень натурально и узнаваемо. И да, алгоритмы шумоподавления мотогарнитуры выше всяких похвал — шумы от дороги, двигателя мотоцикла полностью подавляются и не заментны тому с кем вы говорите. Это было то, что покорило меня в скалах. Говоря с вами по телефону ни кто ни когда не догадается, что вы едите на моте со скоростью выше 150 км./час
IP67 — грязе и водо защита мотогарнитуры
Стандарт описывает требования к корпусу прибора — оболочке. Первая цифра кода обозначает самую высокую степень защиты от проникновения грязи в прибор. В переводе это звучит так: пыленепроницаемая, полная защита от пыли, воздухонепроницаемая (вакуумная), тестируется в потоке воздуха более 8 часов.
Вторая цифра кода обозначает, что гарнитура может находиться в течении 30 минут на глубине до одного метра и корпус защитит устройство от проникновения влаги внутрь.
Таким образом — под дождем ездим спокойно, по крайней мере до того момента, как прийдется лезть в гарнитуру, например, чтоб заменить батарею. После этого стоит быть с гарнитурой аккуратней.
1.6 км. дальность связи.
За подробностями тестирования дальности связи можно обратиться к моей статье на этом сайте по ссылке.
Если коротко. В режиме DMC между мотоциклистами должно быть не больше 800м. на открытой местности. Если все 15 мотов выстроятся в цепочку, то 5 — 6км. от первого до последнего будет и связь будет надежная. Это в том случае, когда антенны каждой гарнитуры подняты. Не стоит забывать это делать. Поднятая антенна действительно улучшает связь.
В режиме блютуз мотогарнитуры — тех же 800 метров на открытом пространстве.
Не забывайте, частоты, на которых работает гарнитура по свойствам очень близки к свойствам света. Это значит, что за изгибом дороги вам уже слышно попутчика практически не будет.
Ну и в заключении — дальность абсолютно достаточно для обычных поездок на мотах. Вы не будете испытывать дискомфорта и вам не будет казаться, что дальности не хватает. В лесу на багги дальность будет по меньше, но багги и не растягиваются так сильно, как мотоциклы на дороге.
Universal connectivity
Универсальное подключение. Во первых вы сможете подключить одну гарнитуру другого производителя. Во вторых владелец этой гарнитуры сможет также стать участником вашей DMC группы.
Эта функция позволяет, например, приобрести пассажиру гарнитуру самого начального уровня, например Freecom2 — частенько есть у меня в продаже. И ваш пассажир почти не заметит вашей экономии. Он будет очень комфортно общаться с вами. И вашего пассажира и вас будут слышать в группе DMC. Да, чуть чуть пострадает качество его голоса — но все будет понятно и слышно. А связь с вами будет практически идеальной. Отличный вариант для тех, кто ездит не слишком часто.
Точно так же вы сможете включить в общую группу товарища с мотогарнитурой предыдущего поколенья или от другого производителя.
Simple to use
Not exactly ))). Простота в использовании. Давайте разделим вопрсо на две части: настройка гарнитуры и само использование.
Так вот, настройка. Все делается либо через приложение от Cardo либо кнопками. Помните, интерфейс управления придумывали американцы… и у них очень особые отношения с юзабилити. В общем — просто не будет. Но как только вы привыкните и поймете саму идею. Вуаля — это лучшее устройство которое у вас было. Можно настроить все и именно так, как вам хочется. Но на это уйдет время и усилия. С другой стороны, если вам не захочется углубляться в нюансы, то с основными возможностями и функциями гарнитуры вы разберетесь легко. Не забывайте, что в приложении есть раздел помощи с отличным кратким руководством. Дублирую его сюда.
13 hrs. talk time
Время разговора 13 часов. И это правда. Если вы будете все время слушать музыку на максимальной громкости и оставаться на связи в режиме DMC батареи хватит минимум на 8 часов. Этого более чем достаточно. Гарнитуру можно заряжать продолжая ею пользоваться. Так же мотогарнитура предупредит вас голосом, что батарея разряжена и после этого у вас будет еще пара часов на прослушивание музыки. Батареи действительно очень качественные. Берегите их, в конце сезона не помешает батарею полностью зарядить. Не забыть отключить гарнитуру и — на хранение. Желательно в прохладное место, но не там где возможен значительные отрицательные температуры. Тогда 5 сезонов батарея точно должна отходить.
Заглядываем в коробку
Снимаем с коробки рубашку с отличной полиграфией. Перед нами оказывается выдержанная черная коробка из плотного и качественного картона с лого производителя и голубыми торцами. Очень стильно.


Теперь пришло время открыть нашу коробочку.

Ну приятно же, когда дизайнер хорошо поработал. Сверху два модуля, каждый на своем месте в пластиковой подложке.
Посмотрим на модули поближе.

Сверху на модуле мультифункциональное колесико. Оно позволяет уменьшать или увеличивать громкость. Так же бродить по меню. Еще колесико выполняет функцию кнопки, то есть его можно не только крутить но и нажимать.
Теперь посмотрим на модуль с другой стороны.

Собственно хорошо продуманная контактная группа и этикетка.
Как же это все крепится на шлем, спросите вы. Давайте посмотрим на модуль со подключенным микрофоном и динамиками. Выглядит это следующим образом.

По моему ни чего сложного или выдающегося. Сам модуль устанавливается на площадку. От площадки отходят два провода. Один для подключения микрофона. Разъем достаточно специфический. И второй для подключения динамиков. Для динамиков разьем самый стандартный — обычный джек 3.5мм. Ну а теперь к деталям.
Установка на шлем
Площадка в которую защелкивается гарнитура состоит из двух частей и выглядит следующим образом.

На фото выше площадка с установленной прищепкой на шлем. Прищепка цепляется за шкорлупу шлема. Если возможности зацепиться нет, то в комплекте идет площадка для наклейки на шлем. Мой совет использовать прищепку. На 95% шлемов она отлично становится. И только если уж совсем ни как, тогда можно использовать пластину для приклейки. Прищепка отстегивается от площадки с помощью монетки и вместо нее ставится наклейка. Держится модуль и в том и в другом случае на отлично. Но мне все же прищепка понятней и нравится больше. Да, не забудьте, если решите приклеивать — поверхность шлема тщательно обезжирить. Точно определить место наклейки. Ну вы помните — 7 раз отмеряем и один раз клеим ))).
Далее — микрофон. В комплекте два микрофона. Один из них на гибком проводе. Он предназначен для интегралов. Это те шлемы, у которых ничего не отстегивается и не поднимается и они закрывают все лицо.

На фотографии хорошо виден разъем микрофона. Здесь все просто — приклеиваем липучку чуть сбоку от оси шлема. А уже на нее сам микрофон. Так, чтоб микрофон стоял у уголка губ. Это позволит избежать пшиканий и сыканий в микрофон.
Другой микрофон на гибкой штанге. Он для всех остальных типов шлемов.

И вот так он выглядит на шлеме.

И еще одно, сразу договоримся — комплект поставки не предназначен для установки на шлемы одна вторая или их еще полушлемами называют. Это такие:

Для установки гарнитуры на такой шлем нужен специальный адаптер. Этот адаптер не является частью комплекта поставки.

С чем мы еще не разобрались? Ах да, самое пожалуй интересное — наушники
Наушники
Давайте начнем с истории. не будем идти слишком далеко и вынесем за скобки то, чем комплектовались модели G4. Начнем с наушников 35мм. которы шли в комплекте с гарнитурами G9x, Q2, Q3, Smartpack и даже первыми версиями Packtalk. Этим наушникам абсолютно хватало громкости, нормально звучало ФМ радио и конечно было абсолютно нормальное звучание голоса.
Наушники 40мм. Ими комплектуются все современные модели, на которых нет логотипа JBL. Наушники звучат хорошо, в них абсолютно комфортно слушать музыку. Звук чуть плосковатый и ему не хватает глубины и объема.
JBL 40мм.
Далее в дело вступили инженеры JBL. В софт гарнитуры добавлен модуль обработки звука и появились профили такой обработки — вокал, бас и обычный. Так же наушники 40 мм. были доработаны и на них появился логотип JBL. Это сказалось на звуке, однозначно. Появился объем. Гитары и ударные стали звучать резче и прозрачней. На коробках моделей с такими доработками появился логотип JBL. Разница в цене составляет на сегодняшний день порядка 70$. Стоит ли оно того… не знаю… Решать вам. Кого-то и звук стандартных динамиков телевизора устраивает, а кто-то вкладывает тысячи долларов в домашние кинотеатры. Разница в звуке в домашнем кинотеатре за 1 500 долларов и за 3 000 не такая большая, как между обычными гарнитурами с динамиками 40мм и гарнитурах JBL. Так что решать только вам. Конечно в шлеме вы не получите аудиосистему как в домашней акустической системе на 3 000 долларов — мое сравнение не об этом.
JBL наушники 45мм.
Ну и последняя итерация в качестве звука это отдельный комплект наушников от JBL. Они продаются как аксессуар к гарнитурам. В комплекте идут сами наушники и код активации программы обработки звука в самой гарнитуре. Цена за такой комплект чуть более 100 долларов. Сами наушники 45мм. и да они звучат еще лучше, чем наушники 40мм с лого JBL. Еще резче и точней звуки ударных, еще чуть больше объема, еще приятней слушать музыку. Любая гарнитура, начиная со Smartpack поддерживает и профили и саунд процессинг после активации кодом из комплекта. Гарнитуры Freecom поддерживают только обработку звука, но профили не появляются. Если для вас качество звучания музыки на первом месте и вы хотите получить качество за оптимальные деньги, то ваш выбор недорогая мотогарнитура типа Smartpack, Packtalk, SmartH и наушники 45мм. как аксессуар к ней.
Ну и прежде чем вы начнете думать о замене ваших наушников несколько рекомендаций. Динамики должны быть очень точно установлены напротив ушей. Так же используйте вкладыши из комплекта, чтоб приблизить динамики к ушам. Это такие подушечки на фото ниже. Вы удивитесь насколько звук меняется когда вы правильно устанавливаете динамики.

Ну и по возможности удалите все возможные тканевые накладки, которые могут оказаться между динамиками и вашими ушами. Вы поразитесь насколько изменится звук после этого.
Отличие от обычного Packtalk
Единственное отличие мотогарнитуры Пакталк Болд от предыдущей версии Пактолк — наличие продвинутого голосового управления. Во первых стало проще управлять голосом самой гарнитурой. Теперь стало возможным делать звук громче или тише голосовой командой. Так же стало возможным повторить вызов последнего номера. Ну и самое вкусное — для вызова Сири или ОК Гугл вашего телефонного голосового ассистента теперь нет необходимости нажимать кнопку. Насколько функция голосового управления востребована — не знаю. Есть разные мнения на этот счет. Один знакомый умудряется электронные письма себе надиктовывать и отправлять сообщения в мессенджере. В то же время, многие отключают эту функцию мотогарнитуры вообще. Говорят, что гарнитура реагирует на их эмоциональное общение с проезжающими рядом машинами.
Выводы
Очень приемлемое качество звука при прослушивании музыки. Лучшее, что есть на рынке на сегодня. Если компромисы не для вас — посомтрите в сторону отдельного аксессуара наушников JBL 45mm, которые производитель продает отдельно именно для своих гарнитур. Тогда есть смысл купить модель подешевле и докупить комплект наушников к ней.
DMC режим очень удобный. Вы ощутите это если у ваших спутников будут аналогичные гарнитуры от Cardo, поддерживающие DMC. Если нет или вы ездите втроем четвером, возможно есть смысл посмотреть в сторону Freecom4, который подешевле и без DMC. Он так же есть с наушниками JBL. Поэтому качество звука музыки в вашем шлеме не пострадает.
Дальность — ее абсолютно достаточно для покатушек и дальняков. Хоть она и не такая большая, как заявляет производитель. Собственно дальность ограничена выбором частот, на которых работает гарнитура. Против физики не пойдешь — поэтому дальность гарнитур любого производителя очень ограничена. Найти что-то лучше вам не удастся.
Удобство использования — да, это новые ощущения от поездки и практически любая мотогарнитура их вам подарит.
Ну вот, на этом пока и все. Буду дополнять материал по мере поступления вопросов.
Конечно Скала)
Если большинство ваших знакомых на Скалах — у вас нет вариантов. Если большинство на Сенах — ок, берите сену. Это вопрос совместимости.
Алгоритмы подавления шума дороги у Скалы вне конкуренции. Гуглите тесты, если сомневаетесь.
Качество музыки и звука в целом. Гарнитуры scala без JBL звучат хорошо, громкости и разборчивости хватает с запасом, с приставкой JBL — если вы фанат качественной музыки.
Функционал у моделей одинакового уровня идентичен.
Это означает, что гарнитура выпущена в сотрудничестве Cardo и JBL. JBL потрудилась над наушниками и программной обработкой звука самой гарнитуры. Результат сотрудничества реально слышен. Подумайте о приобретении такой гарнитуры если вам нравится качественный звук музыки.
Freecom1 — нет функции интерком связи. Гарнитура подключается к двум устройствам типа телефона и навигатора. Качественный звук.
Freecom1+, Freecom2, Freecom2+ — гарнитуры для пассажира или для связи пассажир — пилот. Помимо телефонов есть возможность разговаривать по интеркому с одним человеком.
Freecom4, Freecom4+ JBL — связь мотоцикл-мотоцикл, дальность до 1000м, 4-6 человек в группе.
Smartpack, Packtalk, SmartH — гарнитуры верхнего уровня. DMS — mesh протокол, до 15 человек на связи.
Нюансы могут быть только с гарнитурами в названии которых есть Slim или SmartH. И со шлемами половинками — полностью открытыми. В первом случае надо убедиться, что гарнитура станет на ваш шлем. Во втором — купить специальный переходник. В остальных случаях проблем быть не должно. Модуль гарнитуры вставляется в базу. База цепляется прищепкой к скорлупе шлема или приклеивается на двухсторонний скотч. С наушниками и микрофоном проблем тоже не возникает.