Руководства
Руководство пользователя |
- Контакты
Язык
| Заголовок | Описание | Дата выпуска (Bерсия) |
файла (Размер) |
|---|---|---|---|
|
Руководство пользователя |
12.09.2016 (01) |
Загрузка (48.00MB) |
Загрузите и просмотрите документ в формате PDF. Для просмотра документов в формате PDF требуется программное обеспечение Adobe® Acrobat Reader DC®. Если у вас нет данного программного обеспечения, вы можете загрузить его, щёлкнув по ссылке «Adobe® Acrobat Reader DC®».
Язык
Руководство пользователя |
| Заголовок | Описание | Дата выпуска (Bерсия) |
файла (Размер) |
|---|---|---|---|
|
Руководство пользователя |
12.09.2016 (01) |
Загрузка (48.00MB) |
Краткий справочник |
| Заголовок | Описание | Дата выпуска (Bерсия) |
файла (Размер) |
|---|---|---|---|
|
Краткий справочник |
12.09.2016 (02) |
Загрузка (13.34MB) |
Приложения |
| Заголовок | Описание | Дата выпуска (Bерсия) |
файла (Размер) |
|---|---|---|---|
|
Заявление о сборе данных при доступе к URL-адресу, начинающемуся с “https://s.brother/” |
16.09.2022 (01) |
Загрузка (0.12MB) |
Другие |
| Заголовок | Описание | Дата выпуска (Bерсия) |
файла (Размер) |
|---|---|---|---|
|
Каталог принадлежностей |
28.03.2023 (22.10) |
Загрузка (14.55MB) |
|
|
Каталог принадлежностей (HTML) |
29.03.2023 (23.03) |
Просмотр (-) |
Загрузите и просмотрите документ в формате PDF. Для просмотра документов в формате PDF требуется программное обеспечение Adobe® Acrobat Reader DC®. Если у вас нет данного программного обеспечения, вы можете загрузить его, щёлкнув по ссылке «Adobe® Acrobat Reader DC®».
Требуется руководство для вашей Brother Innov-is F420 Швейная машина? Ниже вы можете просмотреть и загрузить бесплатно руководство в формате PDF. Кроме того, приведены часто задаваемые вопросы, рейтинг изделия и отзывы пользователей, что позволит оптимально использовать ваше изделие. Если это не то руководство, которое вы искали, – свяжитесь с нами.
Ваше устройство неисправно, и в руководстве отсутствует решение? Перейдите в Repair Café для получения бесплатных ремонтных услуг.
Руководство

Рейтинг
Сообщите нам, что вы думаете о Brother Innov-is F420 Швейная машина, оставив оценку продукта. Хотите поделиться вашими впечатлениями от данного изделия или задать вопрос? Вы можете оставить комментарий в нижней части страницы.
Довольны ли вы данным изделием Brother?
Да Нет
Будьте первым, кто оценит это изделие
0 голоса
Часто задаваемые вопросы
Наша служба поддержки выполняет поиск полезной информации по изделиям и отвечает на часто задаваемые вопросы. Если вы заметили неточность в наших часто задаваемых вопросах, сообщите нам об этом с помощью нашей контактной формы.
Как выбрать правильный размер иглы? Проверенный
Размер иглы зависит от ткани. Для более плотной ткани требуется более толстая игла. На упаковке часто можно найти указания по использованию иглы.
Это было полезно (994)
Я все проверил, но нить моей швейной машины продолжает рваться, что мне делать? Проверенный
Если верхняя нить машины продолжает рваться в месте входа иглы в ткань, возможно, игольная пластина или шпульный колпачок имеют незначительные повреждения в виде царапин и / или острых краев. Эти незначительные повреждения могут привести к обрыву нити после нескольких стежков.
Это было полезно (895)
Каков срок службы иглы швейной машины? Проверенный
Срок службы различается в зависимости от производителя, однако в целом игла будет служить примерно 8 часов. Она может сломаться не сразу, но после 8 часов она уже затупится и может повредить ткань.
Это было полезно (444)
Моя игла ломается, в чем причина? Проверенный
Для этого могут быть разные причины. Игла может быть неподходящей для выбранной ткани, возможно, игла установлена слишком низко, ткань может направляться неправильно или шпульный колпачок может быть установлен неправильно.
Это было полезно (420)
Нужно ли мне полностью выключать швейную машину, чтобы заменить иглу? Проверенный
Вы можете сменить иглу после выключения изделия с помощью переключателя включения / выключения. При чистке изделия необходимо отключить его от источника питания.
Это было полезно (320)
Содержание:
- Операции
- Комплектация
- Надежность
- Удобство использования
- Управление
- Прошиваемость материалов
- Шум
Операции
Количество операций швейной машины Brother Innov-is F420 (NV F420)— 140 шт. , в том числе десять видов петель в автоматическом режиме. Пять видов алфавита, включая и русский.
Строчек у Brother F420 очень много. Все они нарисованы под откидной крышкой. Это очень удобно- все перед глазами. Строчки разделены по функциональному назначению: основные плюс петли, три блока декоративно отделочных и алфавит. В тетьем блоке декоративно отделочных строчек есть строчки рабочие (из первого блока). Просто эти строчки можно использовать не только для шитья, но и для декоративной отделки изделий.

- Прямая (разное положение иглы, прямая горизонтальная влево и вправо)
- Зигзаги (обычный, 2-х, 3-х стежковый, стебельчатый)
- Сметочная строчка
- Краеобметочные
- Потайные
- Стегальные
- Соединительные
- Строчки-мережки
- Декоративные, гладьевые
- Штопальные
- Для аппликаций
- Для пэчворка
- Алфафит
Комплектация
В данной модели хорошая комплектация. Но очень жаль, что нет приставного столика!!!

В стандартную комплектацию входят
- Лапка для строчки зигзаг (универсальная) «J» (установлена на машине)
- Лапка для выстрачивания монограмм «N»
- Лапка для краеобметочных работ (оверлочная) «G»
- Лапка для вшивания молнии «I»
- Лапка для потайной строчки «R»
- Лапка для пришивания пуговиц «M»
- Лапка для петель «
- Набор игл 6 штук — универсальные № 75/11- 2 шт., № 90/14 — 2 шт., для трикотажа № 90/14 (золотистая колба) — 2 шт.
- Двойная игла № 75/2,0
- Шпулька — 4 шт. (одна из них установлена на машине)
- Вспарыватель
- Щеточка для чистки
- Прошивка
- Отвертка
- Отвертка дискообразная
- Горизонтальный стержень для установки катушки
- Колпачок катушки большой
- Колпачок катушки средний — 2 шт. (один из них установлен на машине)
- Колпачок катушки малый
- Вставка для катушки с нитью (Mini -King)
- Сетка для катушки
- Коленоподъемник
- Шпульный колпачок (установлен на машине)
- Педаль
- Сумка для принадлежностей
- Жесткий футляр (чехол)
- Комплект листов с координатной сеткой
- Руководство пользователя на русском языке
- Краткий справочник
- Электрический шнур
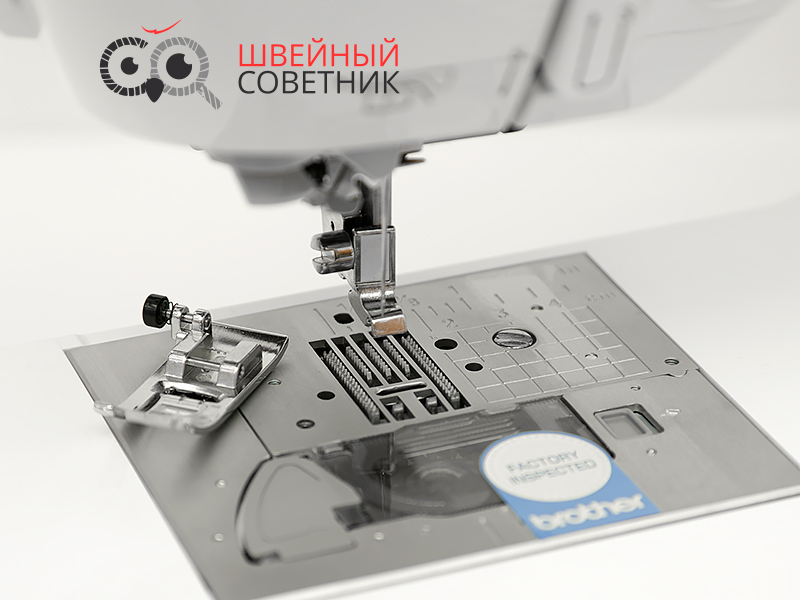
Для шитья толстых материалов можно использовать универсальную лапку. Черной кнопкой слева можно зафиксировать лапку в горизонтальном положении, если Вы нажмете ее до опускания на материал. Эта функция полезна при начале строчки от края толстой ткани или шитья поперек шва.

Например, при подходе к утолщенному месту, опустите иглу и поднимите лапку. Отожмите вниз носик лапки и вдавите черную кнопку. Лапка освободится после нескольких стежков.
Для хорошего результата шитья важную роль играет комбинация иглы, нитки и ткани. Тонкие нитки и иглы используют для тонких тканей, а толстые нити и иглы для тяжелых тканей. Для плотных тканей рекомендуем приобрести иглы для джинсы и кожи, а для эластичных — иглы стрейч или джерси. Советуем обратить особое внимание на иглы «Microtex». Они предназначены для шитья шелка, тканей из микроволокон, тканей с покрытиями и пленок. Сейчас достаточно много производителей игл, но мы отдаем предпочтение Organ и Schmetz.
- Всегда делайте образцы для проверки правильного подбора ткани-иглы-нити.
- Используйте одинаковые нити сверху и для шпули.
- Используйте стабилизирующие прокладки для тонких и эластичных тканей. Особенно это важно, если Вы делаете атласные или вышивальные строчки.
Если возникнет необходимость работать с эластичными тканями, то лапка для трикотажа будет просто необходима, а в работе с кожей или замшей поможет ролевая или тефлоновая лапка. Но все это может заменить верхний транспортер или шагающая лапка.
Комплектация может отличаться в зависимости от поставок
Надежность
В конструкции швейной машины Brother Innov-is F420 используется металлический каркас. Согласно инструкции потребляет 55 Вт.

Удобство использования
Освещение двойное светодиодное — точечное над иглой и над рабочей зоной.

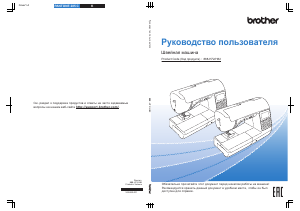
Автоматический нитевдеватель поможет заправить нить в ушко иглы за считанные секунды. Вам нужно лишь правильно заправить верхнюю нить по цифрам и стрелочкам -указателям и опустить рычажок нитевдевателя (№9), расположенный с левой стороны машины, до щелчка вниз, а затем медленно поднять рычаг в исходное положение.
Нитевдеватель можно использовать с иглами № 75-120, а также нитками от № 50 до 90. И нельзя использовать при работе с тонкими иглами № 55-70, а также при работе с двойной иглой.

Нож для обрезки нити находится ниже рычага нитевдевателя на корпусе слева. (№8)
А для челночной нити, в конце бороздки, есть специальный резак. Начать шить можно без предварительного вытягивания нижней нити

Для шитья двойной иглой устанавливаем горизонтальный стержень для установки катушки на вал устройства намотки шпульки.

В данной модели Вы не увидите колесика регулировки прижима лапки. Но это не значит, что такой функции у машины нет. Просто давление прижимной лапки регулируется на экране настроек. Выберите параметр «давление прижимной лапки»и настройте его при помощи кнопок «-» или «+».

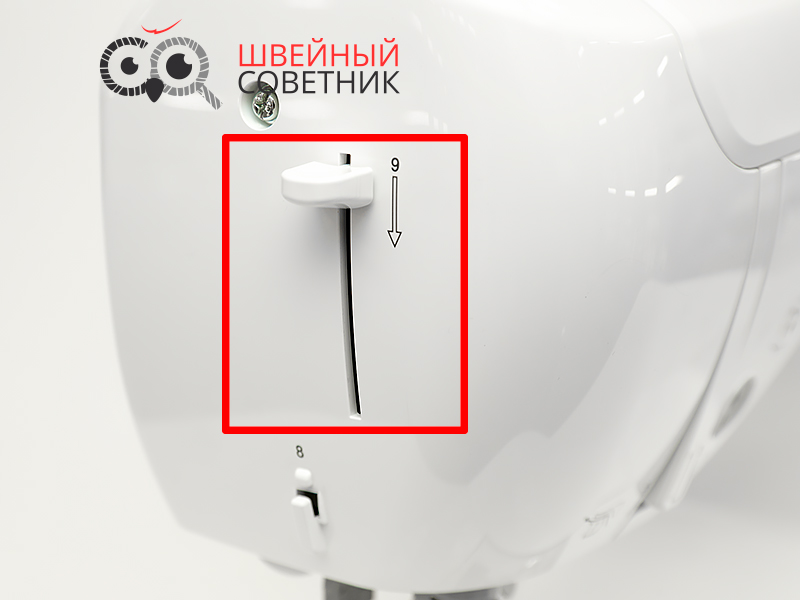
Экран монохромный, размером 3,5 дюйма, очень информативен. На нем отображаются — номер выбранной строчки, указывается рекомендуемая лапка для данной операции, автоматически заданная ширина строчки в мм и длина стежка в мм. Любая выбранная вами дополнительная операция, например закрепка /реверс, игла (одиночная-двойная) также будет высвечиваться на дисплее.

Под ним находятся две продолговатые кнопки — регулировки ширины строчки и длины стежка, регулировки натяжения нити, а также для перемещения по страницам на экране настроек и выбора параметров на экране настроек.

- Кнопка выбора предварительно заданной (основной) строчки или выбора сохраненного рисунка. Прямой выбор строчек. (Наиболее часто используемые основные строчки присвоены цифровым кнопкам. Для выбора этих строчек достаточно просто нажать соответствующую кнопку.) Также с помощью этой кнопки можно быстро извлекать часто используемые комбинации рисунков, ранее сохраненные в памяти машины.
- Кнопка основная строчка (для выбора основных рабочих строчек)- прямая, краеобметочные, петли и т.д. Нужно ввести номер требуемой строчки, используя цифровые кнопки.
- Кнопка декоративная строчка (для выбора декоративных строчек). Доступны три режима декоративных строчек 1,2,3
- Кнопка символьная строчка (для выбора алфавита) — 5 режимов (готический, рукописный, контурный, русский и японский шрифты)
- Кнопка назад для отмены операции и возвращения на предыдущий экран. Также этой кнопкой можно удалить последний рисунок, добавленный в результате сочетания символьных или декоративных строчек.
- Цифровые кнопки для быстрого выбора одной из десяти наиболее часто используемых строчек или для ввода номера требуемой строчки.
- Кнопка ОК для подтверждения выбранного параметра или операции.
- Кнопка сброса, чтобы вернуть строчке оригинальные настройки
- Кнопка памяти (memory) для сохранения созданных комбинаций строчек в памяти машины.
- Кнопка с изображением лапки блокирует все кнопки и не позволяет использовать машину. Используется при замене иглы, лапки и т.д.
- Кнопка возврата к началу рисунка.
- Кнопка настройки используется для выбора параметров шитья, а также для перехода на следующие страницы на экране настроек.
- Кнопка ножницы — автоматическая обрезка нити.Машину можно настроить так, чтобы она автоматически обрезала нити в конце строчки.Если запрограммирована обрезка нитей, то и функция автоматического выполнения обратных/закрепляющих стежков становится активна.
- Кнопка ручного сохранения в памяти. Используется для сохранения настроек ширины строчки и длины стежка, а также для сохранения настройки натяжения нити.
- Кнопка реверса (выполнение обратных стежков). Когда выбрана строчка, перед началом штья включите функцию автоматического закрепления строчки, и машина будет автоматически выполнять закрепляющие стежки ( в зависимости от рисунка строчки) в начале и в конце строчки.

Для таких операций как штопка, пришивание пуговиц, вышивка Для отключения/включения подачи ткани предусмотрен специальны регулятор (рычаг). Переключив рычаг в крайнее положение, нижний транспортер опускается и становится ниже игольной пластины. В таком положении ткань не продвигается. При нормальном шитье транспортер остается в верхнем положении.
Управление
Нажатием кнопки Пуск-Стоп можно запустить или остановить машину. Цвет кнопки зависит от режима работы машины: зеленый — машина готова к работе или уже шьет, красный — шитье невозможно, оранжевый — включена намотка шпульки.
В этом случае педалью можно не пользоваться. А скорость можно переключать электронным регулятором скорости шитья, который расположен между кнопкой ножницы и дисплеем.
Кнопка шитья в обратном направлении реверс используется для выполнения обратных или закрепляющих стежков. Нажмите кнопку и удерживайте ее и машина будет шить в обратном направлении (только для прямой строчки и зигзага). На остальных строчках будет делать только закрепочные стежки.
Кнопка закрепка выполняет один стежок несколько раз для закрепления строчки. При выполнении символьных и декоративных строчек сначала завершает шитье полного мотива. Светодиодный индикатор рядом горит, пока машинка выполняет вышивание полного рисунка и автоматически гаснет по завершении шитья.
Кнопка позиционирования иглы служит для поднятия и опускания иглы. Особенно удобно использовать при заправке нитки в иголку заправщиком, когда игла должна находиться в максимально верхнем положении.
Кнопка ножницы (обрезка нити) обрезает нитку после окончания шитья.

Опускать и поднимать прижимную лапку можно коленом. Для этого используется коленоподъемник. При этом руки остаются свободными для работы с материалом.
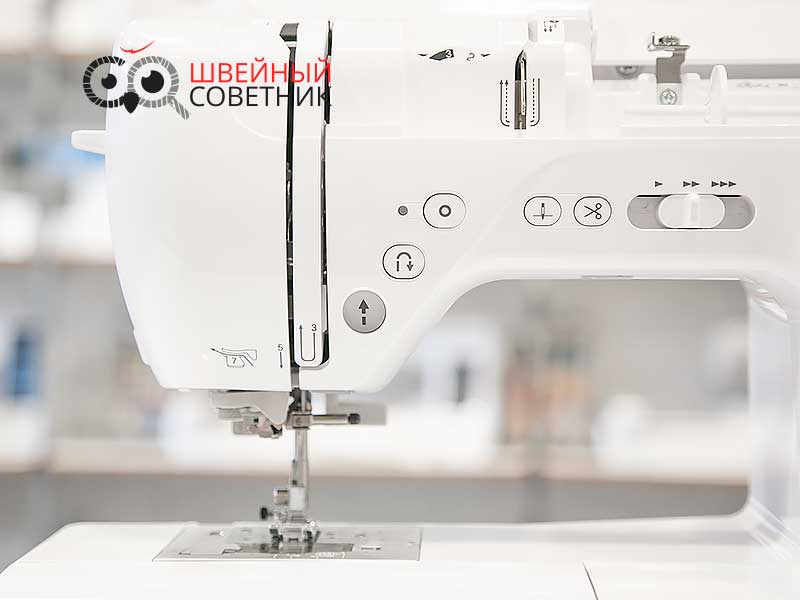
Аксессуары хранятся в выдвижном футляре.

Чехол жесткий. Пластиковый.
Прошиваемость материалов
Широкая 7-ми сегментная зубчатая рейка позволит опытным пользователям с легкостью справляться со многими видами тканей. Она обеспечивает равномерную подачу ткани и высокое качество строчки. У данной модели длина гребенок транспортной ленты длиннее, чем обычно.
Машинка Brother F420 снабжена системой SFDS. Это уникальная разработка фирмы Brother. Она обеспечивает плавную подачу материала под прижимную лапку и удержание её на месте во время образования стежка.
Особенно хочется отметить мягкость и плавность хода Brother F460 при шитье. Машинка прекрасно справилась с тонкими тканями, трикотажем, костюмными тканями, драпом. И даже легко прошила с джинсовую ткань при переходе с двух слоев ткани на восемь.
Broter F420 — это идеальный баланс между возможностями швейной машины и простотой ее использования!
Результаты проверки
- Органза в 2 сложения — Отлично
- Джинс в 8 сложений — Отлично
- Кожа тонкая — Отлично
- Трикотаж — Отлично
Проверка производилась на лапке универсальной и без дополнительных материалов и приспособлений.
Шум
При проверке на шум швейная машина Brother NV-F460 показала отличный результат — на минимальной скорости шитья вибраций и стука практически нет, о чем свидетельствует измерение шума в 48,7 Дба. В результате испытаний на максимальной скорости шитья, значение звукового давления зафиксировалось на отметке 69,1 Дба.
Измерения проводились в домашних условиях. Швейная машина располагалась на деревянном столе. Шумомер MS 6708 установлен на расстоянии 40 см от швейной машины. Погрешность шумомера ± 1,5 ДбА. Наше измерение не следует сравнивать с таблицами усредненных значений, т.к. измерение производилось исключительно по нашим ТУ.
8.6
Итоговая экспертная оценка
Эксперт не сотрудничает с рекламодателями и выставляет оценку, основываясь только на собственном мнении, ценовой категории и действует исключительно в интересах посетителей сайта Швейный Советник.

Operation Manual
Sewing Machine
Product Code: 888-H72/H82
Be sure to read this document before using the machine.
We recommend that you keep this document nearby for future reference.


INTRODUCTION
INTRODUCTION
Thank you for purchasing this machine. Before using this machine, carefully read the “IMPORTANT SAFETY
INSTRUCTIONS”, and then study this manual for the correct operation of the various functions.
In addition, after you have finished reading this manual, store it where it can quickly be accessed for future reference.
IMPORTANT SAFETY INSTRUCTIONS
Please read these safety instructions before attempting to use the machine.
DANGER — To reduce the risk of electrical shock
1Always unplug the machine from the electrical outlet immediately after using, when cleaning, making any user
servicing adjustments mentioned in this manual, or if you are leaving the machine unattended.
WARNING — To reduce the risk of burns, fire, electrical shock, or injury to
persons.
2Always unplug the machine from the electrical outlet when making any adjustments mentioned in the instruction
manual.
• To unplug the machine, switch the machine to the symbol “O” position to turn it off, then grasp the plug and pull
it out of the electrical outlet. Do not pull on the cord.
• Plug the machine directly into the electrical outlet. Do not use an extension cord.
• Always unplug your machine if there is a power failure.
3Electrical Hazards:
• This machine should be connected to an AC power source within the range indicated on the rating label. Do not
connect it to a DC power source or converter. If you are not sure what kind of power source you have, contact a
qualified electrician.
• This machine is approved for use in the country of purchase only.
4Never operate this machine if it has a damaged cord or plug, if it is not working properly, has been dropped or
damaged, or water is spilled on the unit. Return the machine to the nearest authorized Brother dealer for
examination, repair, electrical or mechanical adjustment.
• While the machine is stored or in use if you notice anything unusual, such as an odor, heat, discoloration or
deformation, stop using the machine immediately and unplug the power cord.
• When transporting the machine, be sure to carry it by its handle. Lifting the machine by any other part may
damage the machine or result in the machine falling, which could cause injuries.
• When lifting the machine, be careful not to make any sudden or careless movements, which may cause a
personal injury.
i

IMPORTANT SAFETY INSTRUCTIONS
5Always keep your work area clear:
• Never operate the machine with any air openings blocked. Keep ventilation openings of the machine and foot
control free from the build up of lint, dust, and loose cloth.
• Do not store objects on the foot controller.
• Do not use extension cords. Plug the machine directly into the electrical outlet.
• Never drop or insert foreign objects in any opening.
• Do not operate where aerosol (spray) products are being used or where oxygen is being administered.
• Do not use the machine near a heat source, such as a stove or iron; otherwise, the machine, power cord or
garment being sewn may ignite, resulting in fire or an electric shock.
• Do not place this machine on an unstable surface, such as an unsteady or slanted table, otherwise the machine
may fall, resulting in injuries.
6Special care is required when sewing:
• Always pay close attention to the needle. Do not use bent or damaged needles.
• Keep fingers away from all moving parts. Special care is required around the machine needle.
• Switch the machine to the symbol “O” position to turn it off when making any adjustments in the needle area.
• Do not use a damaged or incorrect needle plate, as it could cause the needle to break.
• Do not push or pull the fabric when sewing, and follow careful instruction when free motion stitching so that
you do not deflect the needle and cause it to break.
7This machine is not a toy:
• Your close attention is necessary when the machine is used by or near children.
• The plastic bag that this machine was supplied in should be kept out of the reach of children or disposed of.
Never allow children to play with the bag due to the danger of suffocation.
• Do not use outdoors.
8For a longer service life:
• When storing this machine, avoid direct sunlight and high humidity locations. Do not use or store the machine
near a space heater, iron, halogen lamp, or other hot objects.
• Use only neutral soaps or detergents to clean the case. Benzene, thinner, and scouring powders can damage the
case and machine, and should never be used.
• Always consult the Operation Manual when replacing or installing any assemblies, the presser feet, needle, or
other parts to assure correct installation.
9For repair or adjustment:
• If the light unit is damaged, it must be replaced by an authorized Brother dealer.
• In the event a malfunction occurs or adjustment is required, first follow the troubleshooting table in the back of
the Operation Manual to inspect and adjust the machine yourself. If the problem persists, please consult your
local authorized Brother dealer.
Use this machine only for its intended use as described in the manual.
Use accessories recommended by the manufacturer as contained in this manual.
The contents of this manual and specifications of this product are subject to change without notice.
For additional product information, visit our website at www.brother.com
ii

IMPORTANT SAFETY INSTRUCTIONS
SAVE THESE INSTRUCTIONS
This machine is intended for household use.
FOR USERS IN COUNTRIES EXCEPT EUROPEAN COUNTRIES
This appliance is not intended for use by persons (including children) with reduced
physical, sensory or mental capabilities, or lack of experience and knowledge,
unless they have been given supervision or instruction concerning use of the
appliance by a person responsible for their safety. Children should be supervised
to ensure that they do not play with the appliance.
FOR USERS IN EUROPEAN COUNTRIES
This appliance can be used by children aged from 8 years and above and persons
with reduced physical, sensory or mental capabilities or lack of experience and
knowledge if they have been given supervision or instruction concerning use of the
appliance in a safe way and understand the hazards involved. Children shall not
play with the appliance. Cleaning and user maintenance shall not be made by
children without supervision.
FOR USERS IN THE UK, EIRE, MALTA
AND CYPRUS ONLY
IMPORTANT
• In the event of replacing the plug fuse, use a fuse approved by ASTA to BS 1362, i.e. carrying the mark,
rating as marked on plug.
• Always replace the fuse cover. Never use plugs with the fuse cover omitted.
• If the available electrical outlet is not suitable for the plug supplied with this equipment, you should contact your
authorized Brother dealer to obtain the correct lead.
iii

ABOUT THIS MANUAL
ABOUT THIS MANUAL
This manual was written for several machine models.
The machine models are categorized according to their specifications and referred to as “Model” followed by a number.
Refer to the Quick Reference Guide for the model of your machine.
The screen displays may differ from the ones displayed on your machine.
Refer to the Quick Reference Guide for details on accessories and pre-programmed stitch patterns.
First, read “Functions available with each model” and “Using the utility stitch tables in the “Sewing” section” on page B-8.
WHAT YOU CAN DO WITH THIS MACHINE
B Basic operations
After purchasing your machine, be sure to read this section first. This section provides details on the initial setup
procedures as well as descriptions of this machine’s more useful functions.
Chapter 1 GETTING READY
To learn the operation of the principal parts and the screens
Chapter 2 STARTING TO SEW
To learn how to prepare for sewing and basic sewing operations
Page B-2
Page B-34
S Sewing
This section describes procedures for using the various utility stitches as well as other functions. It provides details on
basic machine sewing in addition to the more expressive features of the machine, such as sewing tubular pieces and
buttonholes.
Chapter 1 SEWING ATTRACTIVE FINISHES
Tips for sewing attractive finishes and various fabrics
Chapter 2 UTILITY STITCHES
Sew pre-programmed frequently used stitches
Page S-2
Page S-7
D Decorative sewing
This section provides instructions on sewing character stitches and decorative stitches as well as on adjusting and editing
them. In addition, it describes how to use MY CUSTOM STITCH, which allows you to create original stitch patterns.
Chapter 1 CHARACTER / DECORATIVE STITCHES
The variety of stitches widen your creativity
Chapter 2 MY CUSTOM STITCH
Create original decorative stitches
Page D-2
Page D-12
A Appendix
This section provides important information for operating this machine.
Chapter 1 MAINTENANCE AND TROUBLESHOOTING
The various maintenance and troubleshooting procedures are described.
Page A-2
iv

CONTENTS
CONTENTS
INTRODUCTION………………………………………….. i
IMPORTANT SAFETY INSTRUCTIONS …………….. i
ABOUT THIS MANUAL ……………………………….. iv
WHAT YOU CAN DO WITH THIS MACHINE…. iv
B Basic operations
Chapter 1 GETTING READY 2
Names of Machine Parts and Their Functions …… 2
Machine …………………………………………………………………….. 2
Needle and presser foot section ………………………………………….. 3
Operation buttons………………………………………………………… 3
Operation panel and operation keys ……………………………….. 4
Using the flat bed attachment ………………………………………… 5
Included accessories …………………………………………………….. 6
Optional accessories…………………………………………………….. 7
Functions available with each model ………………………………. 8
Using the utility stitch tables in the “Sewing” section …………. 8
Turning the Machine On/Off………………………….. 9
Turning on the machine………………………………………………. 10
Turning off the machine………………………………………………. 10
Select machine setting for the first time ………………………….. 10
LCD ………………………………………………………….. 11
Viewing the LCD ……………………………………………………….. 11
Settings screen …………………………………………………………… 12
Choosing the display language ……………………………………… 14
Adjusting input sensitivity for operation keys ………………….. 14
Winding/Installing the Bobbin………………………. 15
Winding the bobbin ……………………………………………………. 15
Installing the bobbin …………………………………………………… 18
Upper Threading ………………………………………… 21
Threading the upper thread………………………………………….. 21
Threading the needle ………………………………………………….. 23
Threading the needle manually (without using the needle
threader) …………………………………………………………………… 24
Pulling up the bobbin thread………………………………………… 25
Using the twin needle …………………………………………………. 26
Fabric/Thread/Needle Combinations …………….. 28
Replacing the Needle ………………………………….. 29
Checking the needle …………………………………………………… 29
Replacing the needle ………………………………………………….. 29
Replacing the Presser Foot …………………………… 31
Replacing the presser foot……………………………………………. 31
Removing and attaching the presser foot holder………………. 32
Chapter 2 STARTING TO SEW 34
Sewing………………………………………………………. 34
Stitch selection methods ……………………………………………… 34
Selecting a stitch pattern ……………………………………………… 35
Sewing a stitch…………………………………………………………… 36
Sewing reinforcement stitches………………………………………. 38
Automatic reinforcement stitching ………………………………… 38
Setting the Stitch ………………………………………… 40
Setting the stitch width………………………………………………… 40
Setting the stitch length ……………………………………………….. 40
Setting the thread tension…………………………………………….. 41
Saving stitch settings …………………………………………………… 42
Useful Functions…………………………………………. 43
Automatically cutting the thread …………………………………… 43
Mirroring stitches……………………………………………………….. 43
Adjusting the presser foot pressure ………………………………… 44
Hands-free raising and lifting of the presser foot………………. 44
Stitch Setting Chart …………………………………….. 45
S Sewing
Chapter 1
Sewing Tips …………………………………………………. 2
Trial sewing…………………………………………………………………. 2
Changing the sewing direction
Sewing curves ……………………………………………………………… 2
Sewing cylindrical pieces………………………………………………. 2
Sewing an even seam allowance …………………………………….. 3
Sewing Various Fabrics …………………………………. 4
Sewing thick fabrics ……………………………………………………… 4
Sewing thin fabrics……………………………………………………….. 5
Sewing stretch fabrics……………………………………………………. 5
Sewing leathers or vinyl fabrics ………………………………………. 5
Sewing hook-and-loop fastener tape………………………………… 6
Chapter 2 UTILITY STITCHES 7
Basic Stitching……………………………………………… 7
Basting ……………………………………………………………………….. 7
Basic stitching ……………………………………………………………… 7
Blind Hem Stitching ……………………………………… 9
Overcasting Stitches …………………………………… 12
Sewing overcasting stitches using overcasting foot “G” …….. 12
Sewing overcasting stitches using zigzag foot “J”……………… 13
Sewing overcasting stitches using the side cutter
(sold separately with some models) ……………………………….. 13
Buttonhole Stitching/Button Sewing ……………… 15
Buttonhole sewing………………………………………………………. 15
Button sewing ……………………………………………………………. 18
Zipper Insertion …………………………………………. 20
Inserting a centered zipper …………………………………………… 20
Inserting a side zipper …………………………………………………. 21
Zipper/piping Insertion ……………………………….. 24
Inserting a centered zipper …………………………………………… 24
Inserting a piping………………………………………………………… 25
Sewing Stretch Fabrics and Elastic Tape…………. 26
Stretch stitching………………………………………………………….. 26
Elastic attaching …………………………………………………………. 26
Appliqué, Patchwork and Quilt Stitching……….. 27
Appliqué stitching ………………………………………………………. 27
Patchwork (crazy quilt) stitching……………………………………. 28
Piecing……………………………………………………………………… 28
Quilting…………………………………………………………………….. 30
Free motion quilting……………………………………………………. 31
Satin stitching using the sewing speed controller ……………… 32
Reinforcement Stitching………………………………. 34
Triple stretch stitching …………………………………………………. 34
Bar tack stitching………………………………………………………… 34
Darning…………………………………………………………………….. 35
Eyelet Stitching ………………………………………….. 37
Attaching Patches or Emblems to Shirt Sleeves
Decorative Stitching …………………………………… 40
Fagoting ……………………………………………………………………. 40
Scallop stitching…………………………………………………………. 41
Smocking ………………………………………………………………….. 41
Shell tuck stitching ……………………………………………………… 42
Joining………………………………………………………………………. 42
Heirloom stitching………………………………………………………. 43
SEWING ATTRACTIVE FINISHES
………………………………………….. 2
…. 38
2
v

CONTENTS
D Decorative sewing
Chapter 1 CHARACTER / DECORATIVE
STITCHES 2
Sewing the Various Built-in Decorative Patterns
Selecting stitch patterns …………………………………………………. 2
Deleting a pattern…………………………………………………………. 3
Sewing attractive finishes ………………………………………………. 3
Basic sewing ……………………………………………………………….. 4
Combining patterns………………………………………………………. 5
Repeating combined patterns …………………………………………. 5
Checking the selected pattern…………………………………………. 6
Changing the pattern size ………………………………………………. 6
Changing the stitch density…………………………………………….. 6
Changing the pattern length …………………………………………… 7
Changing character spacing …………………………………………… 7
Creating step stitch patterns……………………………………………. 7
Mirroring a pattern image………………………………………………. 8
Returning to the beginning of the pattern………………………….. 9
Saving a pattern……………………………………………………………. 9
Retrieving a pattern …………………………………………………….. 10
Realigning the pattern …………………………………………………. 10
Chapter 2 MY CUSTOM STITCH 12
Designing a Stitch……………………………………….. 12
Drawing a sketch of the pattern…………………………………….. 12
Entering the pattern data………………………………………………. 12
Examples of designs ……………………………………………………. 14
…. 2
A Appendix
Chapter 1 MAINTENANCE AND
TROUBLESHOOTING 2
Care and Maintenance…………………………………… 2
Restrictions on oiling…………………………………………………….. 2
Precautions on storing the machine…………………………………. 2
Cleaning the LCD screen……………………………………………….. 2
Cleaning the machine surface ………………………………………… 2
Cleaning the race …………………………………………………………. 2
Troubleshooting……………………………………………. 4
Frequent troubleshooting topics ……………………………………… 4
Upper thread tightened up …………………………………………….. 4
Tangled thread on wrong side of fabric ……………………………. 5
Incorrect thread tension…………………………………………………. 6
Fabric is caught in the machine and cannot be removed …….. 8
If the thread becomes tangled under the bobbin winder seat
List of symptoms…………………………………………………………. 12
Error messages……………………………………………………………. 18
Operation beep………………………………………………………….. 20
Nothing appears in the LCD…………………………………………. 20
Index ………………………………………………………… 21
….. 10
vi

Basic
operations
This section provides details on the initial setup procedures as well as descriptions of this
machine’s more useful functions.
Page number starts with “B” in this section.
Chapter1 GETTING READY…………………………………………….B-2
Chapter2 STARTING TO SEW ……………………………………….B-34

Names of Machine Parts and Their Functions
a
b
c
d
e
f
h
k
l
m
n
o
g
i
j
Chapter 1
GETTING READY
Names of Machine Parts and Their Functions
The names of the various parts of the machine and their functions are described below. Before using the machine,
carefully read these descriptions to learn the names of the machine parts and their locations.
Machine
■ Front view
C Thread cutter
Pass the threads through the thread cutter to cut them.
D Needle threader lever
Use the needle threader lever to thread the needle.
E Thread tension dial
(Equipped on some models. Refer to page B-8)
Use the dial to adjust the upper thread tension. (page B-41)
■ Right-side/rear view
1 Top cover
Open the top cover to place the spool of thread on the spool
pin.
2 Thread guide plate
Pass the thread around the thread guide plate when threading
the upper thread.
3 Bobbin winding thread guide and pretension disk
Pass the thread under this thread guide and around the
pretension disk when winding the bobbin thread.
4 Spool cap
Use the spool cap to hold the spool of thread in place.
5 Spool pin
Place a spool of thread on the spool pin.
6 Bobbin winder
Use the bobbin winder when winding the bobbin.
7 LCD (liquid crystal display)
Settings for the selected stitch and error messages appear in
the LCD. (page B-11)
8 Operation panel
From the operation panel, stitch settings can be selected and
edited, and operations for using the machine can be selected.
(page B-4)
9 Knee lifter mounting slot
Insert the knee lifter into the knee lifter mounting slot.
0 Knee lifter
Use the knee lifter to raise and lower the presser foot.
(page B-44)
A Operation buttons and sewing speed controller
Use these buttons and the slide to operate the machine.
(page B-3)
B Flat bed attachment
Insert the presser foot accessory tray into the accessory
compartment of the flat bed attachment. Remove the flat bed
attachment when sewing cylindrical pieces such as sleeve
cuffs.
B-2
1 Handwheel
Turn the handwheel toward you (counterclockwise) to raise and
lower the needle to sew one stitch.
2 Handle
Carry the machine by its handle when transporting.
3 Presser foot lever
Raise and lower the presser foot lever to raise and lower the
presser foot.
4 Feed dog position switch
Use the feed dog position switch to raise and lower the feed
dogs. (page S-31)
5 Main power switch
Use the main power switch to turn the machine on and off.
6 Power supply jack
Insert the plug on the power supply cord into the power supply
jack.
7 Foot controller
Depress the foot controller to control the speed of the machine.
(page B-37)
8 Air vent
The air vent allows the air surrounding the motor to circulate.
Do not cover the air vent while the machine is being used.
9 Foot controller jack
Insert the plug on the end of the foot controller cable into the
foot controller jack.

Names of Machine Parts and Their Functions
Needle and presser foot section
i
h
g
f
e
1 Needle bar thread guide
Pass the upper thread through the needle bar thread guide.
2 Needle plate
The needle plate is marked with guides for sewing straight
seams.
3 Needle plate cover
Remove the needle plate cover to clean the bobbin case and
race.
4 Bobbin cover/bobbin case
Remove the bobbin cover, and then insert the bobbin into the
bobbin case.
5 Feed dogs
The feed dogs feed the fabric in the sewing direction.
6 Presser foot
The presser foot applies pressure consistently on the fabric as
the sewing takes place. Attach the appropriate presser foot for
the selected stitch.
7 Presser foot holder
The presser foot is attached onto the presser foot holder.
8 Presser foot holder screw
Use the presser foot holder screw to hold the presser foot in
place. (page B-32)
9 Buttonhole lever
Lower the buttonhole lever when sewing buttonholes and bar
tacks or when darning.
d
a
c
Operation buttons
b
1 “Start/Stop” button
Press the “Start/Stop” button to start or stop sewing. The
machine stitches at a slow speed at the beginning of sewing
while the button is pressed. When sewing is stopped, the
needle is lowered in the fabric. For details, refer to “STARTING
TO SEW” on page B-34.
The button changes color according to the machine’s
operation mode.
Green: The machine is ready to sew or is sewing.
Red: The machine can not sew.
Orange: The machine is winding the bobbin thread, or
2 Reverse stitch button
For straight, zigzag, and elastic zigzag stitch patterns that use
reverse stitches, the machine will sew reverse stitches at low
speed only while holding down the Reverse stitch button. The
stitches are sewn in the opposite position.
For other stitches, use this button to sew reinforcement
stitches at the beginning and end of sewing. Press and hold
this button, and the machine sews 3 stitches in the same spot
and stops automatically. (page B-38)
3 Reinforcement stitch button
Use this button to sew a single stitch repeatedly and tie-off.
For character/decorative stitches, press this button to end with
a full stitch instead of at a mid-point. The LED light beside this
button lights up while the machine is sewing a full motif, and
automatically turns off when the sewing is stopped. (page B-
38)
4 Needle position button
Press the needle position button to raise or lower the needle.
Pressing the button twice sews one stitch.
5 Thread cutter button
Press the thread cutter button after sewing is stopped to cut
both the upper and the bobbin threads. For details, refer to
step
j under “Sewing a stitch” on page B-36.
6 Sewing speed controller
Slide the sewing speed controller to adjust the sewing speed.
B
GETTING READY
the bobbin winder shaft is moved to the right
side.
• Do not press (Thread cutter button) after
the threads have already been cut, otherwise
the needle may break, the threads may
become tangled or damage to the machine
may occur.
Basic operations B-3

Names of Machine Parts and Their Functions
Operation panel and operation keys
a
b
c
d
e
f
g
h
l
k
j
i
The keys with * are lit while they are ON.
1 LCD (liquid crystal display)
Settings for the selected stitch and error messages for
incorrect operations appear in the LCD.
For details, refer to “LCD” on page B-11
2 Stitch width keys/Settings screen page selection
keys
Press to adjust the stitch width or to move to previous/next
pages in the settings screen.
3 Preset utility stitch/saved pattern key *
Press to select the utility stitch assigned to a numeric key or to
retrieve a pattern that has been saved.
4 Utility stitch key *
Press to select a utility stitch.
5 Decorative stitch key *
Press to select a decorative stitch.
6 Character stitch key *
Press to select a character stitch.
7 Back key
Press this key to cancel the operation and return to the
previous screen.
In addition, pressing this key removes the last pattern added
when combining characters or decorative stitches.
8 Numeric keys
Use these keys to quickly select one of the ten most often used
stitches. When selecting other stitches, use these keys to type
in the number of the desired stitch.
9 OK key
Press to apply the selection or perform the operation.
0 Reset key
Press to reset the selected stitch to its original settings.
A Memory key
Press to save stitch pattern combinations to machine memory.
B Presser foot/Needle exchange key
Press this key before changing the needle, the presser foot,
etc.
This key locks all key and button functions to prevent operation
of the machine.
C Back to beginning key
Press this key to return to the beginning of the pattern.
D Settings key
Press to select sewing settings or other settings, or to move to
next pages in the settings screen.
s
r
q
p
o
n
m
E Automatic thread cutting key *
Press to select the automatic thread cutting function.
F Manual memory key
Press to save the adjusted stitch width and length settings. For
models equipped with the thread tension keys (Refer to
page B-8.), the thread tension setting is also saved.
G Automatic reverse/reinforcement key *
Press to use the automatic reverse/reinforcement stitching
function.
H Thread tension keys (Equipped on some models.
Refer to page B-8)/Value selection keys
Press to adjust the thread tension or to change the value of the
selected item in the settings screen.
I Stitch length keys/Item selection keys
Press to adjust the stitch length or to select the next/previous
items in the settings screen.
• The operation keys of this machine are
capacitive touch sensors. Operate the keys by
directly touching them with your finger.
The response of the keys varies according to the
user.
The pressure exerted on the keys does not affect
the response of the keys.
• Since the operation keys react differently
depending on the user, adjust the setting for the
input sensitivity. (page B-14)
• When using an electrostatic touch pen, make
sure that its point is 8 mm or more. Do not use a
touch pen with a thin point or a unique shape.
B-4

Using the flat bed attachment
Pull the top of the flat bed attachment to open the accessory
compartment.
A presser foot accessory tray is stored in the accessory
compartment of the flat bed attachment.
Names of Machine Parts and Their Functions
B
GETTING READY
a
b
1 Storage space of the flat bed attachment
2 Presser foot accessory tray
Basic operations B-5

Names of Machine Parts and Their Functions
Included accessories
Included accessories may differ from the table below depending on your model. For more details on included accessories and
their part codes of your machine, refer to the Quick Reference Guide.
1. 2. 3. 4. 5. 6.
N
Zigzag foot “J” (on machine) Monogramming foot “N” Overcasting foot “G” Zipper foot “I” Blind stitch foot “R” Button fitting foot “M”
M
7. 8. 9. 10. 11. 12.
Buttonhole foot “A”
Needle set
*1
Twin needle
*2
Bobbin (4)
(One is on machine.)
Seam ripper Cleaning brush
13. 14. 15. 16. 17. 18.
Eyelet punch Screwdriver Disc-shaped screwdriver Horizontal spool pin Spool cap (large) Spool cap (medium) (2)
(One is on machine.)
19. 20. 21. 22. 23. 24.
Spool cap (small) Thread spool insert
(mini king thread spool)
Spool net Knee lifter Bobbin case (on machine) Foot controller
25. 26. 27. 28.
Accessory bag Grid sheet set Operation Manual Quick Reference Guide
*1
75/11 2 needles, 90/14 2 needles, 90/14 2 needles: Ball point needle (gold colored)
*2
2/11 needle
B-6

Names of Machine Parts and Their Functions
Optional accessories
The following are available as optional accessories to be purchased separately. Optional accessories differ depending on your
model. For more optional accessories and their part codes, refer to the Quick Reference Guide.
1. 2. 3. 4. 5. 6.
Quilting foot Walking foot 1/4″ quilting foot 1/4″ quilting foot with guide Quilting guide Side cutter “S”
7. 8. 9. 10. 11. 12.
B
GETTING READY
Open toe foot Free motion open toe
13.
Straight stitch foot and
needle plate set
• To obtain optional accessories or parts, contact your authorized Brother dealer.
• All specifications are correct at the time of printing. Please be aware that some specifications may change without
notice.
• A variety of feet are available to enable different types of stitching and finishes. Visit your nearest authorized Brother
dealer for a complete listing of optional accessories available for your machine.
• Always use accessories recommended for this machine.
quilting foot “O”
Non stick foot Stitch guide foot “P” Adjustable zipper/piping
foot
Roller foot
Basic operations B-7

Names of Machine Parts and Their Functions
Functions available with each model
Specifications differ depending on the machine model. For
the functions available with your sewing machine model,
refer to the table below. Refer to the Quick Reference Guide
for the model of your sewing machine.
Model 2 Model 1 Page
Fine adjustment
horizontal (setting)
Size selection
(setting)
Step stitch pattern
Thread tension dial
Thread tension key
*1
Pattern size can be changed for decorative stitches, satin
stitches and all fonts of character stitches.
*2
Pattern size can be changed for character stitches other
than handwriting font.
9
99
9
−
9
−
−
9
−
D-10
D-6
D-7
B-41
B-41
Using the utility stitch tables in the “Sewing”
section
The utility stitch numbers differ depending on the model of
your machine. Refer to the Quick Reference Guide for the
model of your sewing machine.
Stitch name Stitch
Basting stitch 1-08 08 07
Straight stitch (Left)
Straight stitch (Middle) 1-03
Triple stretch stitch 1-05
Model 4
Stitch number
1-01
1-02
Model 3, 2
* 01*
01
* 02*
02
* 03*
03
* 05*
05
Model 1
Presser foot
J
B-8

Turning the Machine On/Off
Turning the Machine On/Off
• Use only regular household electricity for the power source. Using other power sources may result in fire,
electric shock, or damage to the machine.
• Make sure that the plugs on the power cord are firmly inserted into the electrical outlet and the power
cord receptacle on the machine. Otherwise, a fire or electric shock may result.
• Do not insert the plug on the power cord into an electrical outlet that is in poor condition.
• Turn the main power to OFF and remove the plug in the following circumstances:
When you are away from the machine
After using the machine
When the power fails during use
When the machine does not operate correctly due to a bad connection or a disconnection
During electrical storms
• Use only the power cord included with this machine.
• Do not use extension cords or multi-plug adapters with any other appliances plugged into them. Fire or
electric shock may result.
• Do not touch the plug with wet hands. Electric shock may result.
• When unplugging the machine, always turn the main power to OFF first. Always grasp the plug to remove
it from the electrical outlet. Pulling on the cord may damage the cord, or lead to fire or electric shock.
• Do not allow the power cord to be cut, damaged, modified, forcefully bent, pulled, twisted, or bundled.
Do not place heavy objects on the cord. Do not subject the cord to heat. These things may damage the
cord, or cause fire or electric shock. If the cord or plug is damaged, take the machine to your authorized
Brother dealer for repairs before continuing use.
• Unplug the power cord if the machine is not to be used for a long period of time. Otherwise, a fire may
result.
• When leaving the machine unattended, either the main switch of the machine should be turned to OFF or
the plug must be removed from the electrical outlet.
• When servicing the machine or when removing covers, the machine must be unplugged.
•(For U.S.A. only)
This appliance has a polarized plug (one blade wider than the other). To reduce the risk of electrical
shock, this plug is intended to fit in a polarized electrical outlet only one way.
If the plug does not fit fully in the electrical outlet, reverse the plug. If it still does not fit, contact a
qualified electrician to install the proper electrical outlet. Do not modify the plug in any way.
B
GETTING READY
Basic operations B-9

Turning the Machine On/Off
Turning on the machine
Make sure that the machine is turned off (the main
a
power switch is set to “ ”), and then plug the power
cord into the power supply jack on the right side of the
machine.
Insert the plug of the power cord into a household
b
electrical outlet.
1 Power supply jack
2 Main power switch
Press the right side of the main power switch on the
c
right side of the machine to turn the machine on (set it
to “I”).
Turning off the machine
When you are finished using the machine, turn it off. In
addition, before transporting the machine to another location,
be sure to turn it off.
Make sure that the machine is not sewing.
a
Press the main power switch on the right side of the
b
machine in the direction of the “ ” symbol to turn
the machine off.
Select machine setting for the first time
When you first turn on the machine, select the language of
your choice. Follow the procedure below when the settings
screen appears automatically.
Use the “-” or “+” key to choose the desired language.
a
→ The light, LCD and the “Start/Stop” button light up
when the machine is turned on.
• When the machine is turned on, the needle and
the feed dogs will make a sound when they move;
this is not a malfunction.
• If the machine is turned off in the middle of sewing
in the “Sewing” function, the operation will not
resume after turning the power on again.
b
Press .
B-10

LCD
LCD
Viewing the LCD
When the power is turned on, the LCD comes on, and the following screen is displayed. The screen will vary slightly depending
on your machine model.
The screen is changed using the keys below the LCD.
No. Display Item Name Explanation Page
1 Presser foot Shows presser foot to be used. B-31
2 — Stitch preview Shows a preview of the selected stitch. B-35
3 Stitch category Shows the category of the currently selected stitch pattern.
: Preset utility stitch
: Utility stitch
: Decorative stitch (category 1)
: Decorative stitch (category 2)
: Decorative stitch (category 3)
: Character stitch (Gothic font)
: Character stitch (Handwriting font)
: Character stitch (Outline)
: Character stitch (Cyrillic font)
: Character stitch (Japanese font)
4 — Stitch number Shows the number of the currently selected stitch pattern. B-45
5 Needle position setting Shows single or twin needle mode setting, and the needle stop position.
: Single needle/down position
: Single needle/up position
: Twin needle/down position
: Twin needle/up position
6 Single/repeat sewing Shows single or continuous patterns sewing mode setting.
: Single sewing mode
: Repeat sewing mode
7 Horizontal mirror image Appears when the stitch is mirrored. B-43
8 Stitch width Shows the stitch width of the currently selected stitch pattern. B-40
B-34
B-12
D-5
B
GETTING READY
9 Stitch length Shows the stitch length of the currently selected stitch pattern. B-40
0 Thread tension
(Equipped on some
models. Refer to page B-8)
Shows the automatic thread tension setting for the currently selected stitch pattern. B-41
Basic operations B-11

LCD
Settings screen
Press to change various sewing machine operations and sewing settings.
Press to move to previous/next pages.
* You can also move to next pages by pressing .
Press to select the next/previous items.
* Press (Downward arrow) to select the next item.
* Press (Upward arrow) to select the previous item.
Press to change the value of the selected item.
• The parameters in the settings screens differ depending on the model of your machine.
B-12
1 Page number
2 Machine settings
3 Value
1 Use to check the pattern when the specified pattern is not displayed on the screen. For details, refer to “Checking the selected
pattern” in the “Decorative sewing” section.
2 Select the needle stop position (the needle position for when the machine is not being operated) to be up or down.
3 Set to “ON” when using twin needle. For details, refer to “Using the twin needle” on page B-26.
4 Allows the stitch width to be adjusted using the sewing speed controller. For details, refer to “Satin stitching using the sewing
speed controller” in the “Sewing” section.
5 Select either “01 Straight stitch (Left)” or “03 Straight stitch (Middle)” as the utility stitch that is automatically selected when the
machine is turned on.
6 Changes the stitch length when 7 mm satin stitch patterns are selected. For details, refer to “Changing the pattern length” in the
“Decorative sewing” section.
7 Changes the thread density when satin stitch patterns are selected. For details, refer to “Changing the stitch density” in the
“Decorative sewing” section.
8 Changes the character spacing. For details, refer to “Changing character spacing” in the “Decorative sewing” section.

LCD
B
9 Changes the size of the stitch pattern. For details, refer to “Changing the pattern size” in the “Decorative sewing” section.
0 When set to “ON” you can sew the mirror image of a stitch horizontally (left and right). For details on this function, refer to
“Mirroring stitches” on page B-43.
A Select either “single sewing” or “repeated sewing” for combined patterns. For details on this function, refer to “Repeating
combined patterns” on page D-5.
B Adjust the presser foot pressure. The higher the number, the greater the pressure will be. For details on this function, refer to
“Adjusting the presser foot pressure” on page B-44.
C Adjusts the up and down position of the pattern. For details, refer to “Realigning the pattern” in the “Decorative sewing” section.
D Adjusts the left and right position of the pattern. (Equipped on some models. Refer to page B-8.) For details on this function, refer
to “Realigning the pattern” in the “Decorative sewing” section.
E Specifies whether or not a beep is sounded with each operation. For details, refer to “Operation beep” in the “Appendix” section.
F Switches the needle area and work area lights to remain “ON” or “OFF”.
G Adjusts the brightness of the LCD.
H When set “ON”, reinforcement stitches are sewn at the beginning and/or end of sewing for a reinforcement stitch pattern, even
when the reverse button is pressed. For details, refer to “Automatic reinforcement stitching” on page B-38.
I Select the level of the input sensitivity for operation keys. For details, refer to “Adjusting input sensitivity for operation keys” on
page B-14.
J Selects the display language. For details, refer to “Choosing the display language” on page B-14.
K Displays the program version.
GETTING READY
• Press or to return to the original screen.
Basic operations B-13

LCD
Choosing the display language
Press .
a
Select (Language) display.
b
Use the “-” or “+” key to choose the desired language.
c
Press to return to the original screen.
d
Adjust the input sensitivity by pressing the “-” or “+”
c
key.
• The lower the setting, the less sensitive the keys will
be; the higher the setting, the more sensitive the keys
will be. The default setting is “3”.
• We recommend selecting the highest setting if
an electrostatic touch pen is being used.
• While adjusting the input sensitivity, press any of
the numeric keys to check the sensitivity.
When the key responds, the setting value
indicating the sensitivity blinks.
Adjusting input sensitivity for operation keys
You can adjust the sensitivity of the operation keys to five
levels. Display the settings screen to set desired level.
■ If the machine does not respond when an
operation key is pressed
Turn machine off, then hold down (Needle position
button) and turn on the machine to reset the settings.
Display the settings screen, and then adjust the settings
again.
a
b
B-14
1 Operation keys
Press .
Select (Input sensitivity) in the settings screen.

Winding/Installing the Bobbin
Winding/Installing the Bobbin
Place the bobbin on the bobbin winder shaft so that the
b
spring on the shaft fits into the notch in the bobbin
Press down on the bobbin until it snaps into place.
.
B
• Only use the Bobbin (part code: SA156, SFB:
XA5539-151) designed specifically for this
machine. Use of any other bobbin may result
in injuries or damage to the machine.
• The included bobbin was designed specifically
for this machine.
If bobbins from other models are used, the
machine will not operate correctly. Use only
the included bobbin or bobbins of the same
type (part code: SA156, SFB: XA5539-151).
SA156 is Class15 type bobbin.
* Made of plastic
1 This model
2 Other models
3 11.5 mm (approx. 7/16 inch)
1
2
1 Notch
2 Bobbin winder shaft spring
Slide the bobbin winder in the direction of the arrow
c
until it snaps into place.
• The “Start/Stop” button lights up in orange.
Remove the spool cap that is inserted onto the spool
d
pin.
GETTING READY
• When the foot controller is connected, bobbin
winding can be started and stopped with the foot
controller.
Winding the bobbin
This section describes how to wind thread onto a bobbin.
Open the top cover.
a
1 Spool pin
2 Spool cap
Place the spool of thread for the bobbin onto the spool
e
pin.
Slide the spool onto the pin so that the spool is
horizontal and the thread unwinds to the front at the
bottom.
• If the spool is not positioned so that the thread
unwinds correctly, the thread may become tangled
around the spool pin.
Basic operations B-15

Winding/Installing the Bobbin
Slide the spool cap onto the spool pin.
f
Slide the spool cap as far as possible to the right, as
shown, with the rounded side on the left.
• When using the spool as shown below, use the
small spool cap, and leave a small space between
the cap and the spool.
• If the spool or the spool cap is not installed
correctly, the thread may become tangled
around the spool pin, causing the needle to
break.
• Three spool cap sizes are available, allowing
you to choose a spool cap that best fits the size
of spool being used. If the spool cap is too
small for the spool being used, the thread may
catch on the slit in the spool or the machine
may be damaged. When using mini king thread
spool, use the thread spool insert (mini king
thread spool).
For details on thread spool insert (mini king
thread spool), refer to “Memo” on page B-16.
c
a
1 Spool cap (small)
2 Spool (cross-wound thread)
3 Space
• When using thread that winds off quickly, such as
transparent nylon thread or metallic thread, place
the spool net over the spool before placing the
spool of thread onto the spool pin.
If the spool net is too long, fold it to fit the size of
the spool.
1
3
b
2
4
1 Spool net
2 Spool
3 Spool cap
4 Spool pin
• If a spool of thread whose core is 12 mm (1/2
inch) in diameter and 75 mm (3 inches) high is
inserted onto the spool pin, use the thread spool
insert (mini king thread spool).
1 Thread spool insert (mini king thread spool)
2 12 mm (1/2 inch)
3 75 mm (3 inches)
B-16

Winding/Installing the Bobbin
While holding the thread near the spool with your right
g
hand, as shown, pull the thread with your left hand,
and then pass the thread behind the thread guide cover
and to the front.
1
1 Thread guide cover
Pass the thread under the thread guide plate, and then
h
pull it to the right.
While holding the thread with your left hand, wind the
j
thread that was pulled out clockwise around the
bobbin five or six times with your right hand.
• Make sure that the thread between the spool and
the bobbin is pulled tight.
• Be sure to wind the thread clockwise around the
bobbin, otherwise the thread will become
wrapped around the bobbin winder shaft.
Pass the end of the thread through the guide slit in the
k
bobbin winder seat, and then pull the thread to the
right to cut it.
B
GETTING READY
1 Thread guide plate
Pass the thread under the hook on the thread guide,
i
and then wind it counterclockwise under the
pretension disk.
1 Thread guide
2 Pretension disk
3 Pull it in as far as possible
• Make sure that the thread passes under the
pretension disk.
1 Guide slit in bobbin winder seat
(with built-in cutter)
• Be sure to cut the thread as described. If the
bobbin is wound without cutting the thread
using the cutter built into the slit in the bobbin
winder seat, the thread may become tangled in
the bobbin or the needle may bend or break
when the bobbin thread starts to run out.
Slide the sewing speed controller to the right.
l
1
1 Speed controller
• Bobbin winding speeds may vary depending on
type of thread being wound on bobbin.
Turn on the machine.
m
Basic operations B-17

Winding/Installing the Bobbin
Press the “Start/Stop” button once to start winding the
n
bobbin.
When the foot controller is plugged in, press down on
the foot controller.
1
1 “Start/Stop” button
• If the bobbin winder shaft is set to the right side,
the needle will not move. (Sewing is impossible.)
Slide the sewing speed controller back to desired
r
sewing speed position.
Remove the spool for the bobbin thread from the spool
s
pin.
• When the machine is started or the handwheel is
turned after winding the bobbin, the machine will
make a clicking sound; this is not a malfunction.
• When winding transparent nylon thread on the
bobbin, stop bobbin winding when the bobbin is
1/2 to 2/3 full.
If the bobbin is fully wound with transparent
nylon thread, the pressure may create fractures
to the plastic bobbin. This will lead to irregular
stitches or possible breakage to bobbin.
When the bobbin winding becomes slow, press the
o
“Start/Stop” button once to stop the machine.
When the foot controller is plugged in, remove your
foot from the foot controller.
• When the bobbin winding becomes slow, stop
the machine, otherwise the machine may be
damaged.
Installing the bobbin
Install the bobbin wound with thread.
You can begin sewing immediately without pulling up the
bobbin thread by simply inserting the bobbin in the bobbin
case and guiding the thread through the slit in the needle
plate cover.
• For details on sewing after pulling up the bobbin
thread, for example, when making gathers or with
free motion quilting, refer to “Pulling up the
bobbin thread” on page B-25.
• Use a bobbin that has been correctly wound
with thread, otherwise the needle may break
or the thread tension will be incorrect.
Use scissors to cut the end of the thread wound around
p
the bobbin.
Slide the bobbin winder shaft to the left, and then
q
remove the bobbin from the shaft.
B-18
• Before inserting or changing the bobbin, be
sure to press (Presser foot/Needle
exchange key) on the operation panel to lock
all keys and buttons, otherwise injuries may
occur if the “Start/Stop” button or any other
button is pressed and the machine starts.
Press (Needle position button) once or twice to
a
raise the needle, and then lower the presser foot lever.

Press .
b
• If is pressed while the presser foot is raised, an
error message appears. Lower the presser foot.
→ The screen changes, and all keys and operation
buttons are locked (except ).
Raise the presser foot lever.
c
Slide the bobbin cover latch to the right.
d
Winding/Installing the Bobbin
• Be sure to hold down the bobbin with your
finger and unwind the bobbin thread
correctly, otherwise the thread may break or
the thread tension will be incorrect.
• The order that the bobbin thread should be
passed through the bobbin case is indicated by
marks around the bobbin case. Be sure to thread
the machine as indicated.
B
GETTING READY
1 Bobbin cover
2 Latch
Remove the bobbin cover.
e
Hold the bobbin with your right hand with the thread
f
unwinding to the left, and hold the end of the thread
with your left hand. Then, with your right hand, place
the bobbin in the bobbin case.
Lightly hold down the bobbin with your right hand
g
(1), and then guide the end of the thread around the
tab of the needle plate cover with your left hand (2).
While lightly holding down the bobbin with your right
h
hand (1), guide the thread through the slit in the
needle plate cover (2) and lightly pull it with your left
hand (3).
• The thread enters the tension spring of the bobbin
case.
While lightly holding down the bobbin with your right
i
hand (1), continue guiding the thread through the slit
with your left hand (2) Then, cut the thread with the
cutter (3).
1 Tab
Basic operations B-19

Winding/Installing the Bobbin
• If the thread is not correctly inserted through the
tension-adjusting spring of the bobbin case, it
may cause incorrect thread tension.
1 Tension-adjusting spring
Reattach the bobbin cover.
j
Insert the tab in the lower-left corner of the bobbin
cover, and then lightly press down on the right side.
→ The bobbin threading is finished.
Next, thread the upper thread. Continue with the
procedure in “Upper Threading” on page B-21.
• You can begin sewing without pulling up the
bobbin thread. If you wish to pull up the bobbin
thread before starting to sew, pull up the thread
according to the procedure in “Pulling up the
bobbin thread” on page B-25.
Press to unlock all keys and buttons.
k
B-20

Upper Threading
• Three spool cap sizes are available, allowing
you to choose a spool cap that best fits the size
of spool being used. If the spool cap is too
small for the spool being used, the thread may
catch on the slit in the spool or the needle may
break. When using mini king thread spool, use
the thread spool insert (mini king thread
spool). For more information regarding the
choice of spool caps for your thread choice,
see page B-16.
Upper Threading
Turn on the machine.
a
Raise the presser foot lever to raise the presser foot.
b
1 Presser foot lever
→ The upper thread shutter opens so the machine can
be threaded.
B
GETTING READY
• When threading the upper thread, carefully
follow the instructions. If the upper threading
is not correct, the thread may become tangled
or the needle may bend or break.
• Never use a thread weight of 20 or lower.
• Use the needle and the thread in the correct
combination. For details on the correct
combination of needles and threads, refer to
“Fabric/Thread/Needle Combinations” on
page B-28.
Threading the upper thread
1 Shutter
• If the presser foot is not raised, the machine
cannot be threaded.
Press (Needle position button) once or twice to
c
raise the needle.
1 Needle position button
→ The needle is correctly raised when the mark on the
handwheel is at the top, as shown below. Check the
handwheel and, if this mark is not at this position, press
(Needle position button) until it is.
→ When threading the upper thread, carefully follow
the instructions.
1 Mark on handwheel
Basic operations B-21

Upper Threading
Remove the spool cap that is inserted onto the spool
d
pin.
1 Spool pin
2 Spool cap
Place the spool of thread onto the spool pin.
e
Slide the spool onto the pin so that the spool is
horizontal and the thread unwinds to the front at the
bottom.
While holding the thread lightly with your right hand,
h
pass the thread under the thread guide plate, and then
pull it up.
1 Thread guide plate
Pass the thread through the thread channel in the order
i
shown below.
• If the spool or the spool cap is not positioned
correctly, the thread may become tangled
around the spool pin or the needle may break.
Slide the spool cap onto the spool pin.
f
Slide the spool cap as far as possible to the right, as
shown, with the rounded side on the left.
While holding the thread lightly with your right hand,
g
pull the thread with your left hand, and then pass the
thread behind the thread guide cover and to the front.
1 Shutter
• If the presser foot has been lowered and the
shutter is closed, the machine cannot be
threaded. Be sure to raise the presser foot to
open the shutter before threading the machine.
In addition, before removing the upper thread, be
sure to raise the presser foot to open the shutter.
• This machine is equipped with a window that
allows you to check the position of the take-up
lever. Look through this window and check that
the thread is correctly fed through the take-up
lever.
Lower the presser foot.
j
1 Thread guide cover
B-22

Upper Threading
Press .
k
• If is pressed while the presser foot is raised, an
error message appears. Lower the presser foot.
→ The screen changes, and all keys and operation
buttons are locked (except ).
Slide the thread behind the needle bar thread guide.
l
The thread can easily be slid behind the needle bar
thread guide by holding the thread in your left hand,
then feeding the thread with your right hand, as shown.
Make sure that the thread is passed through to the left of
the tab of the needle bar thread guide.
Pull the end of the thread, which has been passed
a
through the needle bar thread guide, to the left, then
pass the thread through the notch of the threader
thread guide a, and then firmly pull the thread from
the front and insert it into the slit of the threader
thread guide disk marked “7” all the way b.
• Make sure that the thread passes through the notch of
the threader thread guide.
B
GETTING READY
1 Needle bar thread guide
2 Tab
Raise the presser foot lever.
m
Threading the needle
• The needle threader can be used with machine
needles 75/11 through 100/16.
• The needle threader cannot be used with the wing
needle or the twin needle.
• When thread such as transparent nylon
monofilament or specialty threads are used it is
not recommended to use the needle threader.
• If the needle threader cannot be used, refer to
“Threading the needle manually (without using the
needle threader)” on page B-24.
1 Notch of the threader thread guide
2 Threader thread guide disk
Cut the thread with the thread cutter on the left side of
b
the machine.
1 Cutter
• If the thread is pulled through and cannot be cut
correctly, lower the presser foot lever so that the
thread is held in place before cutting the thread.
If this operation is performed, skip step
• When using thread that quickly winds off the
spool, such as metallic thread, it may be difficult
to thread the needle if the thread is cut.
Therefore, instead of using the thread cutter, pull
out about 8 cm (approx. 3 inches) of thread after
passing it through the threader thread guide
disks (marked “7”).
c.
1 8 cm (approx. 3 inches) or more
Basic operations B-23

Upper Threading
Lower the presser foot lever to lower the presser foot.
c
1 Presser foot lever
Lower the needle threader lever on the left side of the
d
machine until it clicks, and then slowly return the lever
to its original position.
Raise the presser foot lever, pass the end of the thread
f
through and under the presser foot, and then pull out
about 5 cm (approx. 2 inches) of thread toward the
rear of the machine.
1
1 5 cm (approx. 2 inches)
Press to unlock all keys and buttons.
g
Threading the needle manually (without
using the needle threader)
When using specialty thread, such as transparent nylon
thread, a wing needle or a twin needle which cannot be used
with the needle threader, thread the needle as described
below.
Thread the machine to the needle bar thread guide.
a
• For details, refer to “Threading the upper thread” on
page B-21.
1 Hook
2 Needle threader lever
→ The hook is rotated and passes the thread through the
eye of the needle.
• If the needle is not raised to its highest position,
the needle threader cannot thread the needle.
Turn the handwheel counterclockwise until the
needle is at its highest position. The needle is
correctly raised when the mark on the handwheel
is at the top, as shown under step
page B-21.
Carefully pull the end of thread that was passed
e
through the eye of the needle.
If the needle was not completely threaded, but a loop in
the thread was formed in the eye of the needle, carefully
pull the loop through the eye of the needle to pull out
the end of the thread.
c on
Lower the presser foot lever.
b
1
1 Presser foot lever
Insert the thread through the eye of the needle from
c
front to back.
Raise the presser foot lever, pass the end of the thread
d
through and under the presser foot, and then pull out
about 5 cm (approx. 2 inches) of thread toward the
rear of the machine.
• When pulling out the thread, do not pull it
with extreme force, otherwise the needle may
break or bend.
B-24
Press to unlock all keys and buttons.
e

Pulling up the bobbin thread
When making gathers or before free motion quilting, first pull
up the bobbin thread as described below.
Refer to “Threading the upper thread” (page B-21) to
a
thread the machine with the upper thread and thread
the needle.
Follow steps d to f “Installing the bobbin” (page B-
b
18) for installing the bobbin to insert the bobbin into
the bobbin case.
Pass the bobbin thread through the slot.
c
Do not cut the thread with the cutter.
While lightly holding the upper thread with your left
d
hand, press (Needle position button) twice to
lower and then raise the needle.
Upper Threading
Reattach the bobbin cover.
g
Insert the tab in the lower-left corner of the bobbin
cover, and then lightly press down on the right side.
B
GETTING READY
→ The bobbin thread is looped around the upper thread
and can be pulled up.
Carefully pull the upper thread upward to pull out the
e
end of the bobbin thread.
Pull up the bobbin thread, pass it under the presser
f
foot and pull it about 10 cm (4 inches) toward the back
of the machine, making it even with the upper thread.
Basic operations B-25

Upper Threading
Using the twin needle
With the twin needle, you can sew two parallel lines of the
same stitch with two different threads. Both upper threads
should have the same thickness and quality. Be sure to use the
twin needle, the horizontal spool pin and the appropriate
spool cap.
For details on the stitches that can be sewn with the twin
needle, refer to “Stitch Setting Chart” beginning on page B-45.
• Traditionally a twin needle is also used for creating
pin tucks. Contact your nearest authorized
Brother dealer to obtain the optional pin tuck foot
for your machine (SA194, F069: XF5832-001).
Manually thread the left needle with the upper thread.
c
Pass the thread through the eye of the needle from the
front.
Insert the horizontal spool pin onto the bobbin winder
d
shaft.
Insert the horizontal spool pin so that it is perpendicular
to the bobbin winder shaft.
1 Bobbin winder shaft
• Only use the twin needle (2/11 needle, part
code: X59296-121). Use of any other needle
may bend the needle or damage the machine.
• Never use bent needles. Bent needles can
easily break, possibly resulting in injuries.
• The needle threader cannot be used with the
twin needle. If the needle threader is used with
the twin needle, the machine may be
damaged.
Press and install the twin needle.
a
• If is pressed while the presser foot is raised, an
error message appears. Lower the presser foot.
→ The screen changes, and all keys and operation
buttons are locked (except ).
• For details on installing a needle, refer to “Replacing
the needle” on page B-29.
Swing the spool pin toward the left so that it is
e
horizontal.
Place the upper thread spool for the needle on the right
f
side onto the horizontal spool pin, and then secure it
with the spool cap.
The thread should unwind from the front at the bottom
of the spool.
12
1 Spool cap
2 Spool
Thread the upper thread for the left needle eye.
b
• For details, refer to steps
“Threading the upper thread” on page B-21.
B-26
a through l of

Upper Threading
Thread the upper thread in the same way that the
g
upper thread for the left side was threaded.
1
1 Thread guide cover
• For details, refer to steps g through i of
“Threading the upper thread” on page B-21.
Without passing the thread through the needle bar
h
thread guide, manually thread the right needle.
Insert the thread through the eye of the needle from the
front to the back.
• The needle threader cannot be used with the twin
needle. If the needle threader is used with the twin
needle, the machine may be damaged.
Select (Twin needle) in the settings screen.
k
Set the twin needle mode to “ON.”
l
Press .
m
• When using the twin needle, be sure to select
the twin needle setting, otherwise the needle
may break or the machine may be damaged.
Start sewing.
n
• For details on starting to sew, refer to “STARTING TO
SEW” on page B-34.
→ Two lines of stitching are sewn parallel to each other.
B
GETTING READY
Attach zigzag foot “J”.
i
• For details on changing the presser foot, refer to
“Replacing the presser foot” on page B-31.
• When using the twin needle, be sure to attach
zigzag foot “J”. If bunched stitches occur, use
monogramming foot “N” or attach stabilizer
material.
Press to unlock all keys and buttons, and then
j
select a stitch.
• For stitch selection see “Selecting a stitch pattern” on
page B-35.
• See “Stitch Setting Chart” on page B-45 for stitches
that use a twin needle.
• When using the twin needle, be sure to select
an appropriate stitch, otherwise the needle
may break or the machine may be damaged.
• When changing the sewing direction, press
(Needle position button) to raise the needle from
the fabric, and then raise the presser foot lever
and turn the fabric.
• Do not try turning the fabric while the twin
needle is down in the fabric, otherwise the
needle may break or the machine may be
damaged.
Basic operations B-27

Fabric/Thread/Needle Combinations
Fabric/Thread/Needle Combinations
• Needles that can be used with this machine: Home sewing machine needles (size 65/9 — 100/16)
* The larger the number, the larger the needle. As the numbers decrease, the needles get finer.
• Thread that can be used with this machine: 30 — 90 weight
* Never use thread of 20 weight or lower. It may cause machine to malfunction.
* The smaller the number, the heavier the thread. As the numbers increase, the thread gets finer.
• The machine needle and thread that should be used depends on the type and thickness of the fabric. Refer to
the following table when choosing the thread and needle appropriate for the fabric that you wish to sew.
— The combinations shown in the table provide a general guideline. Be sure to sew trial stitches on the actual number of
layers and type of fabric to be used in your project.
— The machine needles are consumables. For safety and best results, we recommend replacing the needle regularly. For
details on when to replace the needle, refer to “Checking the needle” on page B-29.
• In principle, use a fine needle and thread with lightweight fabrics, and a larger needle and heavier thread with
heavyweight fabrics.
• Select a stitch appropriate for the fabric, and then adjust the stitch length. When sewing lightweight fabrics,
make the stitch length finer (shorter). When sewing heavyweight fabrics, make the stitch length coarser
(longer). (page B-40)
When sewing stretch fabrics, refer to “Sewing stretch fabrics” in the “Sewing” section.
Fabric Type/Application
Lightweight
fabrics
Medium weight
fabrics
Heavyweight
fabrics
Stretch fabrics
(knit fabrics, etc.)
For top-stitching
Lawn, georgette, challis, organdy,
crepe, chiffon, voile, gauze, tulle,
lining, etc.
Broadcloth, taffeta, gabardine,
flannel, seersucker, double gauze,
linen, terry cloth, waffle weave,
sheeting, poplin, cotton twill, satin,
quilting cotton, etc.
Denim (12 ounces or more), canvas,
etc.
Denim (12 ounces or more), canvas,
tweed, corduroy, velour, melton
wool, vinyl-coated fabric, etc.
Jersey, tricot, T-shirt fabric, fleece,
interlock, etc.
Cotton thread,
Cotton thread,
Cotton thread
Cotton thread,
Cotton thread,
Polyester thread,
Polyester thread,
Cotton thread
Thread
Type Weight
Polyester
thread
Silk thread
Polyester
thread
Silk thread
Polyester
thread,
Polyester
thread
Silk thread
Silk thread
60 — 90
50 — 80
60 — 90
50 — 60
30 100/16
60
30 — 50
50
30 90/14 — 100/16
50 — 60 75/11 — 90/14
■ Transparent nylon thread
Use a home sewing machine topstitching needle, regardless of the fabric or thread.
Size of needle
65/9 — 75/11
75/11 — 90/14
90/14 — 100/16
Ball point needle
75/11 — 90/14
Stitch length
[mm (inch)]
Fine stitches
1.8-2.5
(1/16-3/32)
Regular stitches
2.0-3.0
(1/16-1/8)
Coarse stitches
2.5-4.0
(3/32-3/16)
Setting appropriate for
the fabric thickness
Setting appropriate for
the fabric thickness
• The appropriate fabric, thread and needle combinations are shown in the preceding table. If the
combination of the fabric, thread and needle is not correct, particularly when sewing heavy fabrics (such
as denim) with thin needles (such as 65/9 to 75/11), the needle may bend or break. In addition, the
stitching may be uneven or puckered or there may be skipped stitches.
B-28

Replacing the Needle
Be sure to observe the following precautions concerning the
handling of the needle. Failure to observe these precautions is
extremely dangerous, for example, if the needle breaks and
fragments are dispersed. Be sure to read and carefully follow
the instructions below.
• Only use recommended home sewing machine
needles. Use of any other needle may bend the
needle or damage the machine.
• Never use bent needles. Bent needles can
easily break, possibly resulting in injuries.
Checking the needle
Sewing with a bent needle is extremely dangerous since the
needle may break while the machine is being operated.
Before using the needle, place the flat side of the needle on a
flat surface and check that the distance between the needle
and the flat surface is even.
Replacing the Needle
• Replace the needle in cases such as the four
described below:
1 If an unusual sound is produced when the needle
enters the fabric while sewing trial stitches at low
speed. (The tip of the needle may be broken.)
2 If stitches are skipped. (The needle may be bent.)
3 After completing one project, such as a piece of
clothing.
4 After using three full bobbins of thread.
Replacing the needle
Use the screwdriver and a needle that has been determined to
be straight according to the instructions in “Checking the
needle”.
Press (Needle position button) once or twice to
a
raise the needle.
Place fabric or paper under the presser foot to cover
b
the hole in the needle plate.
B
GETTING READY
1 Flat side
2 Needle type marking
• If the distance between the needle and the flat
surface is not even, the needle is bent. Do not
use a bent needle.
• Before replacing the needle, cover the hole in the
needle plate with fabric or paper to prevent the
needle from falling into the machine.
Lower the presser foot.
c
Press .
d
• If is pressed while the presser foot is raised, an
error message appears. Lower the presser foot.
→ The screen changes, and all keys and operation
buttons are locked (except ).
1 Flat surface
Basic operations B-29

Replacing the Needle
Hold the needle with your left hand, and then use a
e
screwdriver to turn the needle clamp screw toward
you (counterclockwise) to remove the needle.
• The needle clamp screw can also be loosened or
tightened with the disc-shaped screwdriver.
2
1 Screwdriver
2 Needle clamp screw
• Do not apply a strong force when loosening or
tightening the needle clamp screw, otherwise certain
parts of the machine may be damaged.
With the flat side of the needle toward the rear of the
f
machine, insert the needle until it touches the needle
stopper.
1
1 Needle stopper
While holding the needle with your left hand, use the
g
screwdriver to tighten the needle clamp screw.
Turn the screw toward the back of the machine
(clockwise).
• Be sure to insert the needle until it touches the
needle stopper and securely tighten the needle
clamp screw with the screwdriver, otherwise
the needle may break or damage may result.
Press to unlock all keys and buttons.
h
B-30

Replacing the Presser Foot
Replacing the Presser Foot
Place a different presser foot below the holder so that
f
the presser foot pin is aligned with the notch in the
holder.
B
• Use the presser foot appropriate for the type
of stitch that you wish to sew, otherwise the
needle may hit the presser foot, causing the
needle to bend or break.
• Only use presser feet designed specifically for
this machine. Use of any other presser foot
may result in injuries or damage to the
machine.
Replacing the presser foot
Press (Needle position button) once or twice to
a
raise the needle.
Lower the presser foot.
b
Press .
c
• If is pressed while the presser foot is raised, an
error message appears. Lower the presser foot.
→ The screen changes, and all keys and operation
buttons are locked (except ).
1
4
2
3
1 Presser foot holder
2 Notch
3 Pin
4 Presser foot type
Slowly lower the presser foot lever so that the presser
g
foot pin snaps into the notch in the presser foot holder.
J
GETTING READY
Raise the presser foot lever.
d
Press the black button at the back of the presser foot
e
holder.
1 Black button
2 Presser foot holder
1 Presser foot lever
2 Presser foot holder
3 Notch
4 Pin
→ The presser foot is attached.
Raise the presser foot lever to check that the presser
h
foot is securely attached.
1 Presser foot lever
Press to unlock all keys and buttons.
i
Basic operations B-31

Replacing the Presser Foot
• When a stitch is selected, the icon for the presser
foot that should be used appears in the screen.
Check that the correct presser foot is attached
before starting to sew. If the wrong presser foot
is installed, attach the appropriate presser foot.
Zigzag foot “J”
Monogramming foot “N”
Use the screwdriver to loosen the presser foot holder
c
screw.
Turn the screw toward the back of the machine
(counterclockwise).
• The presser foot holder screw can also be loosened
or tightened with the disc-shaped screwdriver.
1 Screwdriver
2 Presser foot holder
3 Presser foot holder screw
■ Attaching the presser foot holder
Overcasting foot “G”
Buttonhole foot “A”
Blind stitch foot “R”
Button fitting foot “M”
Side cutter “S”
• For details on the presser foot that should be
used with the selected stitch, refer to “Stitch
Setting Chart” on page B-45.
Removing and attaching the presser foot
holder
Remove the presser foot holder when cleaning the machine or
when installing a presser foot that does not use the presser
foot holder, such as the walking foot and quilting foot. Use
the screwdriver to remove the presser foot holder.
Press .
a
• If is pressed while the presser foot is raised, an
error message appears. Lower the presser foot.
→ The screen changes, and all keys and operation
buttons are locked (except ).
Press .
a
• If is pressed while the presser foot is raised, an
error message appears. Lower the presser foot.
→ The screen changes, and all keys and operation
buttons are locked (except ).
Raise the presser foot lever.
b
Align the presser foot holder with the lower-left side of
c
the presser bar.
Remove the presser foot.
b
• For details, refer to “Replacing the presser foot” on
page B-31.
B-32

Hold the presser foot holder in place with your right
d
hand, and then tighten the screw using the screwdriver
in your left hand.
Turn the screw toward you (clockwise).
1 Screwdriver
• Be sure to securely tighten the presser foot
holder screw, otherwise the presser foot
holder may fall off and the needle may strike
it, causing the needle to bend or break.
• If the presser foot holder is not correctly
installed, the thread tension will be incorrect.
Replacing the Presser Foot
B
GETTING READY
Basic operations B-33

Sewing
Chapter 2
STARTING TO SEW
Sewing
• While the machine is in operation, pay special
attention to the needle location. In addition,
keep your hands away from all moving parts
such as the needle and handwheel, otherwise
injuries may occur.
• Do not pull or push the fabric too hard while
sewing, otherwise injuries may occur or the
needle may break.
• Never use bent needles. Bent needles can
easily break, possibly resulting in injuries.
• Make sure that the needle does not strike
basting pins, otherwise the needle may break
or bend.
Stitch selection methods
A stitch can be selected from the following methods available.
Stitch patterns can be selected through either direct select (by
pressing the designated key for a specific stitch) or number
selection (by entering the number for the stitch pattern).
For details on the types of stitches available, refer to the Quick
Reference Guide.
1 Preset utility stitch/saved pattern key
2 Numeric keys
■ Number selection
After pressing (Utility stitch key), (Decorative
stitch key) or (Character stitch key) to select the stitch
mode, use the numeric keys to type in the number for the
desired stitch.
■ Direct selection
With direct selection, there are two stitch modes listed
below. Each press of switches the modes.
Preset utility stitch
Saved patterns
The most frequently used utility stitches have been
assigned to the numeric keys.
These stitches can be selected simply by pressing
the designated key.
For details, refer to “Preset utility stitches” on
page B-51.
Frequently used patterns and combined patterns can
be saved on the machine’s memory and easily
retrieved using (Preset utility stitch/saved
pattern key). For details, refer to “Saving a pattern”
and “Retrieving a pattern” in the “Decorative sewing”
section.
1 Utility stitch key
2 Decorative stitch key
3 Character stitch key
4 Numeric keys
Utility stitches
There are various utility stitches, including straight
stitches, overcasting stitches and buttonhole stitches.
Decorative stitches
There are three decorative stitch modes: decorative stitch
1 mode , decorative stitch 2 mode and
decorative stitch 3 mode .
For details, refer to “Selecting stitch patterns” in the
“Decorative sewing” section.
B-34

Sewing
Character stitches
There are five character stitch modes: Gothic font mode
, Handwriting font mode , Outline font mode
, Cyrillic font mode and Japanese font mode
.
For details, refer to “Selecting stitch patterns” in the
“Decorative sewing” section.
Selecting a stitch pattern
■ When selecting a utility stitch
Press .
a
■ When selecting from the preset utility stitches
Since various stitches have been assigned to the numeric
keys, these stitches can be selected simply by pressing the
designated numeric key.
Check that appears in the upper-left corner of the
a
screen.
If a different icon is displayed, press .
B
STARTING TO SEW
→ is displayed on the upper-left corner of the LCD
screen.
Enter the number of the desired stitch using numeric
b
keys.
• For number of each stitch, refer to “Stitch Setting
Chart” on page B-45 or the Quick Reference Guide.
• For stitches 01 through 09, the stitch can also be
selected by using the numeric keys to type in a one-
digit number, then pressing .
• When using one-digit numbers and it is entered
incorrectly, press to erase the entered number.
→ The selected stitch is displayed on the LCD screen.
Press the numeric key on which the desired stitch is
b
printed.
■ When selecting a character/decorative stitch
After pressing or on the operation panel the
necessary number of times, enter a number.
For more details, refer to “Selecting stitch patterns” in the
“Decorative sewing” section.
Basic operations B-35

Sewing
Sewing a stitch
Lower the presser foot.
f
You do not have to pull up the bobbin thread.
Turn the main power to ON and push (Needle
a
position button) to raise the needle.
Select the desired stitch following the procedure
b
described in “Selecting a stitch pattern” on page B-35.
If necessary, specify the setting for automatic reverse/
c
reinforcement stitching and adjust the stitch length,
etc.
• For details on adjusting the stitch width and length,
refer to “Setting the stitch width” on page B-40 and
“Setting the stitch length” on page B-40.
• When a stitch is selected, the icon for the
presser foot that should be used appears on the
screen. Check that the correct presser foot is
attached before starting to sew. If the wrong
presser foot is installed, attach the appropriate
presser foot.
Install the presser foot.
d
• For details on changing the presser foot, refer to
“Replacing the Presser Foot” on page B-31.
Adjust the sewing speed with the sewing speed
g
controller.
You can use this controller to adjust sewing speed
during sewing.
b
1 Fast
2 Slow
Press the “Start/Stop” button to start sewing.
h
Guide the fabric lightly by hand.
a
• Always use the correct presser foot. If the
wrong presser foot is used, the needle may
strike the presser foot and bend or break,
possibly resulting in injury.
Refer to page B-45 for presser foot
recommendations.
Set the fabric under the presser foot. Hold the fabric
e
and thread with your left hand, and rotate the
handwheel counterclockwise or press (needle
position button) to set the needle in the sewing start
position.
• When the foot controller is being used, you
cannot start sewing by pressing the “Start/Stop”
button.
Press the “Start/Stop” button again to stop sewing.
i
Press the (Thread cutter button) to trim the upper
j
and lower threads.
• The black button on the left side of zigzag foot
“J” should be pressed only if the fabric does not
feed or when sewing thick seams. For details,
refer to “Sewing thick fabrics” in the “Sewing”
section. Normally, you can sew without pressing
the black button.
B-36
1 Thread cutter button
→ The needle will return to the up position
automatically.
 Loading…