Модуль ударных ALESIS NITRO

Введение
Поддержка
Для получения последней информации об этом продукте (системные требования, информация о совместимости и т. Д.) И регистрации продукта посетите alesis.com.
Для получения дополнительной поддержки по продукту посетите alesis.com/support.
Быстрый старт/схема подключения
Настройка и игра

- Подключите пэды электронной ударной установки к кабельному змеевику, затем подключите кабельный змеевик к входу Cable Snake на задней панели модуля.
- Необязательно: если у вас есть какие-либо дополнительные пэды (например, дополнительный том, дополнительная тарелка крэш), подключите их к входу Tom 4 или Crash 2 модуля.
- Подключите динамики (продаются отдельно) к выходам и/или подключите 1/8-дюймовые стереонаушники (продаются отдельно) к выходу наушников. Поверните ручку громкости до упора вниз (против часовой стрелки).
- Подключите модуль к источнику питания с помощью прилагаемого адаптера питания (9 В постоянного тока, 500 мА, центральный плюс).
- Нажмите выключатель питания, чтобы включить модуль.
- Установите регулятор громкости на соответствующий уровень и играйте на барабанах!
Выбор набора ударных: После включения модуля или после нажатия кнопки Kit вы увидите индикатор Kit и NUM на дисплее. Используйте кнопки < и > для выбора набора ударных и начинайте играть! Вы также можете предварительноview звуки (с фиксированной скоростью), нажимая кнопки выбора пэда. Наборы 01-24 являются предустановленными наборами. Наборы 25-40 являются пользовательскими наборами (дополнительную информацию см. в разделе Редактирование и сохранение наборов ударных).
Внимание: Если светодиод над кнопкой Song/Pattern не горит, нажмите и удерживайте Page/Select, пока он не загорится.
Использование метронома: Вы можете включать и выключать метроном («щелчковую дорожку»), нажимая кнопку Click. Отрегулируйте его темп, нажав Tempo и используя кнопки < и >, чтобы установить новый BPM (ударов в минуту). Дополнительные сведения о функциях метронома см. в разделе Настройка метронома.
Особенности
Передняя панель

- Дисплей: отображает текущие настройки и функции модуля.
- Песня/образец: в обычном режиме нажмите эту кнопку, чтобы войти в меню песни, где вы можете выбрать песню или изменить настройки, связанные с песней. В режиме обучения нажмите эту кнопку, чтобы войти в меню паттернов, где вы можете выбрать паттерн (полный набор плюс аккомпанемент) для игры или настроить параметры, связанные с паттерном.
Внимание: Светодиоды над и под этой кнопкой показывают, находится ли модуль в нормальном режиме или в режиме обучения соответственно. - Kit/Rhythm: В обычном режиме нажмите эту кнопку, чтобы войти в меню Kit, где вы можете выбрать набор или изменить настройки, связанные с набором. В режиме обучения нажмите эту кнопку, чтобы выбрать ритм (полный набор) для воспроизведения или отрегулировать настройки, связанные с паттерном.
- Voice/Beat: в обычном режиме нажмите эту кнопку, чтобы войти в голосовое меню, где вы можете выбрать голос (звук ударных) или изменить настройки, связанные с голосом. В режиме обучения нажмите эту кнопку, чтобы выбрать долю (только для малого барабана) для игры или отрегулировать настройки, связанные с паттерном.
- Page/Select: нажмите эту кнопку для просмотра доступных настроек для текущего режима/меню. Нажмите и удерживайте эту кнопку в течение одной секунды, чтобы переключить три кнопки над ней между обычным режимом и режимом обучения.
- Громкость: регулирует выходную громкость основного выхода и наушников.
- Старт/Стоп: Нажмите, чтобы начать/остановить воспроизведение или запись.
- Сохранить: Нажмите, чтобы сохранить текущие настройки набора.
- < / >: Используйте эти кнопки со стрелками для изменения значения параметра, отображаемого на дисплее. (Обычно это регулирует числовые значения, такие как номера наборов или уровни эффектов.)
- Щелчок: Нажмите, чтобы включить/выключить метроном («щелчковую дорожку»). Дополнительную информацию см. в разделе «Настройка метронома».
- Drum Off: когда эта кнопка включена, ее светодиодный индикатор будет гореть, а предварительно записанная партия ударных будет отключена, чтобы вы могли слышать только свое исполнение и любой аккомпанемент (аккомпанемент). Нажмите ее еще раз, чтобы прослушать предварительно записанную партию ударных. (Эта кнопка будет автоматически включена во время записи.)
- Запись: Нажмите эту кнопку один раз, чтобы включить запись в модуль. Его светодиод будет мигать. Чтобы начать запись, нажмите Start/Stop или ударьте по пэду. Во время записи его светодиод будет гореть постоянно. (Чтобы остановить запись, снова нажмите Start/Stop.) Дополнительную информацию см. в разделе «Запись».
- Tempo: нажмите эту кнопку, чтобы отобразить на дисплее текущий темп в BPM (количество ударов в минуту). Используйте кнопки < или > для изменения темпа.
- Utility: нажмите эту кнопку, чтобы получить доступ к расширенным настройкам пэдов, а также к настройкам MIDI модуля. Дополнительную информацию см. в разделе «Настройка параметров утилиты».
- Play/Practice: В обычном режиме нажмите эту кнопку, чтобы прослушать записанное исполнение. В режиме обучения нажмите эту кнопку, чтобы начать воспроизведение доли, ритма или паттерна; затем вы можете подыгрывать ему, не получая очков. Нажмите и удерживайте эту кнопку в течение 2 секунд, чтобы прослушать воспроизведение вашей практики (каждая практика записывается автоматически). Нажмите еще раз, чтобы остановить воспроизведение.
- Кнопки выбора пэда: нажмите эти кнопки, чтобы предварительноview голоса (звуки ударных), используемые для каждой части набора, представленные кнопками. (После нажатия кнопки Snare или любой из кнопок тома вы можете нажать кнопку Rim, чтобы услышать голос, используемый в качестве звука обода этого барабана.)
Задняя панель

- Выходы: используйте стандартные кабели 1/4″ TRS для подключения этих выходов к динамику или ampлиферная система. Уровень этих выходов регулируется ручкой громкости.
- Aux In: используйте стандартный 1/8-дюймовый стереокабель для подключения этого входа к дополнительному аудиоплееру (например, MP3-плееру, CD-плееру и т. д.). Этот звук будет слышен на выходе Outputs и Phones. Во время записи звук с этого входа не будет записываться.
- Вход Tom 4: используйте стандартный кабель 1/4″ TRS для подключения этого входа к дополнительному барабанному пэду, который будет запускать звук Tom 4.
- Вход Crash 2: используйте стандартный кабель 1/4″ TS для подключения этого входа к дополнительному пэду для тарелок, который будет запускать звук Crash 2.
- MIDI-выход: используйте стандартный пятиконтактный MIDI-кабель для подключения этого выхода к MIDI-входу внешнего MIDI-устройства.
- MIDI In: используйте стандартный пятиконтактный MIDI-кабель для подключения этого входа к MIDI-выходу внешнего MIDI-устройства.
- USB: это соединение позволит вам отправлять MIDI-информацию на компьютер. Используйте кабель USB (продается отдельно) для подключения модуля к свободному порту USB на вашем компьютере. Примечание. По USB-соединению передается только MIDI-информация, а не звук.
Боковые панели

- Подключение питания: подключите прилагаемый адаптер питания (9 В постоянного тока, 500 мА, центральный положительный контакт) сюда, затем подключите адаптер к розетке.
- Кнопка питания: нажмите эту кнопку, чтобы включить модуль. Нажмите и удерживайте ее в течение секунды, затем отпустите, чтобы выключить модуль.
- Телефоны: к этому выходу подключите комплект 1/8-дюймовых стереонаушников.
Внимание: в целях экономии энергии модуль ударных автоматически выключается через 30 минут бездействия. Если вам не нужна эта функция или вы хотите настроить время выключения, сделайте следующее:
- Включите модуль ударных.
- Нажмите Утилита.
- Используйте кнопки < / >, чтобы выбрать Power Page (POW).
- Используйте кнопки < / > для настройки времени выключения (30–60 минут или ВЫКЛ.).
Основные функции
Редактирование и сохранение наборов ударных
важно:
- Чтобы редактировать и сохранять свои комплекты, вы должны находиться в обычном режиме. Если светодиод над кнопкой Song/Pattern не горит, нажмите и удерживайте Page/Select, пока он не загорится.
- Не забудьте сохранить свои комплекты после того, как вы ввели нужные настройки!
Сначала нажимайте Kit, пока на дисплее не появится NUM. Используйте кнопки < и >, чтобы выбрать нужный комплект. Выбрав комплект, вы можете изменить его настройки:
Чтобы настроить параметры комплекта:
- Нажмите Kit, затем нажимайте Page/Select, пока на дисплее не появится нужная настройка:
- VOL: Громкость комплекта
- REV*: комплект реверберации
- EQH*: Эквалайзер, высокие частоты
- EQM*: Эквалайзер, средние частоты
- EQL*: Эквалайзер, низкие частоты
- Используйте кнопки < и > для настройки значения.
Реверберация и эквалайзер влияют на звук набора, песни и выходного сигнала подключенного MIDI-устройства, когда этот набор выбран.
Чтобы настроить параметры пэда:
- Ударьте по пэду, настройки которого вы хотите изменить, или нажмите соответствующую кнопку выбора пэда.
- Нажмите Voice, затем нажимайте Page/Select, пока на дисплее не появится нужная настройка:
- NUM / HC**: тембр пэда (звук ударных)
- VOL: Громкость пэда
- PAN: Панорамирование пэдов
- PIT: шаг пэда
- REV: Реверберация пэда
- MID: MIDI-нота. См. Приложение для списка номеров нот MIDI по умолчанию для каждого пэда.
- PS: переключатель песни пэда (выбирает, будет ли песня воспроизводиться при ударе по пэду)
- PN***: номер песни пэда (выбирает, какая песня будет воспроизводиться при ударе по этому пэду, если для PS установлено значение ON)
- Используйте кнопки < и > для настройки значения.
Если выбран пэд Hi-Hat, вы можете выбрать одну из комбинаций звуков открытого и закрытого хай-хэта (HC, 001-007). Песни 61-80 имеют высоту тона, без ударных.ampфайлы (например, бас, фортепиано, вибрафон и т. д.), а не настоящие песни, поэтому они идеально подходят для назначения пэду при выборе «номера песни пэда». Они будут менять высоту звука с каждым ударом. Песни 1-60 настоящие песни
Чтобы сохранить настройки:
- Нажмите Сохранить.
- Используйте кнопки < и >, чтобы выбрать слот пользовательского набора, в который вы хотите его сохранить (25-40).
- Нажмите Сохранить еще раз.
Играя вместе с песнями
Важнo: Чтобы воспроизводить песни, вы должны находиться в обычном режиме. Если светодиод над кнопкой Song/Pattern не горит, нажмите и удерживайте Page/Select, пока он не загорится.
Чтобы выбрать и воспроизвести песню:
- Нажимайте Song, пока на дисплее не появится NUM.
- Используйте кнопки < и > для выбора песни.
- Нажмите Старт/Стоп, чтобы начать воспроизведение.
Внимание: Во время воспроизведения кнопки выбора пэда загораются, показывая, какие барабаны играют. Чтобы отключить/включить эту функцию, нажмите кнопку выбора пэда «Kick».
Отрегулируйте темп, нажав Tempo и используя кнопки < и >, чтобы установить новый BPM. Нажмите обе кнопки < и > одновременно, чтобы сбросить темп до значения по умолчанию.
Отрегулируйте громкость музыки (не партии ударных), нажав Song, а затем нажимая Page/Select, пока на дисплее не появится ACC. Используйте кнопки < и > для регулировки громкости. (Он вернется к настройкам по умолчанию, если вы выключите модуль.) Отрегулируйте громкость партии ударных, нажав Song, затем нажимая Page/Select, пока на дисплее не появится DRM. Используйте кнопки < и > для регулировки громкости. Чтобы полностью отключить/включить звук партии ударных, нажмите Drum Off. (Он вернется к настройкам по умолчанию, если вы выключите модуль.)
Игра под биты, ритмы и паттерны
Важнo: чтобы подыгрывать паттернам, вы должны находиться в режиме обучения. Если светодиод под кнопкой Song/Pattern не горит, нажмите и удерживайте Page/Select, пока он не загорится.
- Нажмите одну из кнопок режима обучения, чтобы выбрать способ игры:
- Доля (BEA): только малый барабан
- Ритм (RHM): полный комплект
- Выкройка (ПТН): Полный комплект плюс музыкальное сопровождение
- Используйте кнопки < и > для выбора доли, ритма или паттерна, которые вы хотите попрактиковать.
- Чтобы потренироваться без подсчета очков, нажмите Play/Practice (на дисплее появится PRA). После отсчета бит, ритм или паттерн будут повторяться, чтобы вы могли попрактиковаться.
Чтобы играть и получать очки, нажмите Start/Stop. После отсчета (на дисплее появится EXM) бит, ритм или паттерн будут воспроизведены один раз без партии ударных. Сыграйте партию ударных как можно точнее. В конце вы получите оценку (SCO) на основе вашей точности. Чтобы улучшить свой результат, потренируйтесь в такте, ритме или паттерне, не получая очков (см. выше), и попробуйте еще раз!
Каждая тренировка автоматически записывается. Нажмите и удерживайте Play/Practice в течение 2 секунд, чтобы прослушать воспроизведение вашей тренировки (PLY). Нажмите Play/Practice еще раз, чтобы остановить воспроизведение.
Ноты:
- Если на дисплее появляется EPY, это означает, что память пуста, так как запись не производилась. Играйте, оценивая свое выступление (как описано выше) для записи.
- Если на дисплее отображается FUL, это означает, что память модуля была заполнена во время записи. Вы можете очистить/перезаписать память, просто сделав новую запись.
Чтобы настроить параметры режима обучения:
Каждый режим обучения имеет различные настраиваемые параметры. Нажмите кнопку нужного режима обучения (доля, ритм или паттерн), затем продолжайте нажимать Page/Select, чтобы просмотреть настройки, и используйте кнопки < и >, чтобы отрегулировать их значения:
- Бит (BEA): (DRM) Громкость барабана
- Ритм (RHM): (LEV) уровень сложности; (DRM) Громкость барабана
- Шаблон (PTN): (LEV) Уровень сложности; (ACC) Аккомпанемент; (DRM) Громкость барабана
Расширенные функции
Изменение настроек утилиты
Настройки Utility позволяют дополнительно настроить параметры пэда и настроить параметры MIDI модуля.
Чтобы изменить настройки утилиты:
- Ударьте по пэду, настройки которого вы хотите изменить, или нажмите соответствующую кнопку выбора пэда.
- Нажмите Utility, затем нажимайте Page/Select, пока на дисплее не появится нужная настройка:
- SEN (Чувствительность пэда): Управляет откликом пэда при ударе по нему. Чем выше значение, тем менее сильно вам нужно играть, чтобы произвести громкий удар.
- THR (порог пэда): контролирует, насколько сильно вы должны ударить по пэду, чтобы создать звук. Чем выше значение, тем сильнее вы должны поразить его.
- CRO (перекрестные помехи пэдов): перекрестные помехи — это непреднамеренное срабатывание пэда при ударе по соседнему пэду. Чем выше значение, тем меньше вероятность срабатывания пэда из-за перекрестных помех.
- CUR (кривая скорости пэда): управляет динамическим откликом пэда относительно силы (скорости) вашего удара. Кривые приведены в Приложении.
- RS (Чувствительность обода пэда): контролирует реакцию обода пэда при ударе по нему.
- SS (чувствительность хай-хэта «всплеск»): Управляет откликом эффекта «всплеска» хай-хэта при нажатии на педаль. (Чтобы создать этот звук, нажмите ногой на педаль, но сразу же поднимите ее, а не оставляйте ногу нажатой.)
- LOC (локальный режим): Для получения дополнительной информации см. Настройки MIDI.
- GM (общий режим MIDI): дополнительную информацию см. в разделе «Настройки MIDI».
- Используйте кнопки < и > для настройки значения.
Чтобы сохранить настройки, нажмите Сохранить. В противном случае они вернутся к своим настройкам по умолчанию, когда вы отключите питание модуля.
Настройка метронома
Встроенный метроном модуля можно использовать при занятиях, исполнении, записи или воспроизведении.
Использование метронома:
Вы можете включать и выключать метроном («щелчковую дорожку»), нажимая кнопку Click. Отрегулируйте его темп, нажав Tempo и используя кнопки < и >, чтобы установить новый BPM (ударов в минуту).
Чтобы настроить параметры метронома:
- Включите метроном (нажав Click), затем нажимайте Page/Select, пока на дисплее не появится нужная установка:
- SIG (Тактовый размер): Тактовый размер, который отсчитывает метроном. (Если в качестве первого числа выбрано «0», первая доля не будет обозначаться другим звуком метронома; каждая доля будет иметь один и тот же звук.)
- INT (интервал): доли, воспроизводимые метрономом.
- VOL (Громкость): громкость метронома.
- VOC (голос): звук метронома.
- Используйте кнопки < и > для настройки значения. Настройки будут автоматически сохранены.
запись
Записать:
- Если светодиод над кнопкой Song/Pattern не горит, нажмите и удерживайте Page/Select, пока он не загорится.
- Нажмите Запись. Светодиод кнопки начнет мигать, и метроном включится автоматически. Это означает, что модуль поставлен на запись.
- Чтобы начать запись, нажмите Start/Stop или ударьте по любому пэду. Светодиод записи будет гореть постоянно. (Чтобы отменить запись, нажмите «Запись» еще раз.)
- Чтобы остановить запись, нажмите Start/Stop или нажмите Record. Индикатор записи погаснет.
- Чтобы воспроизвести запись, нажмите Play/Practice. Нажмите еще раз, чтобы остановить воспроизведение.
Ноты:
- В режиме обучения ваши выступления записываются автоматически.
- Если на дисплее отображается FUL, это означает, что память модуля была заполнена во время записи. Вы можете очистить/перезаписать память, просто сделав новую запись.
Чтобы записать свое исполнение с песней:
- Настройте номер песни (SNG) (как описано в разделе «Настройка параметров записи» ниже).
- Начните запись (как описано в разделе «Запись» выше).
- Чтобы воспроизвести запись, нажмите Play/Practice. Нажмите еще раз, чтобы остановить воспроизведение.
Чтобы настроить параметры записи:
- Если светодиод над кнопкой Song/Pattern не горит, нажмите и удерживайте Page/Select, пока он не загорится.
- Нажмите Запись. Светодиод кнопки начнет мигать, и метроном включится автоматически.
- Это означает, что модуль поставлен на запись.
- Нажимайте Page/Select до тех пор, пока на дисплее не появится нужная настройка:
- SNG (номер песни): песня, которая будет играть в фоновом режиме.
- KIT (Установка): набор ударных, который будет записан.
- BPM (темп): темп записи.
- SIG (тактовый размер): тактовый размер записи.
- INT (интервал): доли, воспроизводимые метрономом.
- DRM (Drum off): если не выбрана песня (—) или установлена песня 61–80, этот параметр отключается, поскольку реальная песня не выбрана (композиции 61–80 на самом деле простоampфайлы, которые могут быть назначены пэдам). Если установлено значение Song 1-60, вы можете установить его в положение ON или OFF, чтобы включить или выключить исходную партию ударных. Кроме того, вы можете нажать кнопку Drum Off.
- PRC (предварительный отсчет): если установлено значение ON, перед началом записи будет отсчитываться один такт. Если установлено значение OFF, запись начнется сразу после того, как вы нажмете Start/Stop или ударите по пэду.
- Используйте кнопки < и > для настройки значения. Настройки будут автоматически сохранены.
Настройки MIDI
Вы можете подключить модуль ударных к внешнему MIDI-модулю или устройству, что позволит вам:
- используйте подключенную электронную ударную установку для запуска звуков во внешнем модуле
- используйте другое MIDI-устройство для запуска звуков в модуле ударных
Чтобы изменить номер MIDI-ноты, посылаемой каждым пэдом, см. раздел «Настройка параметров пэда» в разделе «Редактирование и сохранение наборов ударных».
Чтобы изменить настройки MIDI:
- Ударьте по пэду, настройки которого вы хотите изменить, или нажмите соответствующую кнопку выбора пэда.
- Нажмите Utility, затем нажимайте Page/Select, пока на дисплее не появится нужная настройка:
- ЛОК (локальный режим):
- Если установлено значение ON, при игре на электронной ударной установке будут воспроизводиться звуки модуля ударных.
- Если установлено значение OFF, воспроизведение вашей электронной ударной установки будет запускать звуки в звуковом модуле, подключенном к MIDI-выходу модуля, минуя звуковую библиотеку модуля ударных.
- GM (общий режим MIDI): дополнительную информацию см. в разделе «Доступ к программам модуля» ниже.
- Если установлено значение ON, канал 10 в модуле ударных будет использовать перкуссионные звуки General MIDI.
- Если установлено значение OFF, канал 10 в модуле ударных будет использовать внутренние звуки ударных модуля.
- Используйте кнопки < и > для настройки значения.
Доступ к программам модуля: Вы можете использовать внешнее MIDI-устройство (например, MIDI-клавиатуру или секвенсор) для доступа к другим звуковым библиотекам («программам») модуля ударных, таким как фортепиано, бас, струнные и т. д. Выберите другую программу, отправки сообщения Program Change с вашего внешнего устройства. Каждая программа использует выделенный MIDI-канал (1-16). Канал 10 зарезервирован для звуков ударных.
Для записи на внешний секвенсор:
- Используйте стандартный MIDI-кабель (продается отдельно) для подключения MIDI-выхода модуля ударных к MIDI-входу вашего секвенсора. Используйте другой MIDI-кабель, чтобы соединить MIDI-выход секвенсора с MIDI-входом вашего модуля.
- Установите активную дорожку вашего секвенсора на канал 10 и начните запись.
- Играйте на своей электронной ударной установке!
- Остановите запись на секвенсоре. Ваше выступление записано.
Ноты:
- При нажатии Start/Stop для запуска/остановки воспроизведения композиции генерируется MIDI-сообщение FA (начало) или FC (стоп).
- При синхронизации модуля с другим MIDI-устройством модуль Nitro может быть только ведущим, а не ведомым.
Документы / Ресурсы
Рекомендации
-
Contents
-
Table of Contents
-
Bookmarks
Quick Links
User Guide
English ( 3 – 9 )
Guía del usuario
Español ( 10 – 16 )
Guide d’utilisation
Français ( 17 – 23 )
Guida per l’uso
Italiano ( 24 – 30 )
Benutzerhandbuch
Deutsch ( 31 – 37 )
Appendix
English ( 38 )
Related Manuals for Alesis Nitro
Summary of Contents for Alesis Nitro
-
Page 1
User Guide English ( 3 – 9 ) Guía del usuario Español ( 10 – 16 ) Guide d’utilisation Français ( 17 – 23 ) Guida per l’uso Italiano ( 24 – 30 ) Benutzerhandbuch Deutsch ( 31 – 37 ) Appendix English ( 38 ) -
Page 3: Quick Start / Connection Diagram
Introduction Support For the latest information about this product (system requirements, compatibility information, etc.) and product registration, visit alesis.com. For additional product support, visit alesis.com/support. Quick Start / Connection Diagram Setup and Playing Crash 2 Cymbal Pad* Tom 4 Drum Pad*…
-
Page 4: Front Panel
Features Front Panel 1. Display: Shows the module’s current settings and functions. 2. Song/Pattern: In Normal Mode, press this button to enter the Song Menu, where you can select a song or adjust song-related settings. In Learning Mode, press this button to enter the Pattern Menu, where you can select a pattern (full kit plus accompaniment) to play along to or adjust pattern-related settings.
-
Page 5: Rear Panel
Rear Panel 1. Outputs: Use standard 1/4″ TRS cables to connect these outputs to a speaker or amplifier system. The level of these outputs is controlled by the Volume knob. 2. Aux In: Use a standard 1/8″ stereo cable to connect this input to an optional audio player (e.g,.
-
Page 6: Editing And Saving Drum Kits
Basic Functions Editing and Saving Drum Kits Important: • To edit and save your kits, you must be in Normal Mode. If the LED above the Song/Pattern button is not lit, press and hold Page/Select until it is. • Remember to save your kits after you have entered the settings you want! First, press Kit until NUM appears in the display.
-
Page 7: Playing Along With Songs
Playing Along With Songs Important: To play songs, you must be in Normal Mode. If the LED above the Song/Pattern button is not lit, press and hold Page/Select until it is. To select and play a song: 1. Press Song until NUM appears in the display. 2.
-
Page 8: Adjusting Utility Settings/Metronome
Advanced Functions Adjusting Utility Settings The Utility settings let you further customize your pad settings and adjust the module’s MIDI settings. To adjust the Utility settings: Hit the pad whose settings you want to adjust, or press its corresponding Pad Select button. Press Utility, then press Page/Select until the desired setting appears in the display: •…
-
Page 9: Midi Settings
Stop recording on your sequencer. Your performance has been recorded. Notes: • Pressing Start/Stop to start/stop Song playback generates the MIDI message FA (start) or FC (stop). • When syncing the module with another MIDI device, the Nitro module can only be the master, not the slave.
-
Page 10: Inicio Rápido Y Diagrama De Conexión
Introducción Soporte Para obtener la información más completa acerca de este product (los requisitos del sistema, compatibilidad, etc) y registro del producto, visite alesis.com. Para soporte adicional del producto, visite alesis.com/support. Inicio rápido y diagrama de conexión Cómo instalarlo y tocar…
-
Page 11: Panel Frontal
Características Panel frontal Pantalla: Muestra los parámetros y funciones actuales del módulo. Tema/Patrón: En modo normal, pulse este botón para abrir el menú Song (Tema), en el que puede seleccionar un tema o ajustar parámetros relacionados con el tema. En modo de aprendizaje, pulse este botón para abrir el menú…
-
Page 12: Panel Superior
Panel superior 1. Salidas: Use cables estándar TRS de 1/4 pulg. para conectar estas salidas a un altavoz o sistema de amplificador. El nivel de estas salidas se controla con la perilla Volume. 2. Entrada auxiliar: Use un cable estéreo estándar de 1/8 pulg.
-
Page 13
Funciones básicas Cómo editar y guardar los kits de batería Importante: • Para editar y guardar sus kits, debe estar en modo normal. Si el LED que está arriba del botón Song/Pattern no está encendido, mantenga pulsado Page/Select hasta que se encienda. •… -
Page 14
Cómo tocar con temas de acompañamiento Importante: Para reproducir temas, debe estar en modo normal. Si el LED que está arriba del botón Song/Pattern no está encendido, mantenga pulsado Page/Select hasta que se encienda. Para seleccionar y reproducir un tema: Pulse Song (Tema) hasta que aparezca NUM en la pantalla. -
Page 15: Funciones Avanzadas
Funciones avanzadas Cómo ajustar los parámetros de la utilidad Los parámetros Utility (Utilidad) le permiten personalizar más aún los parámetros de sus pads y ajustar los parámetros MIDI. Para ajustar los parámetros de la utilidad: Toque el pad cuyos parámetros desea ajustar o pulse su botón Pad Select (Selección de pad) correspondiente. Pulse Utility y luego Page/Select hasta que aparezca el parámetro deseado en la pantalla: •…
-
Page 16
Al pulsar Start/Stop para iniciar/parar la reproducción del tema, se genera el mensaje MIDI FA (inicio) o FC (parada). • Cuando sincroniza el módulo con otro dispositivo MIDI, el módulo Nitro sólo puede ser el maestro y no el esclavo. -
Page 17: Français
Introduction Assistance Pour les dernières informations concernant ce produit (la configuration système minimale requise, la compatibilité, etc) et l’enregistrement du produit, veuillez visitez le site alesis.com. Pour de plus amples informations, visitez alesis.com/support. Utilisation rapide / schéma de connexion Mise en route installation…
-
Page 18: Caractéristiques
Caractéristiques Panneau avant Écran : Cet écran affiche tous les paramètres et les fonctions en cours du module. Touche Song/Pattern : En mode Normal, appuyez sur cette touche afin d’accéder au menu Song, d’où vous pouvez sélectionner une chanson, ou encore, modifier les paramètres de la chanson.
-
Page 19: Panneau Supérieur
Panneau supérieur 1. Sorties : Utilisez des câbles TRS 1/4 po (6,35 mm) standards afin de brancher ces sorties à un haut-parleur ou à un système de sonorisation. Le niveau de ces sorties est commandé par le bouton Volume. 2. Entrée Aux : Utilisez un câble 1/8 po (3,5 mm) standard afin de brancher cette entrée à…
-
Page 20: Fonctions De Base
Fonctions de base Modification et enregistrement des ensembles de sons de batterie Important : • Pour modifier et enregistrer vos ensembles, le module doit être en mode Normal. Si la DEL au-dessus de la touche Song/Pattern n’est pas allumée, enfoncez la touche Page/Select jusqu’à…
-
Page 21
Utilisation de chansons d’accompagnement Important : Pour faire jouer des chansons, le module doit être en mode Normal. Si la DEL au-dessus de la touche Song/Pattern n’est pas allumée, enfoncez la touche Page/Select jusqu’à ce qu’elle s’allume. Remarque : Pendant la lecture, les touches de sélection s’allumeront à indiquer lesquelles batteries sonnent. -
Page 22: Fonctions Évoluées
Fonctions évoluées Réglage des paramètres utility Les paramètres Utility vous permettent de personnaliser encore plus les paramètres des pads et MIDI. Pour modifier les paramètres Utility : Frappez maintenant le pad pour lequel vous désirez modifier les paramètres ou appuyez sur la touche de sélection correspondante.
-
Page 23
Appuyez sur la touche Start/Stop afin de lancer/arrêter la lecture d’une chanson génère des messages MIDI FA (lancer) ou FC (arrêter). • Lors de la synchronisation du module à un autre appareil MIDI, le module Nitro est toujours le maître, il ne peut être l’esclave. -
Page 24: Inizio Rapido/Schema Dei Collegamenti
Assistenza Per conoscere le ultime informazioni in merito a questo prodotto (i requisiti di sistema complete, compatibilità, ecc) e per la registrazione del prodotto, recarsi alla pagina alesis.com. Per ulteriore assistenza, recarsi alla pagina alesis.com/support. Inizio rapido / schema dei collegamenti…
-
Page 25: Pannello Superiore
Caratteristiche Pannello superiore Display: Mostra le attuali impostazioni e formazioni del modulo. Song/Pattern: In modalità normale, premere questo tasto per entrare nel menu canzoni (Song), dove sarà possibile scegliere una canzone o regolare configurazioni relative alle canzoni. In modalità di apprendimento, premere questo tasto per entrare nel menù…
-
Page 26: Pannello Anteriore
Pannello anteriore 1. Uscite: Servirsi di cavi TRS standard da 1/4″ per collegare queste uscite ad un altoparlante impianto amplificatori. Il livello di queste uscite è controllato dalla manopola Volume. 2. Ingresso Aux: Servirsi di un cavo stereo standard da 1/8″ per collegare questo ingresso ad un lettore audio opzionale (ad es.
-
Page 27
Funzioni base Modifica e salvataggio dei set batteria Importante: • Per modificare e salvare i set, bisogna essere in modalità normale. Se il LED al di sopra del tasto Song/Pattern non è acceso, tenere premuto Page/Select finché non si accende. •… -
Page 28
Suonare a tempo con le canzoni Importante: per suonare le canzoni, occorre essere in modalità normale. Se il LED al di sopra del tasto Song/Pattern non è acceso, tenere premuto Page/Select finché non si accende. Per selezionare e riprodurre una canzone: Premere Song fino a quando a display non compare NUM. -
Page 29: Registrazione
Funzioni avanzate Regolazione delle impostazioni utilità Le impostazioni delle Utilità consentono di personalizzare ulteriormente le configurazioni dei pad e di regolare le impostazioni MIDI del modulo. Per regolare le configurazioni delle Utilità: Battere il pad le cui configurazioni si desidera regolare, oppure premere il tasto Pad Select corrispondente. Premere Utility, quindi premere Page/Select fino a quando la configurazione desiderata non compare a display: •…
-
Page 30: Impostazioni Midi
La pressione di Start/Stop per avviare/interrompere la riproduzione della canzone genera il messaggio MIDI FA (avvio) o FC (stop). • Al momento di sincronizzare il modulo con un altro dispositivo MIDI, il modulo Nitro può solo essere il master, non lo slave.
-
Page 31: Schnellstart / Anschlussdiagramm
Benutzerhandbuch (Deutsch) Einführung Kundendienst Die neuesten Informationen zu diesem Produkt (Systemanforderungen, Kompatibilitätsinformationen usw.) und die Registrierung Ihres Produkts finden Sie auf alesis.com. Für zusätzlichen Produkt-Support besuchen Sie alesis.com/support. Schnellstart / Anschlussdiagramm Einrichten und Spielen Crash 2 Becken-Pad Tom 4 Drum Pad separat erhältlich…
-
Page 32
Funktionen Vorderseite Display: Zeigt die aktuellen Einstellungen und Funktionen des Moduls an. Song/Vorlage: Drücken Sie diese Taste im Normal- Modus, um das Song-Menü aufzurufen, in dem Sie einen Song auswählen oder Song-Einstellungen anpassen können. Drücken Sie diese Taste im Lernmodus, um ins Vorlage-Menü… -
Page 33
Oberseite 1. Ausgänge: Verwenden Sie handelsübliche 1/4″ TRS-Kabel, um diese Ausgänge an einen Lautsprecher oder Verstärkersystem anzuschließen. Lautstärke dieser Ausgänge steuern Sie über den Lautstärke- Regler. 2. Aux In: Verwenden Sie ein handelsübliches Miniklinke 1/8″-Stereokabel, um diesen Eingang mit einem optionalen Audio-Player zu verbinden (z.B. MP3-Player, CD-Player etc.). -
Page 34
Grundfunktionen Drum Kits Bearbeiten und Speichern Wichtig: • Um Ihre Kits zu bearbeiten und zu speichern müssen Sie sich im Normal-Modus befinden. Wenn oberhalb Song/Vorlage-Taste nicht leuchtet, halten Seite/Auswählen bis sie leuchtet. • Denken Sie daran Ihre Kits zu speichern, nachdem Sie die gewünschten Einstellungen eingegeben haben! Drücken Sie zuerst Kit bis NUM am Display erscheint. -
Page 35
Songs Begleiten Wichtig: Um Songs abzuspielen, müssen Sie sich im Normal-Modus befinden. Wenn die LED oberhalb der Song/Vorlage-Taste nicht leuchtet, halten Sie Seite/Auswählen gedrückt bis sie leuchtet. Hinweis: Während der Wiedergabe leuchten die Pad-Auswahltasten auf, um anzuzeigen, welche Drums spielen. Um diese Funktion zu deaktivieren bzw. -
Page 36: Erweiterte Funktionen
Erweiterte Funktionen Anpassen der Optionen Mit den Optionen können Sie Ihre Pad-Einstellungen und die MIDI-Einstellungen des Moduls weiter anpassen. So passen Sie die Optionen an: Betätigen Sie das Pad, dessen Einstellungen Sie anpassen möchten oder drücken Sie die entsprechende Pad- Auswahltaste.
-
Page 37
Wenn Sie Start/Stopp drücken, um die Song-Wiedergabe zu starten/stoppen, wird eine MIDI-Nachricht FA (Start) oder FC (Stopp) erzeugt. • Bei der Synchronisierung des Moduls mit einem anderen MIDI-Gerät kann das Nitro Modul nur als Master und nicht als Slave verwendet werden. -
Page 38: Velocity Curves
Appendix (English) Velocity Curves Curve 1 Curve 2 Curve 3 Volume Volume Volume Velocity (striking Velocity (striking Velocity (striking Curve 4 Curve 5 Curve 6 Volume Volume Volume Velocity (striking Velocity (striking Velocity (striking Pad MIDI Note Numbers Trigger MIDI Note Number Trigger MIDI Note Number Kick…
-
Page 39: Technical Specifications
Specifications are subject to change without notice. Trademarks and Licenses Alesis is a trademark of inMusic Brands, Inc., registered in the U.S. and other countries. All other product or company names are trademarks or registered trademarks of their respective owners.
-
Page 40
Manual Version 1.0…
This manual is also suitable for:
Dm7x
-
Contents
-
Table of Contents
-
Bookmarks
Quick Links
User Guide
English ( 3 – 9 )
Guía del usuario
Español ( 10 – 16 )
Guide d’utilisation
Français ( 17 – 23 )
Guida per l’uso
Italiano ( 24 – 30 )
Benutzerhandbuch
Deutsch ( 31 – 37 )
Appendix
English ( 38 )
Related Manuals for Alesis Nitro
Summary of Contents for Alesis Nitro
-
Page 1
User Guide English ( 3 – 9 ) Guía del usuario Español ( 10 – 16 ) Guide d’utilisation Français ( 17 – 23 ) Guida per l’uso Italiano ( 24 – 30 ) Benutzerhandbuch Deutsch ( 31 – 37 ) Appendix English ( 38 ) -
Page 3: Quick Start / Connection Diagram
Introduction Support For the latest information about this product (system requirements, compatibility information, etc.) and product registration, visit alesis.com. For additional product support, visit alesis.com/support. Quick Start / Connection Diagram Setup and Playing Crash 2 Cymbal Pad* Tom 4 Drum Pad*…
-
Page 4: Front Panel
Features Front Panel 1. Display: Shows the module’s current settings and functions. 2. Song/Pattern: In Normal Mode, press this button to enter the Song Menu, where you can select a song or adjust song-related settings. In Learning Mode, press this button to enter the Pattern Menu, where you can select a pattern (full kit plus accompaniment) to play along to or adjust pattern-related settings.
-
Page 5: Rear Panel
Rear Panel 1. Outputs: Use standard 1/4″ TRS cables to connect these outputs to a speaker or amplifier system. The level of these outputs is controlled by the Volume knob. 2. Aux In: Use a standard 1/8″ stereo cable to connect this input to an optional audio player (e.g,.
-
Page 6: Editing And Saving Drum Kits
Basic Functions Editing and Saving Drum Kits Important: • To edit and save your kits, you must be in Normal Mode. If the LED above the Song/Pattern button is not lit, press and hold Page/Select until it is. • Remember to save your kits after you have entered the settings you want! First, press Kit until NUM appears in the display.
-
Page 7: Playing Along With Songs
Playing Along With Songs Important: To play songs, you must be in Normal Mode. If the LED above the Song/Pattern button is not lit, press and hold Page/Select until it is. To select and play a song: 1. Press Song until NUM appears in the display. 2.
-
Page 8: Adjusting Utility Settings/Metronome
Advanced Functions Adjusting Utility Settings The Utility settings let you further customize your pad settings and adjust the module’s MIDI settings. To adjust the Utility settings: Hit the pad whose settings you want to adjust, or press its corresponding Pad Select button. Press Utility, then press Page/Select until the desired setting appears in the display: •…
-
Page 9: Midi Settings
Stop recording on your sequencer. Your performance has been recorded. Notes: • Pressing Start/Stop to start/stop Song playback generates the MIDI message FA (start) or FC (stop). • When syncing the module with another MIDI device, the Nitro module can only be the master, not the slave.
-
Page 10: Inicio Rápido Y Diagrama De Conexión
Introducción Soporte Para obtener la información más completa acerca de este product (los requisitos del sistema, compatibilidad, etc) y registro del producto, visite alesis.com. Para soporte adicional del producto, visite alesis.com/support. Inicio rápido y diagrama de conexión Cómo instalarlo y tocar…
-
Page 11: Panel Frontal
Características Panel frontal Pantalla: Muestra los parámetros y funciones actuales del módulo. Tema/Patrón: En modo normal, pulse este botón para abrir el menú Song (Tema), en el que puede seleccionar un tema o ajustar parámetros relacionados con el tema. En modo de aprendizaje, pulse este botón para abrir el menú…
-
Page 12: Panel Superior
Panel superior 1. Salidas: Use cables estándar TRS de 1/4 pulg. para conectar estas salidas a un altavoz o sistema de amplificador. El nivel de estas salidas se controla con la perilla Volume. 2. Entrada auxiliar: Use un cable estéreo estándar de 1/8 pulg.
-
Page 13
Funciones básicas Cómo editar y guardar los kits de batería Importante: • Para editar y guardar sus kits, debe estar en modo normal. Si el LED que está arriba del botón Song/Pattern no está encendido, mantenga pulsado Page/Select hasta que se encienda. •… -
Page 14
Cómo tocar con temas de acompañamiento Importante: Para reproducir temas, debe estar en modo normal. Si el LED que está arriba del botón Song/Pattern no está encendido, mantenga pulsado Page/Select hasta que se encienda. Para seleccionar y reproducir un tema: Pulse Song (Tema) hasta que aparezca NUM en la pantalla. -
Page 15: Funciones Avanzadas
Funciones avanzadas Cómo ajustar los parámetros de la utilidad Los parámetros Utility (Utilidad) le permiten personalizar más aún los parámetros de sus pads y ajustar los parámetros MIDI. Para ajustar los parámetros de la utilidad: Toque el pad cuyos parámetros desea ajustar o pulse su botón Pad Select (Selección de pad) correspondiente. Pulse Utility y luego Page/Select hasta que aparezca el parámetro deseado en la pantalla: •…
-
Page 16
Al pulsar Start/Stop para iniciar/parar la reproducción del tema, se genera el mensaje MIDI FA (inicio) o FC (parada). • Cuando sincroniza el módulo con otro dispositivo MIDI, el módulo Nitro sólo puede ser el maestro y no el esclavo. -
Page 17: Français
Introduction Assistance Pour les dernières informations concernant ce produit (la configuration système minimale requise, la compatibilité, etc) et l’enregistrement du produit, veuillez visitez le site alesis.com. Pour de plus amples informations, visitez alesis.com/support. Utilisation rapide / schéma de connexion Mise en route installation…
-
Page 18: Caractéristiques
Caractéristiques Panneau avant Écran : Cet écran affiche tous les paramètres et les fonctions en cours du module. Touche Song/Pattern : En mode Normal, appuyez sur cette touche afin d’accéder au menu Song, d’où vous pouvez sélectionner une chanson, ou encore, modifier les paramètres de la chanson.
-
Page 19: Panneau Supérieur
Panneau supérieur 1. Sorties : Utilisez des câbles TRS 1/4 po (6,35 mm) standards afin de brancher ces sorties à un haut-parleur ou à un système de sonorisation. Le niveau de ces sorties est commandé par le bouton Volume. 2. Entrée Aux : Utilisez un câble 1/8 po (3,5 mm) standard afin de brancher cette entrée à…
-
Page 20: Fonctions De Base
Fonctions de base Modification et enregistrement des ensembles de sons de batterie Important : • Pour modifier et enregistrer vos ensembles, le module doit être en mode Normal. Si la DEL au-dessus de la touche Song/Pattern n’est pas allumée, enfoncez la touche Page/Select jusqu’à…
-
Page 21
Utilisation de chansons d’accompagnement Important : Pour faire jouer des chansons, le module doit être en mode Normal. Si la DEL au-dessus de la touche Song/Pattern n’est pas allumée, enfoncez la touche Page/Select jusqu’à ce qu’elle s’allume. Remarque : Pendant la lecture, les touches de sélection s’allumeront à indiquer lesquelles batteries sonnent. -
Page 22: Fonctions Évoluées
Fonctions évoluées Réglage des paramètres utility Les paramètres Utility vous permettent de personnaliser encore plus les paramètres des pads et MIDI. Pour modifier les paramètres Utility : Frappez maintenant le pad pour lequel vous désirez modifier les paramètres ou appuyez sur la touche de sélection correspondante.
-
Page 23
Appuyez sur la touche Start/Stop afin de lancer/arrêter la lecture d’une chanson génère des messages MIDI FA (lancer) ou FC (arrêter). • Lors de la synchronisation du module à un autre appareil MIDI, le module Nitro est toujours le maître, il ne peut être l’esclave. -
Page 24: Inizio Rapido/Schema Dei Collegamenti
Assistenza Per conoscere le ultime informazioni in merito a questo prodotto (i requisiti di sistema complete, compatibilità, ecc) e per la registrazione del prodotto, recarsi alla pagina alesis.com. Per ulteriore assistenza, recarsi alla pagina alesis.com/support. Inizio rapido / schema dei collegamenti…
-
Page 25: Pannello Superiore
Caratteristiche Pannello superiore Display: Mostra le attuali impostazioni e formazioni del modulo. Song/Pattern: In modalità normale, premere questo tasto per entrare nel menu canzoni (Song), dove sarà possibile scegliere una canzone o regolare configurazioni relative alle canzoni. In modalità di apprendimento, premere questo tasto per entrare nel menù…
-
Page 26: Pannello Anteriore
Pannello anteriore 1. Uscite: Servirsi di cavi TRS standard da 1/4″ per collegare queste uscite ad un altoparlante impianto amplificatori. Il livello di queste uscite è controllato dalla manopola Volume. 2. Ingresso Aux: Servirsi di un cavo stereo standard da 1/8″ per collegare questo ingresso ad un lettore audio opzionale (ad es.
-
Page 27
Funzioni base Modifica e salvataggio dei set batteria Importante: • Per modificare e salvare i set, bisogna essere in modalità normale. Se il LED al di sopra del tasto Song/Pattern non è acceso, tenere premuto Page/Select finché non si accende. •… -
Page 28
Suonare a tempo con le canzoni Importante: per suonare le canzoni, occorre essere in modalità normale. Se il LED al di sopra del tasto Song/Pattern non è acceso, tenere premuto Page/Select finché non si accende. Per selezionare e riprodurre una canzone: Premere Song fino a quando a display non compare NUM. -
Page 29: Registrazione
Funzioni avanzate Regolazione delle impostazioni utilità Le impostazioni delle Utilità consentono di personalizzare ulteriormente le configurazioni dei pad e di regolare le impostazioni MIDI del modulo. Per regolare le configurazioni delle Utilità: Battere il pad le cui configurazioni si desidera regolare, oppure premere il tasto Pad Select corrispondente. Premere Utility, quindi premere Page/Select fino a quando la configurazione desiderata non compare a display: •…
-
Page 30: Impostazioni Midi
La pressione di Start/Stop per avviare/interrompere la riproduzione della canzone genera il messaggio MIDI FA (avvio) o FC (stop). • Al momento di sincronizzare il modulo con un altro dispositivo MIDI, il modulo Nitro può solo essere il master, non lo slave.
-
Page 31: Schnellstart / Anschlussdiagramm
Benutzerhandbuch (Deutsch) Einführung Kundendienst Die neuesten Informationen zu diesem Produkt (Systemanforderungen, Kompatibilitätsinformationen usw.) und die Registrierung Ihres Produkts finden Sie auf alesis.com. Für zusätzlichen Produkt-Support besuchen Sie alesis.com/support. Schnellstart / Anschlussdiagramm Einrichten und Spielen Crash 2 Becken-Pad Tom 4 Drum Pad separat erhältlich…
-
Page 32
Funktionen Vorderseite Display: Zeigt die aktuellen Einstellungen und Funktionen des Moduls an. Song/Vorlage: Drücken Sie diese Taste im Normal- Modus, um das Song-Menü aufzurufen, in dem Sie einen Song auswählen oder Song-Einstellungen anpassen können. Drücken Sie diese Taste im Lernmodus, um ins Vorlage-Menü… -
Page 33
Oberseite 1. Ausgänge: Verwenden Sie handelsübliche 1/4″ TRS-Kabel, um diese Ausgänge an einen Lautsprecher oder Verstärkersystem anzuschließen. Lautstärke dieser Ausgänge steuern Sie über den Lautstärke- Regler. 2. Aux In: Verwenden Sie ein handelsübliches Miniklinke 1/8″-Stereokabel, um diesen Eingang mit einem optionalen Audio-Player zu verbinden (z.B. MP3-Player, CD-Player etc.). -
Page 34
Grundfunktionen Drum Kits Bearbeiten und Speichern Wichtig: • Um Ihre Kits zu bearbeiten und zu speichern müssen Sie sich im Normal-Modus befinden. Wenn oberhalb Song/Vorlage-Taste nicht leuchtet, halten Seite/Auswählen bis sie leuchtet. • Denken Sie daran Ihre Kits zu speichern, nachdem Sie die gewünschten Einstellungen eingegeben haben! Drücken Sie zuerst Kit bis NUM am Display erscheint. -
Page 35
Songs Begleiten Wichtig: Um Songs abzuspielen, müssen Sie sich im Normal-Modus befinden. Wenn die LED oberhalb der Song/Vorlage-Taste nicht leuchtet, halten Sie Seite/Auswählen gedrückt bis sie leuchtet. Hinweis: Während der Wiedergabe leuchten die Pad-Auswahltasten auf, um anzuzeigen, welche Drums spielen. Um diese Funktion zu deaktivieren bzw. -
Page 36: Erweiterte Funktionen
Erweiterte Funktionen Anpassen der Optionen Mit den Optionen können Sie Ihre Pad-Einstellungen und die MIDI-Einstellungen des Moduls weiter anpassen. So passen Sie die Optionen an: Betätigen Sie das Pad, dessen Einstellungen Sie anpassen möchten oder drücken Sie die entsprechende Pad- Auswahltaste.
-
Page 37
Wenn Sie Start/Stopp drücken, um die Song-Wiedergabe zu starten/stoppen, wird eine MIDI-Nachricht FA (Start) oder FC (Stopp) erzeugt. • Bei der Synchronisierung des Moduls mit einem anderen MIDI-Gerät kann das Nitro Modul nur als Master und nicht als Slave verwendet werden. -
Page 38: Velocity Curves
Appendix (English) Velocity Curves Curve 1 Curve 2 Curve 3 Volume Volume Volume Velocity (striking Velocity (striking Velocity (striking Curve 4 Curve 5 Curve 6 Volume Volume Volume Velocity (striking Velocity (striking Velocity (striking Pad MIDI Note Numbers Trigger MIDI Note Number Trigger MIDI Note Number Kick…
-
Page 39: Technical Specifications
Specifications are subject to change without notice. Trademarks and Licenses Alesis is a trademark of inMusic Brands, Inc., registered in the U.S. and other countries. All other product or company names are trademarks or registered trademarks of their respective owners.
-
Page 40
Manual Version 1.0…
This manual is also suitable for:
Dm7x
User Manual for Alesis Nitro Drum Kit, 8-Piece Electronic Kit with Drum ModuleClick to enlarge the picture Contents of the user manual for the Alesis Nitro Drum Kit, 8-Piece Electronic
|
|||||||||||||||||
|
User manual for the Alesis Nitro Drum Kit, 8-Piece Electronic contain basic instructions that need to be followed during installation and operation. Before starting your appliance, the user manual should be read through carefully. Follow all the safety instructions and warnings, and be guided by the given recommendations. User manual is an integral part of any Alesis product, and if it is sold or transferred, they should be handed over jointly with the product. Following the instructions for use is an essential prerequisite for protecting health and property during use, as well as recognition of liability on the part of the manufacturer for possible defects should you make a warranty claim. Download an official Alesis user manual in which you will find instructions on how to install, use, maintain and service your product. And do not forget – unsuitable use of a Alesis product will considerably shorten its lifespan! |
|||||||||||||||||
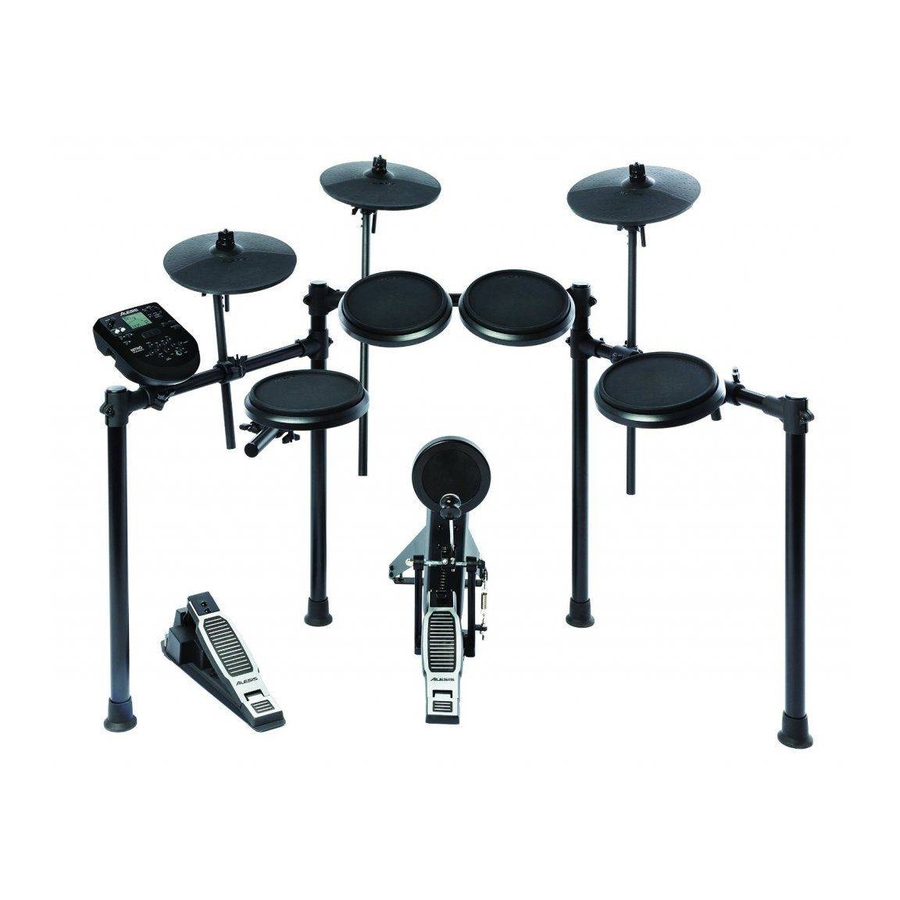
Product descriptionThe Nitro Drum Kit from Alesis is an 8-piece electronic drum set with 3 cymbals, a 4-post aluminum rack, and all connection cables and hardware. It can be used in applications for recording studios, live stage, rehearsals, and more.The kit contains everything you’ll need to get set up and running with a snare pad, tom pad, 10″ hi-hat pad, 10″ crash pad with choke ability, and a 10″ ride cymbal pad. Additionally, a kick pedal, hi-hat pedal, 4-post aluminum rack, drum key, drum sticks, and a power supply are included.When the Nitro electronic drum module is set up, it features 40 ready-to-play classic and modern drum kits and 385 drum and cymbal sounds. Sharpen your skills with the 60 built-in play-along tracks, and take advantage of the sequencer, metronome, and performance recorder that add more versatility to the kit.With a headphone output for private practice, MIDI in and out ports, aux inputs to play along with your own songs, stereo line outputs to connect to any sound system, and USB/MIDI connections for use with virtual instruments and recording software, the Nitro Kit is a suitable solution for your percussion needs.
UPC: 694318019054 In the Box Alesis Nitro Drum Kit, 8-Piece Electronic Kit with Drum Module Table of Contents |
|||||||||||||||||
Upload User Manual Have you got an user manual for the Alesis Nitro Drum Kit, 8-Piece Electronic Kit with Drum Module in electronic form? Please send it to us and help us expand our library of instruction manuals. To upload the product manual, we first need to check and make sure you are not a robot. After that, your «Submit Link» or «Upload File» will appear. 
Contents of the user manual for the Alesis Nitro Drum Kit, 8-Piece Electronic
|
|||||||||||||||||
|
User manual for the Alesis Nitro Drum Kit, 8-Piece Electronic contain basic instructions that need to be followed during installation and operation. Before starting your appliance, the user manual should be read through carefully. Follow all the safety instructions and warnings, and be guided by the given recommendations. User manual is an integral part of any Alesis product, and if it is sold or transferred, they should be handed over jointly with the product. Following the instructions for use is an essential prerequisite for protecting health and property during use, as well as recognition of liability on the part of the manufacturer for possible defects should you make a warranty claim. Download an official Alesis user manual in which you will find instructions on how to install, use, maintain and service your product. And do not forget – unsuitable use of a Alesis product will considerably shorten its lifespan! |
|||||||||||||||||
Product descriptionThe Nitro Drum Kit from Alesis is an 8-piece electronic drum set with 3 cymbals, a 4-post aluminum rack, and all connection cables and hardware. It can be used in applications for recording studios, live stage, rehearsals, and more.The kit contains everything you’ll need to get set up and running with a snare pad, tom pad, 10″ hi-hat pad, 10″ crash pad with choke ability, and a 10″ ride cymbal pad. Additionally, a kick pedal, hi-hat pedal, 4-post aluminum rack, drum key, drum sticks, and a power supply are included.When the Nitro electronic drum module is set up, it features 40 ready-to-play classic and modern drum kits and 385 drum and cymbal sounds. Sharpen your skills with the 60 built-in play-along tracks, and take advantage of the sequencer, metronome, and performance recorder that add more versatility to the kit.With a headphone output for private practice, MIDI in and out ports, aux inputs to play along with your own songs, stereo line outputs to connect to any sound system, and USB/MIDI connections for use with virtual instruments and recording software, the Nitro Kit is a suitable solution for your percussion needs.
UPC: 694318019054 In the Box Alesis Nitro Drum Kit, 8-Piece Electronic Kit with Drum Module Table of Contents |
|||||||||||||||||
Upload User Manual Have you got an user manual for the Alesis Nitro Drum Kit, 8-Piece Electronic Kit with Drum Module in electronic form? Please send it to us and help us expand our library of instruction manuals. To upload the product manual, we first need to check and make sure you are not a robot. After that, your «Submit Link» or «Upload File» will appear.  Please enter here the link to the user manual of this product: User manual for Alesis Nitro Drum Kit, 8-Piece Electronic Kit with Drum Module can be downloaded below, so the upload option is not active. Enter here the file with the user manual of this product from your computer/phone: 0% User manual for Alesis Nitro Drum Kit, 8-Piece Electronic Kit with Drum Module can be downloaded below, so the upload option is not active. Download User ManualThe user manual for the Alesis Nitro Drum Kit, 8-Piece Electronic Kit with Drum Module can be downloaded in PDF format at the link stated below.
|
|


